PL-518 Reworked....Warning lots of photos

Okay folks, it looks amazing, we all agree! NOW, isn't there someone here who has a good guess as to what may be going on with the electrical issue?:scratch2:
 
Great job, looks like a dime bro!

I have a PL-516 which I have replaced both the ICs and power cord. The 516 is the belt driven sister to the 518.

You will need to double check your solder job, but most importantly, make sure that the white swing arm which trips the arm return is installed correctly. If not, when the tonearm is at the inner most grooves, that little arm will actually push against the wiring.

That's my first guess because it's possible with this table to have that arm functioning "correctly" from an improper position.

Do you have the manual with the exploder?
 
Very nice indeed. I have one that I've been meaning to restore for sometime, my major hangup... I only have one of the feet. Does anyone know of a source for the feet on these units? Also, are they like some other TT's where the feet's springs are unique in spring rate and thereby needing to be installed in the proper positions? How would I find out which one's go where if that is indeed the case? Sorry for the thread-jacking :)

Dead tables come up on Ebay occasionally, simply buy one for parts. No there is no unique spring rate.


Keyrimany that turned out nice. Well done.

I have a 518 that I've been thinking about sprucing up. I thought I was pretty original as I was going to paint it copper, but I guess I'm not the first person with that idea. Still, I'll probably do that though.

Did you find it easy to take apart? Mine works perfectly now and I'm a little nervous about disassembling a perfectly good TT to make it purdy.

My first soldering job was reattaching the lead wire on a Boston driver's voice coil. Total hack job but I only dimpled the cone instead of melting clean clean through it, so I'm considering that a success.

You should see what some of the Steampunk types have done with TTs if you dig copper. Pioneers are good subjects for them as they are already "silver", so they only need to add the brass/copper to the look. Also the PL-518/516 is easy to take apart... to an extent. Get yourself a manual with a copy of the exploder before starting and take pics of the key connections and installations. It's easy to put back together incorrectly as there is much to do with the auto-return.
 
Last edited:
Hey guys thanks again......But I am still having problems with the right channel, along with the humming sound as i get close to the head shell.
Perhaps I am not understanding the issue, at first I thought you were talking about the motion of the tonearm. But from a seated position, you are having a hum?

Ground issue to be sure, but again double check that swing arm. Pictured here in the background. It's really easy to install it incorrectly on these.

SDC15959.jpg
 
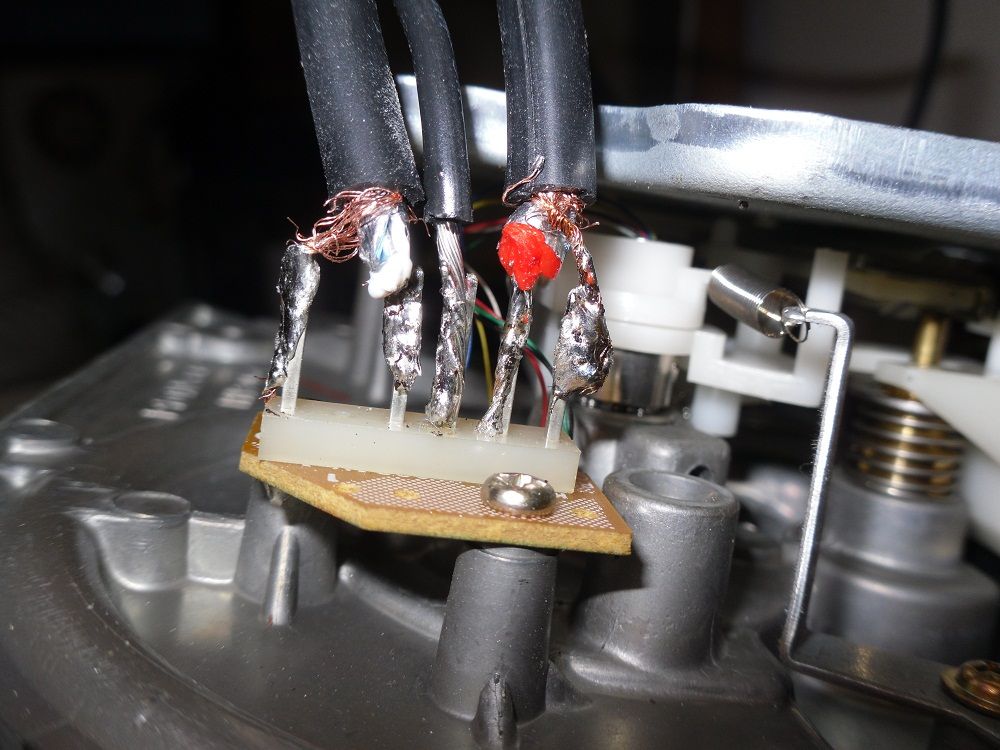
Have you checked the underside of that small circuit board? Maybe the soldering of the tonearm wires were compromised? Even if it looks OK, you may want to heat those spots up with an iron. Also, there are some stray wires that you may want to clean up, just in case. They look like they could touch if manipulated enough.
 
Last edited:
Have you checked the underside of that small circuit board? Maybe the soldering of the tonearm wires were compromised? Even if it looks OK, you may want to heat those spots up with an iron. Also, you'be for some stray wires that you may want to clean up, just in case. They look like they could touch of manipulated enough.

Right, thus the swing arm problem. Infact if that closest, inner lead pictured on the furthest right is infact the right channel then I think its definitely the issue.
 
kevinmasters.....Thanks for your help in helping to push for a fix.

poppachubby....Thanks for you input. I had checked that swing arm assembly a number of time. It is installed correctly.

brminpin.....The small circuit board is what I thought was the problem. However I didn't see anything wrong with it, but I re-flowed the connection anyway. I still had the problem

Okay folks I have tried everything I can think of.....Lets be honest there really, not that much that can go wrong here.

Sometime you just have to try what I least expected....I got it it fixed I am not sure what the problem was yet, but I found my problem area.....I have either a bad head shell....head shell leads....or a bad cart. I put a different head shell/cart on it and I am now rockin:music::music::music: I haven't had the time to look in to which one was the problem. I will keep you all posted.

But until then, we are playing music :thmbsp::thmbsp:

THANKS FOR ALL THE HELP FOLKS
 
Thanks folks.....I haven't had the time to test the cart, head shell, or leads yet. So I can't say for sure who the bad guy is. Not really sure what can go bad on the head shell it self. I really hope it isn't the cart. So my vote is for the leads:D:D:D

Now I have my granddaughters for the weekend.....no bench time for me this weekend:no::no: But on the other hand I do get to spend time at the park and the apple orchard:yes::yes: Got to love my girls
 
Great job! Man what a difference. Yes I agree Pioneer chose some nasty gray colors to use. Glad to hear you're at least enjoying it again as well. Happy times!
 
Looks GREAT:thmbsp:......... nice step by step pic's. I have the 518X. Mine is Black from factory. Try a Stevenson 2 point null protractor from vinylengine for aligning the cart/cantilever. Remove the wires in the head shell and replace them a $5.00 hit. I had one bad in a head shell and it made the hum go away. My ground inside was not soldered correctly so my neighbor who has a soldering station cleaned up all my crummy soldered connections
that was another noise problem I had. Mine has been in the family from new from 1979 and it still sounds great. Your new dust cover is awsome as is the repair and paint work... time to spend some money on a new dust cover...to much work to polish my old one.
[url=http://www.flickr.com/photos/43284454@N04/7957975924/][/URL]
 
I can help

Having recently been through this...I am not new to TT's but was sort of new to continuity testing ...Do you have a meter ? If not spend the dang 15 bucks and get one...Mine has an Ohms setting that beeps for continuity testing...doesn;t get any easier than that...

Now, your solder job (sorry, I mean this kindly) sucks. WAY too much..think of a small dot you see on other solder spots...like a spit ball..yours looks like vesuvius erupted...

Okay...so with your new meter you are going to check continuity from point to point..each leg.

So ..from the headshell - R+ to the tonearm wire in the body (red) one probe on each...Beep. Good. R- (green) to the tonearm wire in the body. Beep. Good. same for left side (L+ white, L-blue) ..beep beep ..good.

Now..do the same out to your RCA's from inside the body where you just checked is good out to the RCA plugs. Right tip is R+. Right outter is R-.

You'll find your break and fix...

If you need more or pics, let us know..

Now...why do I say this is new to me ? Because while I have worked on tables, I never did continuity testing until this weekend...it helped me solve a dual turntable channel loss and hum issue. Now its perfect and I have a new trick in my magic bag

Hope this helps...
 
arcorob.....Thanks for the info.
Yes I do have a continuity tester. And I used it when I had the time.......Problem is solved. I had 2 bad leads. I couldn't get anything out of one and the other was intermittent.

My soldering does suck.....I established that when I posted the pictures. It was my first soldering job. It will get better. I do not worry about this.
 
This thing looks amazing. My dust cover just cracked at the hinges so I was thinking about doing a little work to it and this is quite an inspiration.

:thmbsp:
 
Having recently been through this...I am not new to TT's but was sort of new to continuity testing ...Do you have a meter ? If not spend the dang 15 bucks and get one...Mine has an Ohms setting that beeps for continuity testing...doesn;t get any easier than that...

Now, your solder job (sorry, I mean this kindly) sucks. WAY too much..think of a small dot you see on other solder spots...like a spit ball..yours looks like vesuvius erupted...

Okay...so with your new meter you are going to check continuity from point to point..each leg.

So ..from the headshell - R+ to the tonearm wire in the body (red) one probe on each...Beep. Good. R- (green) to the tonearm wire in the body. Beep. Good. same for left side (L+ white, L-blue) ..beep beep ..good.

Now..do the same out to your RCA's from inside the body where you just checked is good out to the RCA plugs. Right tip is R+. Right outter is R-.

You'll find your break and fix...

If you need more or pics, let us know..

Now...why do I say this is new to me ? Because while I have worked on tables, I never did continuity testing until this weekend...it helped me solve a dual turntable channel loss and hum issue. Now its perfect and I have a new trick in my magic bag

Hope this helps...

I have been reading about "Inductance Meters" for checking carts.:scratch2:
I have a old school volt ohmn meter with a VU dial and a newer digital volt ohmn meter as I have read that a volt ohmn meter can damage a cart:scratch2:

I have checked a few with my digital volt ohmn meter and so far I have not hurt any of the ADC carts(5) I sold here on Barter Town. ADC made several different XLM (Gold body) and I was told to see if it's a XLM I or II or a III Improved (some have the letters/decal missing)you need a "Inductance Meter" and you need to know all the cart specs to sort out which cart you have by it's pf capactance value per channel.I think this what you have to measure. Not sure, I was hoping someone here knows the difference.

I have read different posts that a old school vu meter volt ohmn meter was Ok to checka cart to see if it has a open. And another post had the opposite that a digital ohmn meter can hurt a cart. Not sure about either..MM or MC carts???
 
Back
Top Bottom