Here are a set of steps you can follow to estimate your room's reverberation decay time and the amount of acoustical absorption you should add to dial in your room response. This is meant to be a first draft, so any suggestions for improvements are very welcome.
I created a spreadsheet to do RT60 and room mode calculations for a simple, 6-sided room. You can download the file
HERE and change it however you like. I will use it for these instructions. It's in Excel format. If you don't have a copy of Excel, you should be able to use the spreadsheet in
Libre Office.
The primary purpose of the spreadsheet is to perform a RT60 analysis of a room, based on the dimensions and surface types you enter into it. The RT in RT60 means Reverberation Time, which means the amount of time, in seconds, it takes for a sound to die down in the room. 60 means 60 dB, which is the total change in sound pressure between the sound's peak (when the decay starts) and the end of the reverb time. In other words, RT60 is the time it takes a sound to decrease by 60 dB. RT60 is considered for each octave band individually, which means there are 8 simultaneous calculations.
RT60 is used very frequently by acousticians when designing rooms with acoustical sensitivity. Conference rooms, auditoriums, atria, home theaters, classrooms, even offices have preferred RT60 values for the best compromise between sound reinforcement (high values) and speech clarity (low values).
Generally it's preferable to perform RT measurements in a room to assess it's response. Sometimes the room doesn't yet exist, or sometimes the equipment just isn't available. In those cases calculation or computer modeling must suffice.
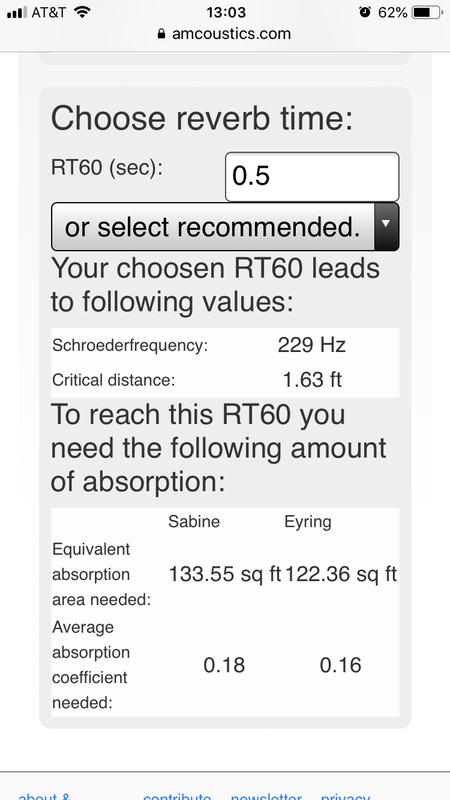
For listening rooms, a good RT60 to shoot for is 0.5 seconds in each of the octave bands.
The spreadsheet has 3 tabs:
RT60 - This is where all of the input information goes, including the room dimensions and the sizes and nature of every wall surface and significant object in the room. At the bottom you will find 2 versions of the RT60 calculation, one for more live rooms (Sabine) and one for more dead rooms (Eyring). Use whichever results match your average absorption the best.
Reference Absorption Values - A list of absorption coefficients for some common coefficients. You use these values by copying them over to the RT60 worksheet. This is certainly not a comprehensive list. There are absorption coefficients for many more materials all over the internet, particularly from manufacturers of acoustical products.
Room Modes - A quick calculation of the primary axial and tangential room modes, based on the room's dimensions. This will give you a hint as to what frequencies might cause problems for you between flat parallel walls or between corners.
Let's get started.
Step 1 - Room Dimensions. Download Simple-Room-Calcs.xls from the above link and open it up. Open it to the RT60 tab and put in the length, width, and height of your room. The spreadsheet refers to the walls as North, South, East, and West, to help you keep track of your surfaces and so it knows which direction is which. Call any room you want North and name the rest accordingly.
Step 2 - Base Surfaces. There are several default materials and values filled in to give you an idea of how the spreadsheet should be used. The first surface to consider is the "Base" surface on the top line of each section. This is going to be the main surface of your walls, most likely a single layer of gypsum wallboard. If your wall is the party wall of a condo or apartment building, it may have 2 layers of wallboard. If you want to use something other than the default, you can copy the values from anywhere else on the spreadsheet or from the Reference Absorption Values tab (paste special... to save formatting). You do not need to set the area of the base material, it's calculated based on your room dimensions and the amount of other materials on the walls.
Step 3 - Existing Surface Coverings. Copy in materials for each surface that is separate from your base surface. This will include doors, windows, wall hangings, and bookshelves. Use the left-most column for notes so you know what it is, set the surface area in the Area column, and fill in the Material and absorption coefficient columns from the Reference worksheet, or with other data that you find elsewhere. Every area that you enter in will subtract from the base surface area, so that the total area for each surface will add up correctly.
If you have an opening to another room, you can model it as a surface with absorption coefficients of 1.0 in each band.
The default state of the spreadsheet shows 0 area 703 panels on each wall. As long as their area remains 0, they will not affect your calculation. You can leave them there, or you can overwrite them with other materials if you need the space.
Step 4 - Room Contents. Below the 6 surface sections is a Room Contents area. This is where you enter things like people and furniture that have area but are not attached to any of the room's surfaces.
For items that say something like (per person, not per square foot), enter the number of items in the Area column, not the actual square footage. For instance, if you expect 2 people to be using your listening room, put a 2 in the Area column.
Step 5 - Existing RT60. After all of your room dimensions, surfaces, and contents are set, the resulting reverberation times will be at the bottom of the spreadsheet. There are 2 calculations, but only 1 will be appropriate, based on the average absorption of your room.
Sabine - This calculation should be used if your room's average absorption coefficients are below 0.2. You can see the Average Absorption Coefficient calculated on the line above "Sabine." Sabine is the classic RT60 calculation from the early 1900's and still holds up.
Eyring - Use these values if your Average Absorption Coefficients are above 0.2.
For small rooms, the accuracy of both of these calculations suffers for the lowest frequencies. In fact, the 63 Hz band may not be dependable at all. Even so, you can at least get a good sense of what your room is doing.
Step 6 - Experiment with Absorption. If your reverb values are well above 0.5 seconds, you will want to add absorptive panels to bring your RT down. In its default state, the spreadsheet has 0 area 2" and 3" OC703 absorbers for each wall. Owens Corning 703 is, by far, the most common room treatment material and the bulk of off-the-shelf absorptive panels are made with this product or an equivalent.
You can "add absorbers" by increasing the areas of these panels. Typical panel sizes are 4, 8, and 16 square feet, so you should add area in 4 s.f. increments. The specific wall that you add these panels to doesn't affect the calculation results, but you should keep track of how much absorption you want on each wall so that you can try to keep absorption symmetrical left to right and front to back.
Do not forget that you can add absorption to your ceiling. In fact, this is often the best place to add absorption if your room has a lot of windows, doors, and coverings that don't leave room for panels.
If you have other acoustical treatments besides generic OC703 panels that you want to try, just enter the values like you would for any other wall covering. Enter bass traps that will sit in a corner in the Room Contents section, so that their area doesn't count against the total surface area of the room.
In addition to getting your RT values at or below 0.5 seconds, you will want to aim for as smooth an absorption spectrum as possible. In other words, you want all of your values to be as close to each other as they can be, especially for 500 Hz and above. If all of your values are within 0.05 seconds of each other, and they're near or below 0.5 s, you are likely to have a very nice sounding room.
Step 7 - Acquire and Install Room Treatment. When you know the thickness and area of panels you want to install, it becomes much easier to purchase them with confidence.
The calculation doesn't care where the panels are located, but your system will. Key places to install are:
-On the back wall behind your speakers. Place them at first reflection points* first. If you're putting a lot of absorption on this wall, just generally line the areas behind your speakers. Some people like to put absorption halfway between their speakers to reduce inter-speaker interaction.
-Side walls at first reflection points. Center them at about ear level (assuming your speakers are also at ear level).
-Back wall first reflection points, or just generally behind the listening position. You may want to mount them a little higher than ear level if you have a sofa.
-Ceiling first reflection points. The ceiling is a great place to put thicker absorption if you can't put it on the walls due to wife resistance. Sometimes people don't notice things that are on the ceiling, like spiders.
(I know you just looked up).
-Bass traps generally go in corners. The manufacturer of your bass trap will probably provide you with installation suggestions. Although they do the same thing, implementation is a little different from trap to trap. Between speakers on the back wall is another common location.
* First reflection points are spots where there is a direct reflection between a speaker and your noggin. The classic trick is to sit in your listening position while a friend or spouse moves a mirror along the wall. When you can see one of your speakers in the mirror, mark the location of the mirror as a first reflection point.
Step 8 - Enjoy. And report back to us with your impressions and pictures.