

You are using an out of date browser. It may not display this or other websites correctly.
You should upgrade or use an alternative browser.
You should upgrade or use an alternative browser.
Trashed JBL L36 Decade Restoration - I Need Your Help!
- Thread starter MCM_Fan
- Start date

 (no b.s.
 MCM_Fan
AK Subscriber
A couple months ago, I'd typed up a couple of very long posts describing every step of this project in detail. Unfortunately, those posts were lost forever, when the forum crashed. But, I didn't want to leave this thread hanging. So, here's a much more brief summary:
Paint used on the grill frames and front baffles: Ace Instant Drying Lacquer - Flat Black. I've used a lot of rattle cans over the years, but I really like this stuff. As the name implies, it dries fast. It covers well and I got absolutely no running, steaks or orange peel. Good stuff and affordable to boot.
Resist the temptation to use anything other than flat black paint for the grill frames when using light colored grill cloth. I thought about using some beige paint for the grill frames, but I'm glad I didn't. Think about it. Nearly everything behind the grill is black - the front baffle, driver cones, surrounds and dust caps. If you're grill frames are anything other than black, they will stand out like a sore thumb.
I almost didn't repaint the front baffles. They weren't perfect, but not too bad. And, who would ever see them besides me? My main concern was the potential for getting black paint on the oak veneer, that I'd already prepped for the final finish. So, rather than the usual generic blue painter's tape, I tried something called 3M Scotch-Blue Painter's Tape for Delicate Surfaces #2080 with EdgeLock. This stuff worked great. Just take your time when applying it and you'll get perfect edge lines. It's available at all the usual home improvement centers and paint stores and for projects like this, well worth the extra buck to buck and a half per roll. I only bought one roll and have enough left over for future projects.
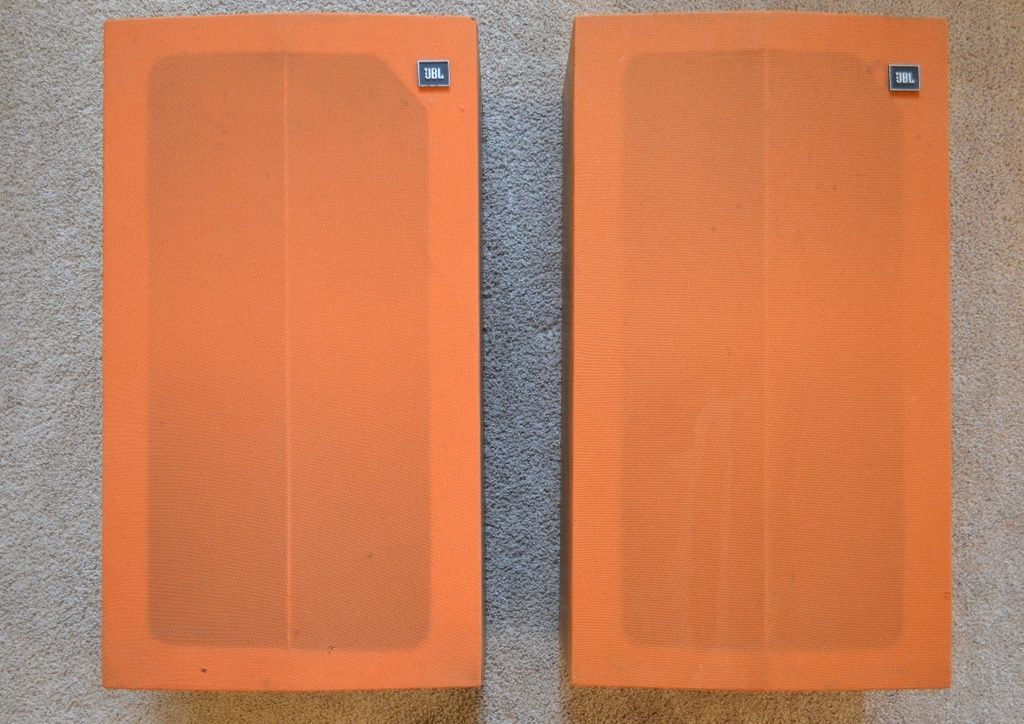
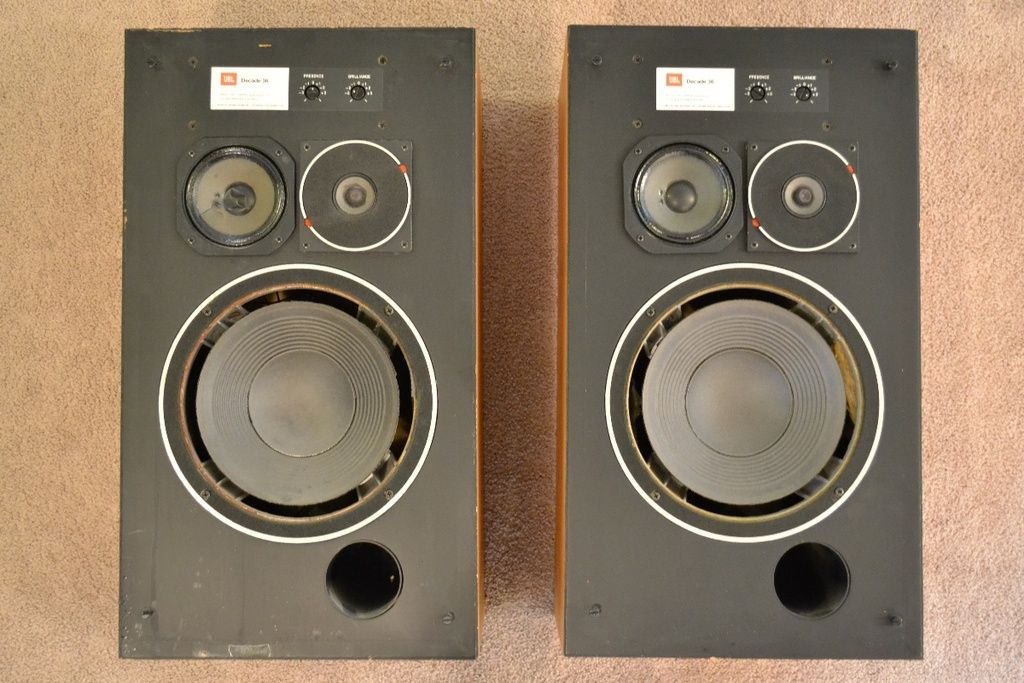
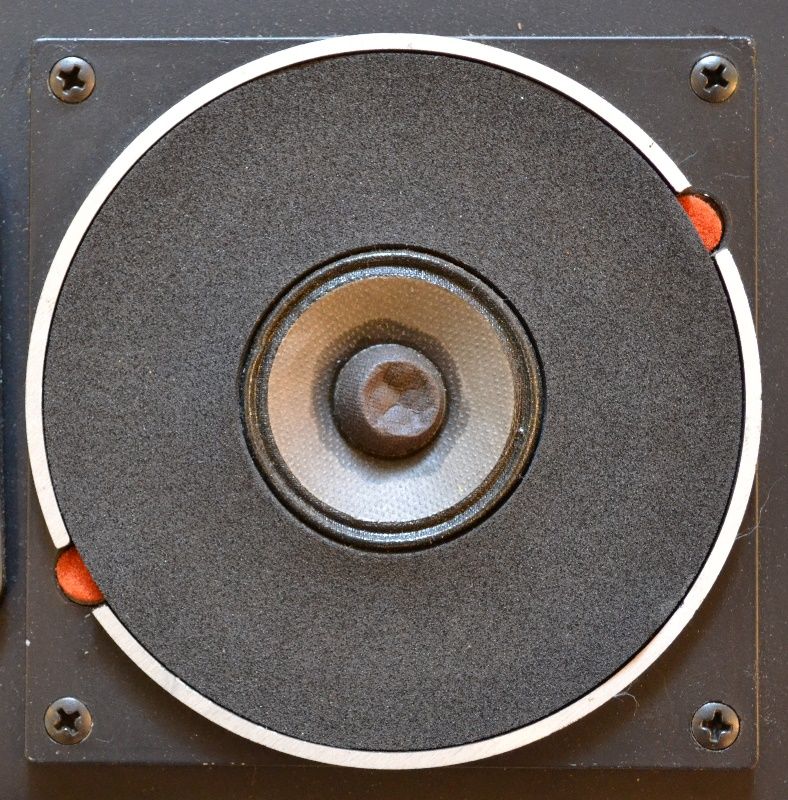
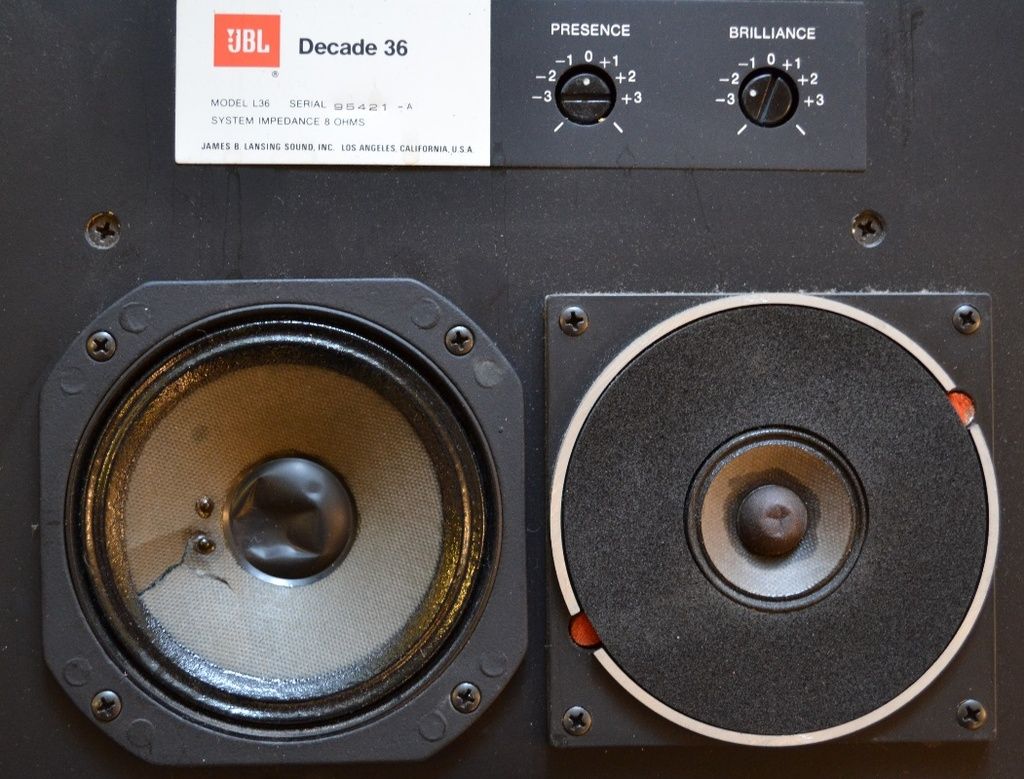
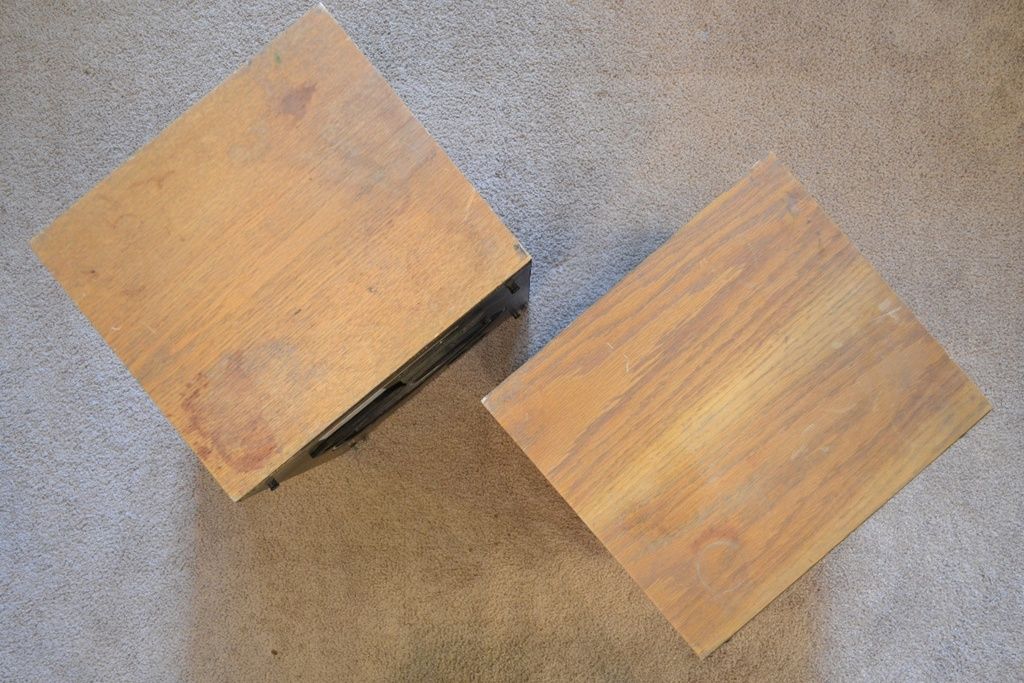
OK, I not the detailed, step-by-step summary I'd previously typed up, but I think most of the info can be found somewhere in this thread. Thanks to all who helped and participated. Here's a photographic summary of the before:


Paint used on the grill frames and front baffles: Ace Instant Drying Lacquer - Flat Black. I've used a lot of rattle cans over the years, but I really like this stuff. As the name implies, it dries fast. It covers well and I got absolutely no running, steaks or orange peel. Good stuff and affordable to boot.
Resist the temptation to use anything other than flat black paint for the grill frames when using light colored grill cloth. I thought about using some beige paint for the grill frames, but I'm glad I didn't. Think about it. Nearly everything behind the grill is black - the front baffle, driver cones, surrounds and dust caps. If you're grill frames are anything other than black, they will stand out like a sore thumb.
I almost didn't repaint the front baffles. They weren't perfect, but not too bad. And, who would ever see them besides me? My main concern was the potential for getting black paint on the oak veneer, that I'd already prepped for the final finish. So, rather than the usual generic blue painter's tape, I tried something called 3M Scotch-Blue Painter's Tape for Delicate Surfaces #2080 with EdgeLock. This stuff worked great. Just take your time when applying it and you'll get perfect edge lines. It's available at all the usual home improvement centers and paint stores and for projects like this, well worth the extra buck to buck and a half per roll. I only bought one roll and have enough left over for future projects.
OK, I not the detailed, step-by-step summary I'd previously typed up, but I think most of the info can be found somewhere in this thread. Thanks to all who helped and participated. Here's a photographic summary of the before:
Last edited:
A couple months ago, I'd typed up a couple of very long posts describing every step of this project in detail. Unfortunately, those posts were lost forever, when the forum crashed. But, I didn't want to leave this thread hanging. So, here's a much more brief summary:
Paint used on the grill frames and front baffles: Ace Instant Drying Lacquer - Flat Black. I've used a lot of rattle cans over the years, but I really like this stuff. As the name implies, it dries fast. It covers well and I got absolutely no running, steaks or orange peel. Good stuff and affordable to boot.
Resist the temptation to use anything other than flat black paint for the grill frames when using light colored grill cloth. I thought about using some beige paint for the grill frames, but I'm glad I didn't. Think about it. Nearly everything behind the grill is black - the front baffle, driver cones, surrounds and dust caps. If you're grill frames are anything other than black, they will stand out like a sore thumb.
I almost didn't repaint the front baffles. They weren't perfect, but not too bad. And, who would ever see them besides me? My main concern was the potential for getting black paint on the oak veneer, that I'd already prepped for the final finish. So, rather than the usual generic blue painter's tape, I tried something called 3M Scotch-Blue Painter's Tape for Delicate Surfaces #2080 with EdgeLock. This stuff worked great. Just take your time when applying it and you'll get perfect edge lines. It's available at all the usual home improvement centers and paint stores and for projects like this, well worth the extra buck to buck and a half per roll. I only bought one roll and have enough left over for future projects.
OK, I not the detailed, step-by-step summary I'd previously typed up, but I think most of the info can be found somewhere in this thread. Thanks to all who helped and participated. Here's a photographic summary of the before:
GREAT THREAD!
I have the L19 little brother and went for the original linseed oil finish, stock cloth plus driver repairs. Wish you'd been around a year earlier with these,I would have plagiarized your ideas mercilessly. They look fabulous.
MCM_Fan
AK Subscriber
GREAT THREAD!
I have the L19 little brother and went for the original linseed oil finish, stock cloth plus driver repairs. Wish you'd been around a year earlier with these,I would have plagiarized your ideas mercilessly. They look fabulous.
Thanks! Plagiarize away. I stole the look (with permission and generous assistance) from this fellow's beautiful, custom made, one-of-a-kind L300s.
MCM_Fan
AK Subscriber
A couple months ago, I'd typed up a couple of very long posts describing every step of this project in detail. Unfortunately, those posts were lost forever, when the forum crashed. But, I didn't want to leave this thread hanging. So, here's a much more brief summary:
Paint used on the grill frames and front baffles: Ace Instant Drying Lacquer - Flat Black. I've used a lot of rattle cans over the years, but I really like this stuff. As the name implies, it dries fast. It covers well and I got absolutely no running, steaks or orange peel. Good stuff and affordable to boot.
Resist the temptation to use anything other than flat black paint for the grill frames when using light colored grill cloth. I thought about using some beige paint for the grill frames, but I'm glad I didn't. Think about it. Nearly everything behind the grill is black - the front baffle, driver cones, surrounds and dust caps. If you're grill frames are anything other than black, they will stand out like a sore thumb.
I almost didn't repaint the front baffles. They weren't perfect, but not too bad. And, who would ever see them besides me? My main concern was the potential for getting black paint on the oak veneer, that I'd already prepped for the final finish. So, rather than the usual generic blue painter's tape, I tried something called 3M Scotch-Blue Painter's Tape for Delicate Surfaces #2080 with EdgeLock. This stuff worked great. Just take your time when applying it and you'll get perfect edge lines. It's available at all the usual home improvement centers and paint stores and for projects like this, well worth the extra buck to buck and a half per roll. I only bought one roll and have enough left over for future projects.
OK, I not the detailed, step-by-step summary I'd previously typed up, but I think most of the info can be found somewhere in this thread. Thanks to all who helped and participated. Here's a photographic summary of the before:
Ok, that's the before photos. For some reason the after photos didn't get posted. So, here they are:


Last edited:
Cadaver2
Member
Hi, i just picked up a pair, and in a first look of them, i will need both midranges, what you recommend me, were i can start? Im curious about recharging the magnets ...Hi, I just finished a complete restoration of a pair of L100s: new walnut veneer, new foam cube grills (blue), recone of the 123a woofers, complete crossover rebuild. Tweeters and mids were ok.
I opted to have Orange County Speakers do the 123a because i read the voice coils have a very narrow gap that is trickier than most. My experience with them was stellar. The cost was significantly higher than diy, but it also included a recharge of the magnets and a warranty.
I'm happy to share anything else if you have further questions.
John
westend
Audiopile
MCM,
Nice work! I'll let you in on a trade secret. Most painters use masking tape bought at their paint distributor (and lots of it). If a painter presses down the edge of the tape, there is very little bleed-through. Whatever does make it through is usually wiped off with a rag. The tape is typically removed right after painting. This allows a painter to use generic tape and not have to buy more expensive Frog or 3M tapes.
Nice work! I'll let you in on a trade secret. Most painters use masking tape bought at their paint distributor (and lots of it). If a painter presses down the edge of the tape, there is very little bleed-through. Whatever does make it through is usually wiped off with a rag. The tape is typically removed right after painting. This allows a painter to use generic tape and not have to buy more expensive Frog or 3M tapes.
Hi, i just picked up a pair, and in a first look of them, i will need both midranges, what you recommend me, were i can start? Im curious about recharging the magnets ...
Consider starting a new thread to customize your restoration. However, normally the L100 uses the LE5-2 alnico midrange, so look for those drivers on eBay or here on AK Barter town if you are a subscriber. They aren't inexpensive. IMO, do not use the lookalike substitutes that are sometimes advertised on eBay because you don't know how they sound compared to the originals, assuming you want the original JBL sound.
As far as recharging the magnets, not usually needed, but if you think the speakers have been severely overheated or overdriven, then the woofers may be recharged back to their full magnetic strength. OCS is no more so I don't know anyone on the West Coast who can do Ths for you. You may contact JBL Professional in Northridge, CA and see if they still offer this or if any of their authorized repair or service stations can do it. Otherwise, it's likely Great Plains Audio can do it, IIRC they are in Oklahoma.
MCM_Fan
AK Subscriber
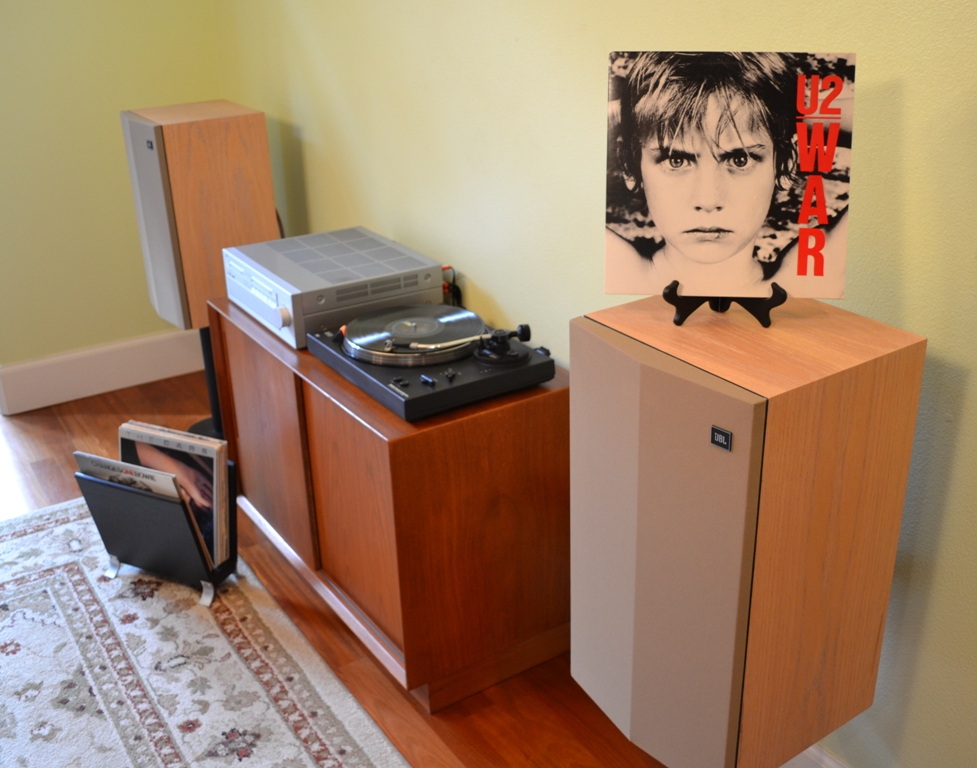
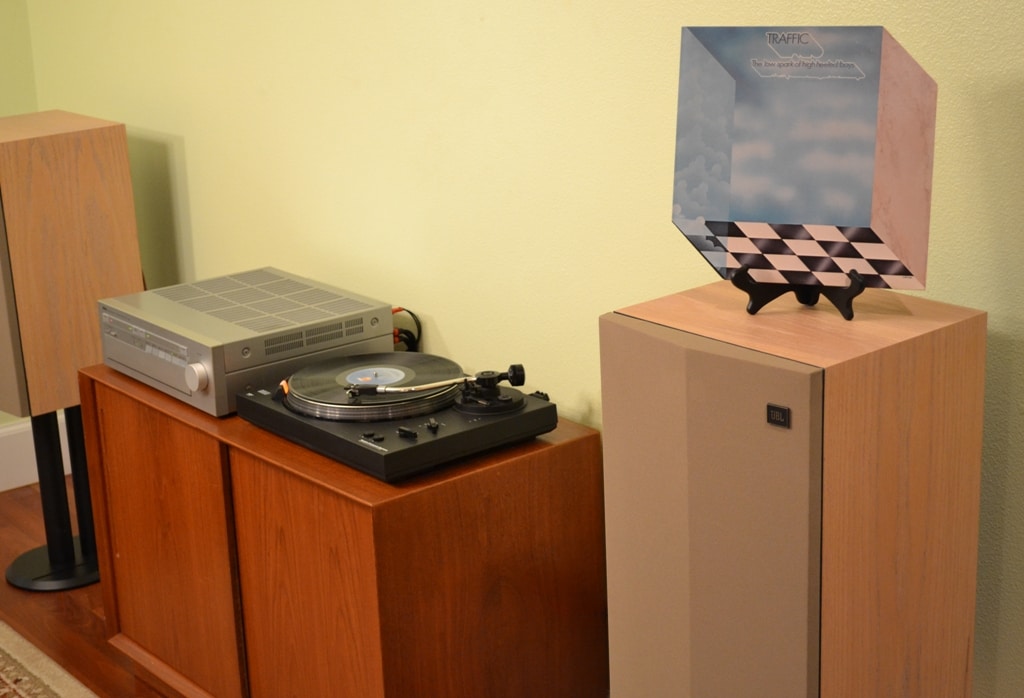
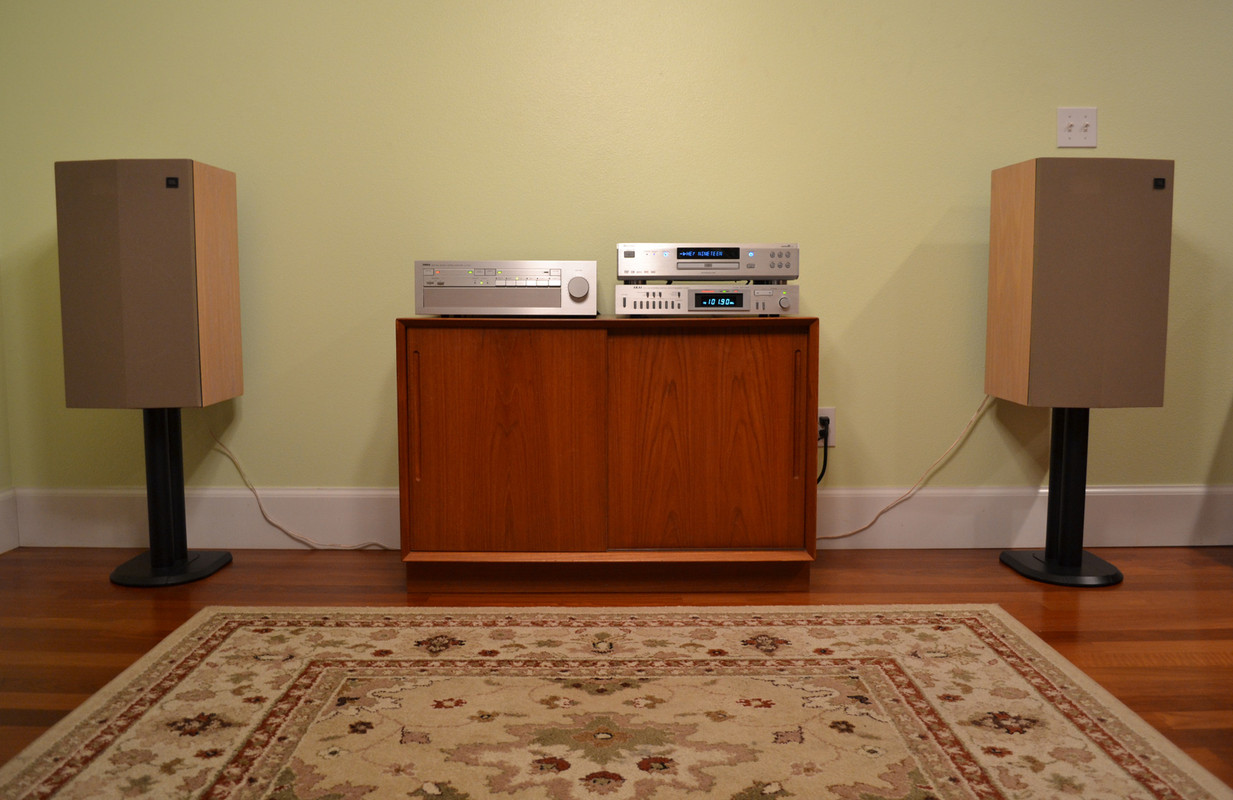
It's been nearly a year since I started this thread and ten and a half months since I put the finished JBLs into daily service. So, I thought I post an update.
I continue to be very satisfied with these speakers. I've sold off several pair of speakers in the last year (Wharfedale W60D, ADS 520, DCM Timeframe 275, Infinity Qa, Klipsch KG4, etc.), but have kept these restored JBL L36 Decades and have no plans to sell them any time soon.
The new crossover caps broke in nicely and the speakers sound great with deep, tight bass, with no boominess. The highs are bright and clear with no edginess or tizz. The mids are solid (piano and female vocals sound very natural and "real"). And the imaging is great. I have a pair of KEF 104/2 speakers in my upstairs system, which are also very nice sounding speakers. In some ways, I prefer the JBLs, but I think that may be more due to the electronics and source material I use to drive both.
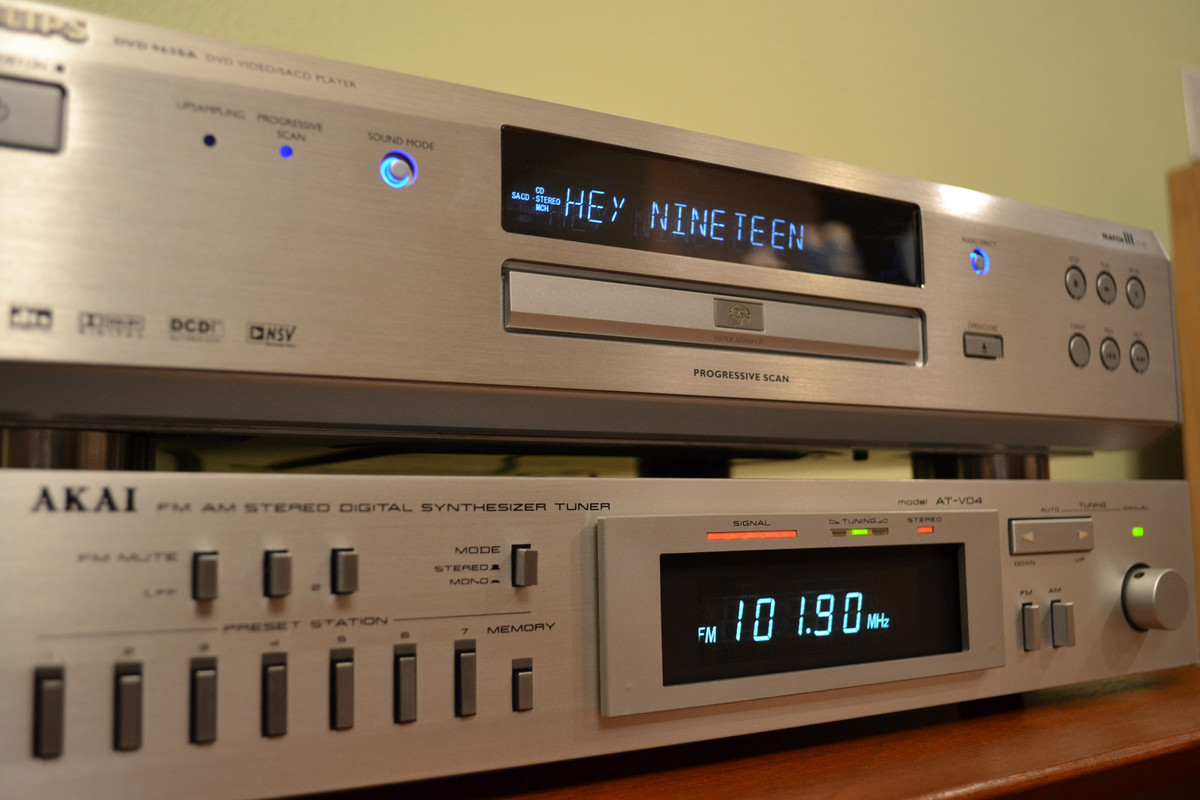
I'm driving these L36 Decades with a Yamaha A-1000 integrated amp. I've been listening to a lot of vinyl lately, and that seems to be where these speakers really shine (or maybe that is vinyl in general). I've been alternating between two different tables - an MCS 6601 with an R47XT cartridge with a NOS Shure Ne95ED stylus and a Realtic Lab-440 with a Signet TK10ML cartridge with the original microline stylus. Both combinations sound great to me. For spinning SACDs, I have a Philips DVD 963SA. For over the air FM I'm using an Akai AT-V04 and lastly, for streaming from my upstairs dedicated Mac Mini music server, I have an Airport Express playing through a Schiit Modi 2 Uber.
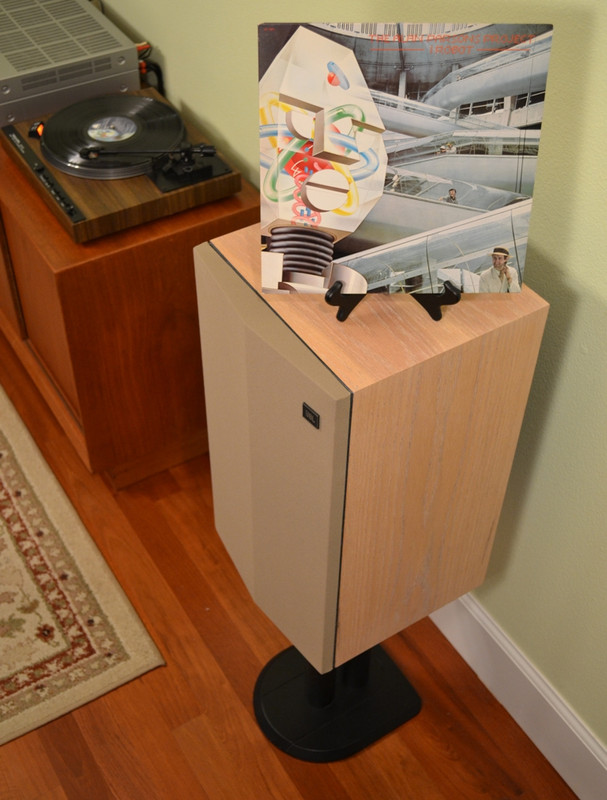
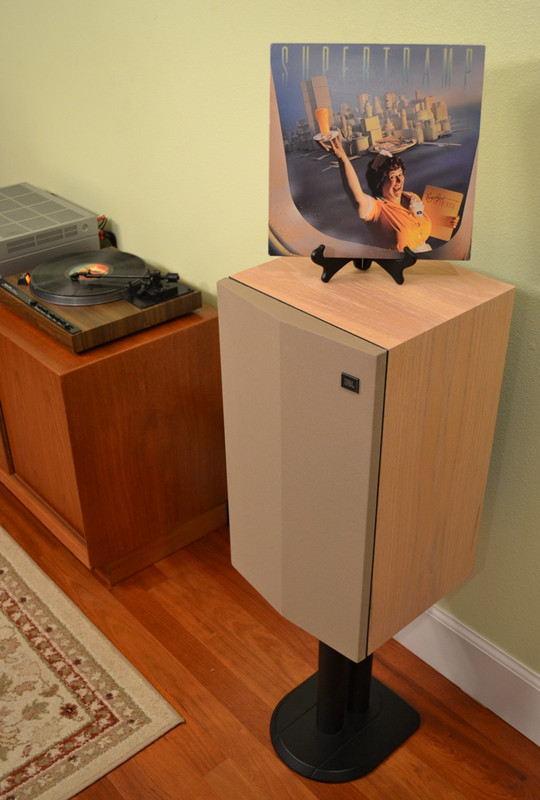
All in all, very satisfied with the way it all sounds (and looks). Here's a few photos of what it all looks like.
With the MCS 6601 turntable:
With the Realistic Lab-440 turntable:
The Philips DVD 963SA SACD player and Akai AT-V04 tuner (both are now inside the teak credenza along with the Airport Express and Schiit Modi 2 Uber):
I have added better speaker wires since that last photo was taken.
I continue to be very satisfied with these speakers. I've sold off several pair of speakers in the last year (Wharfedale W60D, ADS 520, DCM Timeframe 275, Infinity Qa, Klipsch KG4, etc.), but have kept these restored JBL L36 Decades and have no plans to sell them any time soon.
The new crossover caps broke in nicely and the speakers sound great with deep, tight bass, with no boominess. The highs are bright and clear with no edginess or tizz. The mids are solid (piano and female vocals sound very natural and "real"). And the imaging is great. I have a pair of KEF 104/2 speakers in my upstairs system, which are also very nice sounding speakers. In some ways, I prefer the JBLs, but I think that may be more due to the electronics and source material I use to drive both.
I'm driving these L36 Decades with a Yamaha A-1000 integrated amp. I've been listening to a lot of vinyl lately, and that seems to be where these speakers really shine (or maybe that is vinyl in general). I've been alternating between two different tables - an MCS 6601 with an R47XT cartridge with a NOS Shure Ne95ED stylus and a Realtic Lab-440 with a Signet TK10ML cartridge with the original microline stylus. Both combinations sound great to me. For spinning SACDs, I have a Philips DVD 963SA. For over the air FM I'm using an Akai AT-V04 and lastly, for streaming from my upstairs dedicated Mac Mini music server, I have an Airport Express playing through a Schiit Modi 2 Uber.
All in all, very satisfied with the way it all sounds (and looks). Here's a few photos of what it all looks like.
With the MCS 6601 turntable:
With the Realistic Lab-440 turntable:
The Philips DVD 963SA SACD player and Akai AT-V04 tuner (both are now inside the teak credenza along with the Airport Express and Schiit Modi 2 Uber):
I have added better speaker wires since that last photo was taken.
Last edited:
The Fuxtor
Addicted Member
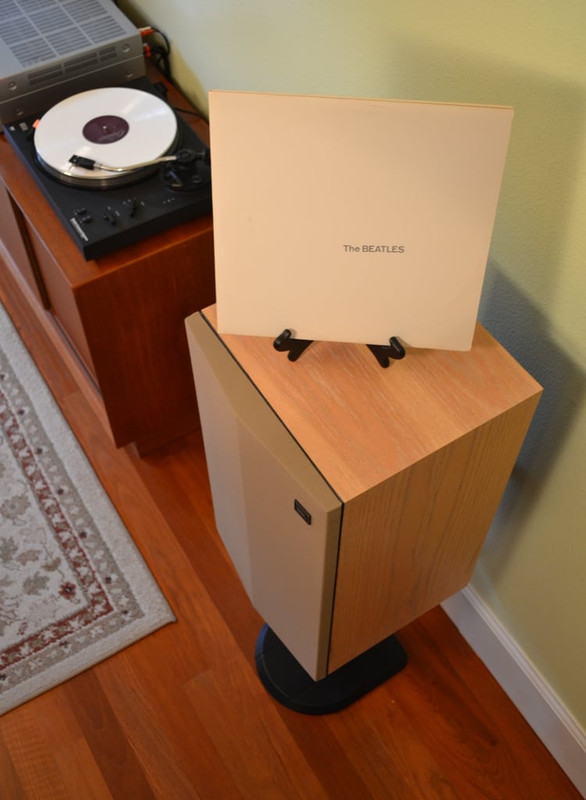
Hi,I have a pair of the same and I am wondering how tall your stands are? My current stands are around a foot but I have been hunting for a nice set at around 18 - 20 " . I would think your stands must be in the 20" range?
MCM_Fan
AK Subscriber
Hi,I have a pair of the same and I am wondering how tall your stands are? My current stands are around a foot but I have been hunting for a nice set at around 18 - 20 " . I would think your stands must be in the 20" range?
The stands are 18" tall. They are Paradigm S-18 stands.
D
Dagis
Guest
Very nice result there MCM! 
Zonker92
All shiny and chrome
MCM_Fan, I can't get enough of your Decades. Did you ever post a detailed restoration thread? I can't find it. I'm particularly interested in how you stretched and attached the grill cloth so well.
(In your thread on LH the pictures are all broken because Photobucket. See http://www.audioheritage.org/vbulletin/showthread.php?38345-JBL-L36-Decades-Reimagined)
Thanks.
(In your thread on LH the pictures are all broken because Photobucket. See http://www.audioheritage.org/vbulletin/showthread.php?38345-JBL-L36-Decades-Reimagined)
Thanks.
MCM_Fan
AK Subscriber
MCM_Fan, I can't get enough of your Decades. Did you ever post a detailed restoration thread? I can't find it. I'm particularly interested in how you stretched and attached the grill cloth so well.
(In your thread on LH the pictures are all broken because Photobucket. See http://www.audioheritage.org/vbulletin/showthread.php?38345-JBL-L36-Decades-Reimagined)
Thanks.
Zonker - this thread is it. The thread at Lansing Heritage is just a subset of this one and doesn't (make that didn't - grrrrrr) contain any additional photos not shown here.
This was my first ever attempt at a full speaker restoration, so it was a lot of going slow and learning by doing. That was definitely true for the grills. I started by removing the original grill cloth, then sanding down the frames to remove remnants of the original glue and any rough spots. I then repainted the grill frames with the same Ace Hardware fast drying lacquer spray paint I used for the front baffles. As with the baffles, I applied several very light coats to avoid any runs or orange peel. As they say, prep work is 90% of the job.
I used a sharp pair of scissors to cut two pieces of grill fabric a little larger than required. I then used blue painters tape to mask off the frames leaving only the area where I wanted the adhesive bare. I did this for two reasons. I didn't want any overspray on the fronts, tops or sides of the frames where it might show through the thin, light colored grill cloth. Also, I didn't want any excess adhesive on the backs of the frames that would muck things up when stretching the grill fabric.
I then sprayed on a nice even coat if the 3M 77 spray on adhesive. This tacks up fairly quickly and gives you about a 15 minute window to get the cloth positioned where you want it. I did one at a time so I could work slowly and not feel rushed. I trimmed the excess fabric from the corners as I was pressing it in place. After the adhesive had cured, I used a metal straight edge and a utility knife to trim away the excess fabric. The backs of the grills look almost as nice as the fronts.
That's pretty much it. The key is to work slow and pay attention to the little details as you go. I'm convinced that sanding and repainting the grill frames, while a lot of "extra work" was worth it. The smooth, freshly painted surface meant no snags or hang ups when stretching the new fabric. Good results take time, especially when attempting something new for the first time.
Similar threads
- Replies
- 7
- Views
- 3K