Yamaha PC5002M extremely rare

I appreciate the offer. I think I've got it covered.


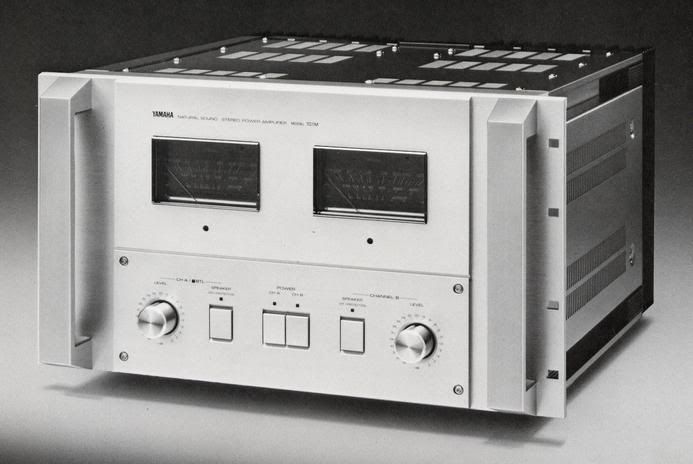
There was a time many years ago when I wouldn't have had any problem man-handling a bulky 158lb box like this. On the other hand, back then I couldn't have afforded this amp. :D My brother-in-law will give me a hand with it tomorrow.

The 158 lb I also could deal with.The shape of the package is what makes that weight more of a challenge.... :yes:
Congrats,mate. :D
 
Finally got the PC5002M in the house. It's in excellent condition. No rack rash. There are a couple of minor scuffs and one of the 4 meter lamps is out. It powers up - there are TWO power switches! Channel A and Channel B.

There's a strong resemblance (and many shared parts) between the PC5002M and the 101M.
I think the PC5002M is the pro version of the 101M


PC5002Mview1.jpg


PC5002Mview3.jpg


PC5002Mview4.jpg


Yamaha101m.jpg
 
I agree about the resemblance to the 101.
It's a testimony to the rack that it has no trouble dealing with the weight.

Be sure to tell us how it sounds(of course we are expecting it to breeze through that examination). :thmbsp:
 
I agree about the resemblance to the 101.
It's a testimony to the rack that it has no trouble dealing with the weight.

Be sure to tell us how it sounds(of course we are expecting it to breeze through that examination). :thmbsp:
There's no doubt about it, the PC5002M is the pro version of the 101M. The specs for the PC5002M and the 101M are identical. The amps share the same circuit boards, output transisters (10 pairs of Sanken NPN/PNP per channel) 6 PS caps per channel (4 x 18,000μF 100V & 2 x 39,000μF 63V). Both models came out in 1982, have identical dimensions (W x H x D) 482 x 264 x 441 mm, and weight, 61kg (134.5lbs).
 
Wow, once again very impressive Mark! What a beast that is...
Seen a centennial series btw, for a price almost too good to believe, but still can't afford it. Some day... :tears:
 
After letting the amp run disconnected for 24 hours I decided to hook it up and give it a listen. Unfortunately I don't have any speaker cables terminated with the small spade connectors that are needed to connect to the amps speaker terminals. Here's a pic of the speaker terminals. Any recommendations on what spade connectors will work with these? There's about 1/4" of space for each terminal.

PC5002Mterminalpanelview1.jpg
 
Any recommendations on what spade connectors will work with these? There's about 1/4" of space for each terminal.

I'm a big fan of bare wire. Couldn't you just strip your speaker wire 1/4" and hit with your soldering iron and a dab of solder?
 
I'm a big fan of bare wire. Couldn't you just strip your speaker wire 1/4" and hit with your soldering iron and a dab of solder?
I thought bare wire or flexi-pins would work but there's not enough room to use them. The screws are very short, and the recepticals that the screws thread into are very shallow, so a longer screw can't be used.
 
Geez,
That's a bitch.
What a bummer.Bare Wire,however I'd be worried about shorting the thing with a stray wire.
 
I wish a had an easy answer.... but a little modification may be the ticket.

must be pretty small area to work with if pins won't fit!

Glad to see that it arrived no worse for wear. I had NO IDEA of the size of that until I saw the pics along with you other amps.
 
Geez,
That's a bitch.
What a bummer.Bare Wire,however I'd be worried about shorting the thing with a stray wire.
Exactly, accidently shorting it is my concern. Most of my speaker cables use very heavy gauge wire. The smallest use 12 gauge and the Zu Libtecs use 10 gauge. I can barely bend a 3/4" length of the 10 gauge. I think the only safe way to go is small spades. Perhaps long term I can have my tech replace the screw terminals with some nice insulated WBT's.
 
I wish a had an easy answer.... but a little modification may be the ticket.

must be pretty small area to work with if pins won't fit!

Glad to see that it arrived no worse for wear. I had NO IDEA of the size of that until I saw the pics along with you other amps.
Yeah it's a big brute. It looks even bigger in the flesh. Including the feet the PC5002M is 11 1/4" high. The MX-10000 is a shade under 8 3/4" high, and the PC4002M is 7 1/4" high.

I think I've found some spade terminals that would be perfect for the amp and my speaker cables. WBT 1/4" spades.
 

Attachments

  • WBT 0.25 spade connector.jpg
    WBT 0.25 spade connector.jpg
    36 KB · Views: 42
That's why I suggest tinning the ends with solder - No frayed ends that way. Can you use longer screws in those terminals?
Unless the wire is a very light gauge (18+) wire is not going to work. All of my speaker cables use 12 gauge or larger wire. Longer screws can't be used because the threaded receptical for the screw is too shallow.
 
Thanks to Fisherdude and Retro Stereo for getting this thread moved to Vintage Solid State.
 
use longer screws through a 1/2" or 3/4" long tubed sleeve/spacer, then into the holes... might make attaching connectors easier?? :dunno:
 
Here are a few pics of the amp with the top removed. Nudies of the trannies, PS caps and output transisters will have to wait until I can get a hand to move the amp and remove the bottom cover and the heatsinks. That probably won't be until the evening of Thanksgiving day.
 

Attachments

  • PC5002M top nudie view 1.jpg
    PC5002M top nudie view 1.jpg
    118 KB · Views: 315
  • PC5002M top nudie view 2.jpg
    PC5002M top nudie view 2.jpg
    98.1 KB · Views: 196
  • PC5002M top nudie view 3.jpg
    PC5002M top nudie view 3.jpg
    130.6 KB · Views: 230
use longer screws through a 1/2" or 3/4" long tubed sleeve/spacer, then into the holes... might make attaching connectors easier?? :dunno:
Thanks for the suggestion Bolly, but that would mean that the screw heads were beyond the separators of the terminal strip, and could easily result in shorting the connectors.

I'm going to get the WBT spades. Those will fit the existing terminals and work fine with the stock screws.
 
Cool nudes (and clean too)! My stack overflowed looking at all the connectors on the pcbs. :)

How do the caps look? Whenever I open an amp for the first time I take a nice pic and note all the caps that could be marginal. Are the caps 105c or 85c?

Judging from the sloppy heatsink grease on the driver transistors, I'd wager the outputs were replaced at some time. Just another thing I'd probably clean/replace after I found a service manual.

If you plan on doing any work on this beast, I'd *strongly* suggest getting a lazy susan work table that can handle 200lbs. No sense scratching up the amp or wrecking the kitchen table (been there - done that) :(

Sweet score and congrats!
 
Last edited:
Back
Top Bottom