OK, I've run the siumulations with Spice and found that you can use the exact same chart of values I use in my crossover. I guess I shouldn't be surprised, but it is indeed good news because now you have a chart to work from.
The only thing is, the nomenclature is different. In my schematic, R1 is the series attenuator, with C1 in shunt across it. R2 is the load resistor. You guys have R2 as the series attenuator, C3 in shunt across it and R1 is the load resistor. So when looking at
my chart, interpret it as follows:
Pi value = Ewave value
======
R1 = R2
R2 = R1
C1 = C3
======
The chart then becomes:
dB - R2 - R1 - C3
=========================
06dB - 12 ohm - 30 ohm - 0.47uF
08dB - 12 ohm - 20 ohm - 0.47uF
10dB - 16 ohm - 16 ohm - 0.47uF
12dB - 25 ohm - 16 ohm - 0.47uF
14dB - 30 ohm - 14 ohm - 0.33uF
16dB - 40 ohm - 12 ohm - 0.33uF
18dB - 50 ohm - 12 ohm - 0.22uF
20dB - 75 ohm - 12 ohm - 0.22uF
=========================
The splitter filter values are different, so the R1/R2 loading is different. That's why your filter is damped a little more than the Pi models. This has been retained.
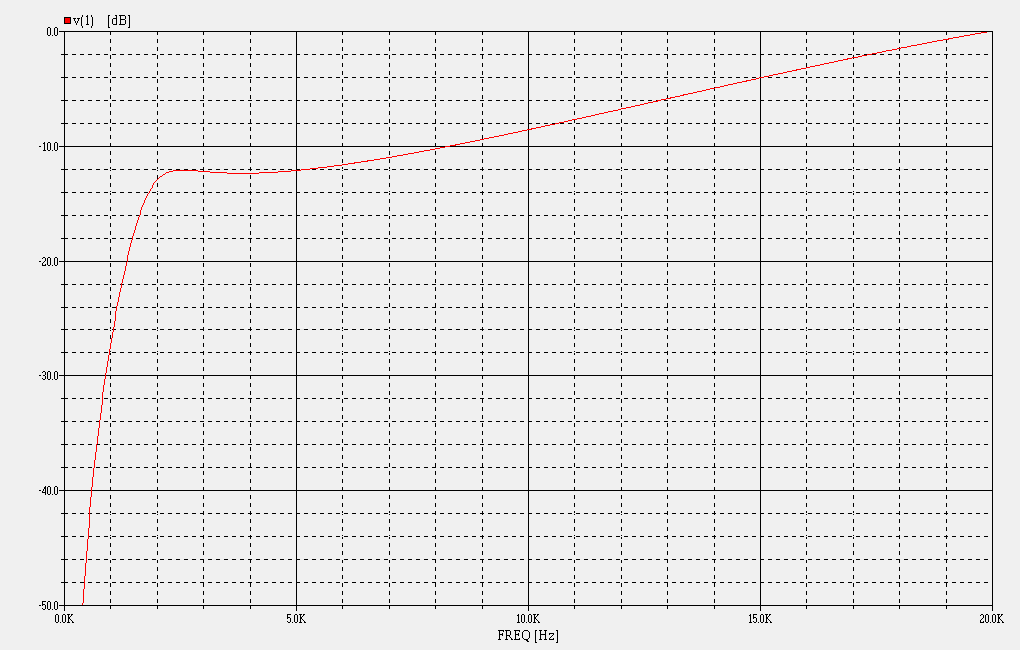
The chart of values shown above gives the exact same transfer characteristic you have with the values you've previously used. This just gives you a few more to work with.
As an example, your "high attenuation" version of the crossover originally called for 16/30 values for R1/R2. That's what I would call 12dB padding. My chart uses 16/25, almost the same thing. In the positions they are used, there is very little difference, too small to see, like 0.2dB or something like that. Yours would have a smidge more attenuation, but basically equivalent.
If you need lower values than 6dB, I think what's happening is your Lpad is too big. Think about it. You need at least 8dB in order to get the proper EQ. So remove the Lpad, if this is the case.
Honestly, I can't see any midwoofers that would be so sensitive the circuit should be setup for less than 8dB attenuation. I've personally never used one that had less than 10dB padding, and I'm used to working with woofers like the JBL 2205, 2225 and 2226 - all of them are 98dB/2.83v/M. You're really not going to find a direct radiating midwoofer that is more sensitive than that, unless cone breakup peaks are there, in which case you wouldn't want to use it. The highest you should ever expect to see is 98dB to 100dB, tops.
This chart is for 8 ohm compression drivers. If you need to use a 16 ohm compression driver, see our previous discussions. A 10dB version of the crossover for 16 ohm drivers has R1 = 16, R2 = 50 ohms and C3 = 0.33uF, by your nomenclature. If you need other padding values, you'll need to run Spice to find them.
There are plenty of
posts about Spice in the Pi Speakers forum. Do a search there for information about it, tips how to run it. If you download my models, they'll run straight out of the box. Just run Spice, load one of the models and hit the button that looks like a traffic light to start the simulation.
One last thing. You'll notice the top-octave bypass capacitance value is usually about 0.47uF. That's a value I found usually works pretty well. It doesn't need to be large, in fact, should not be. Too large a value and you're basically bypassing all the padding. In truth, voice coil inductance provides a good deal of the CD equalization. It provides increasing load impedance with frequency, providing some natural EQ. So you really don't need a lot of bypass capacitance. I'd be more concerned with making it too large than too small.