• The move to the new server is done. There are some software and database maintenance updates in process. This has us passing the hat around to help out. We appreciate any donations. Seriously, even a dollar helps. The payment page may be found here - https://www.audiokarma.org/support.html

SX-1500TD bulb replacement?

mrphilco

Well-Known Member
Can anyone advise how to get to the fuse lamps behind the dial on a Pioneer SX-1500TD receiver?

I have the owner's manual/service manual. Unless I overlooked something, I did not see a procedure for replacement of these lamps.

Two of mine are burned out. I have LED replacements ready to go in...I just need to know how to go about getting in there...

Thanks in advance for any assistance.
 
Register to hide this ad
Completely remove the Face, knobs and all.
Then carefully remove the plastic piece with the FM/AM frequencies on it.
Can't 'member if screws hold it in, or plastic tabs.
Careful not to break the dial pointer and lose and screws.
Then remember to put everything back like it came off.

Fairly simple process.
 
Noodle

Thanks - I really appreciate it, that is just what I needed to know!

For anyone else running into this problem, I wanted to illustrate how I changed the fuse lamps in my SX-1500 TD folllowing Noodle's advice:

Carefully remove all of the knobs. There are four nuts which hold the front face in place - behind the function switch to the right of the tuning knob; behind the mode switch knob; behind the Mic Level control; and behind the Off-On-Speaker switch. Remove each nut and washer, then carefully remove the face.

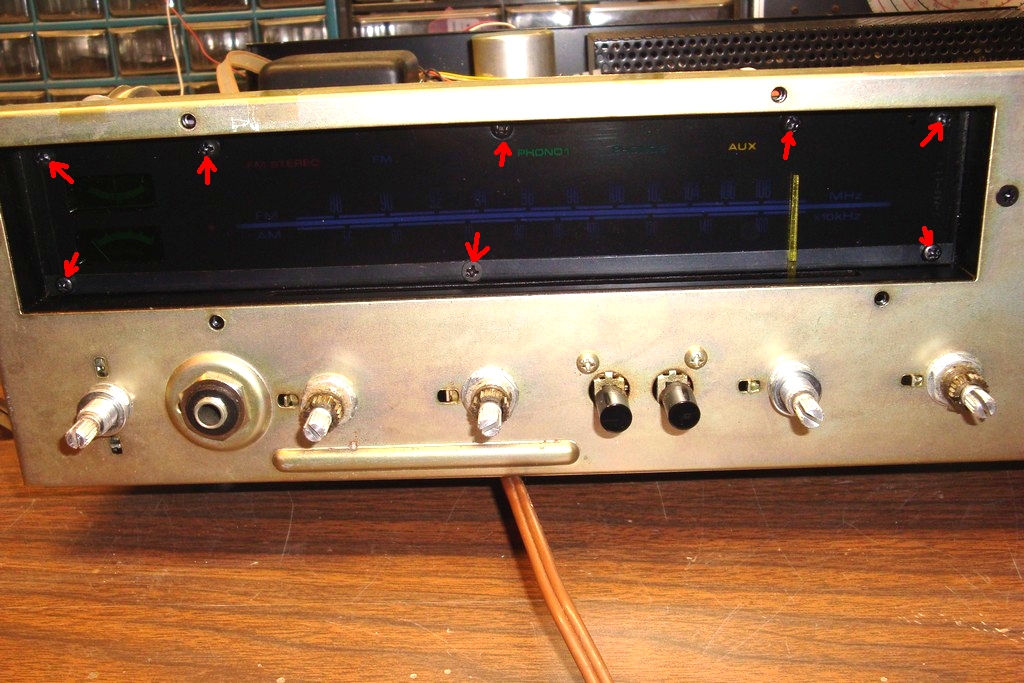
There are eight screws which hold the plastic dial in place. Tune the receiver to the high end of the FM band (turn the tuning knob clockwise to make the pointer move as far to the right as it will go), then remove these eight screws.

Image00007a.jpg


There is also a piece of thin metal below the plastic dial; it should be removed first once the screws are removed. Then carefully pull the plastic dial out.

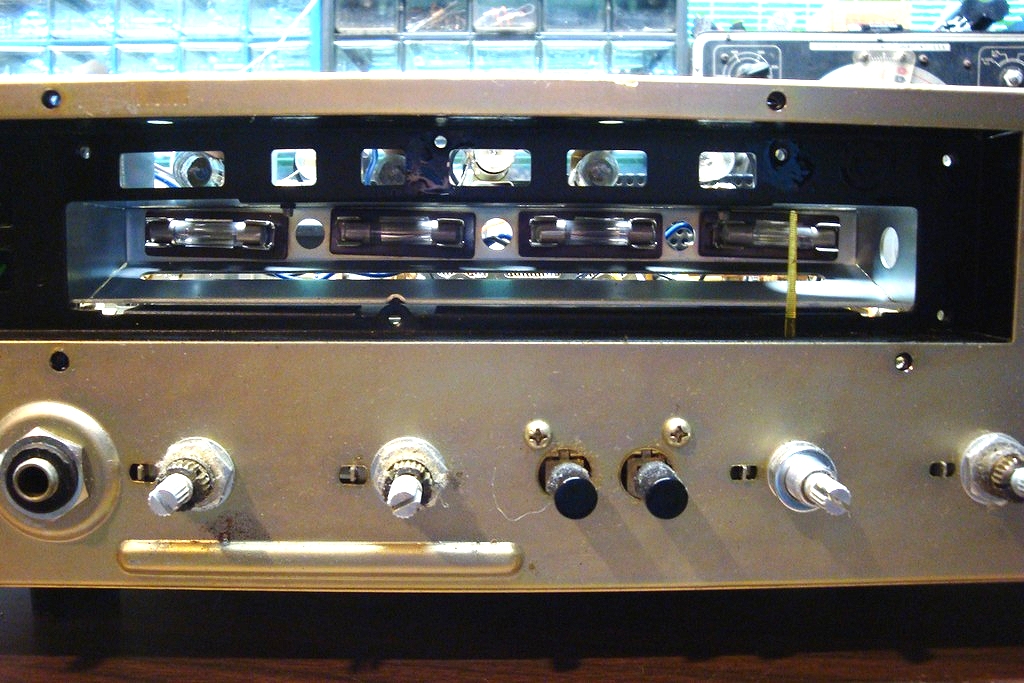
Now the fuse lamps are exposed:

Image00001.jpg


These can be removed with the aid of a long, skinny straight blade screwdriver to carefully pry one end of the old fuse lamp free.

I suggest that you use a pair of needle nose pliers to carefully tighten the contacts of each fuse lamp holder before installing the new LED fuse lamps. Do this very carefully, it is only necessary to slightly bend the contacts toward each other. Don't overdo or you could break the contacts! This step may not be necessary, but I found that two of my LED replacement fuse lamps were loose in their holders once installed, and would flicker when the receiver was moved. Once I tightened the contacts slightly, this problem was eliminated.

You will also have to retune the receiver to get to all of the lamps without breaking the pointer.

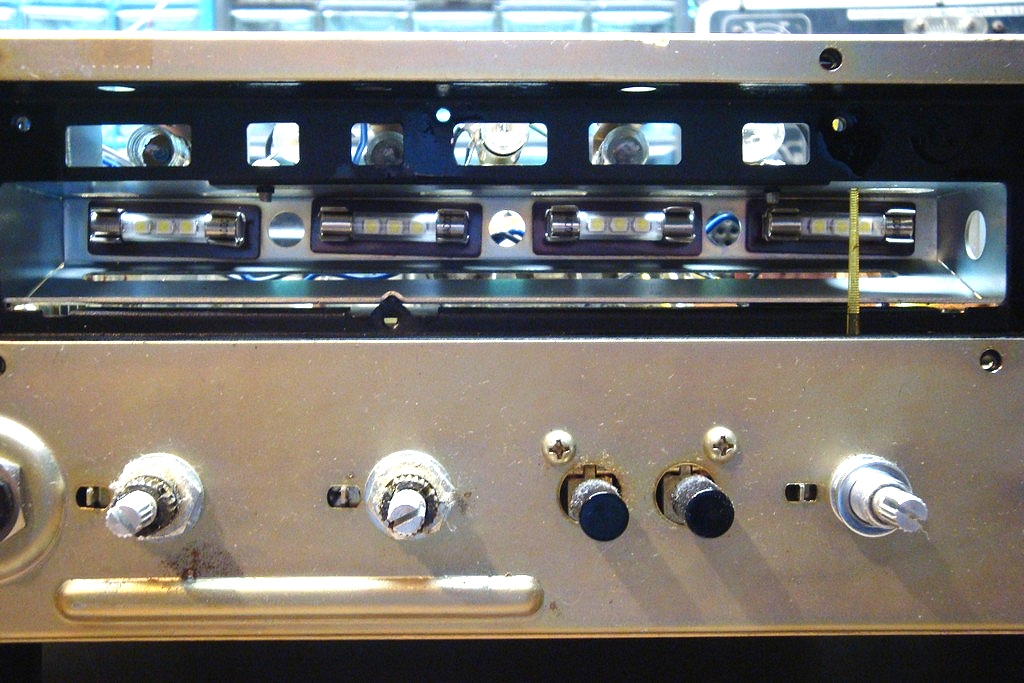
When the new lamps were in place, here's how they looked:

Image00002.jpg


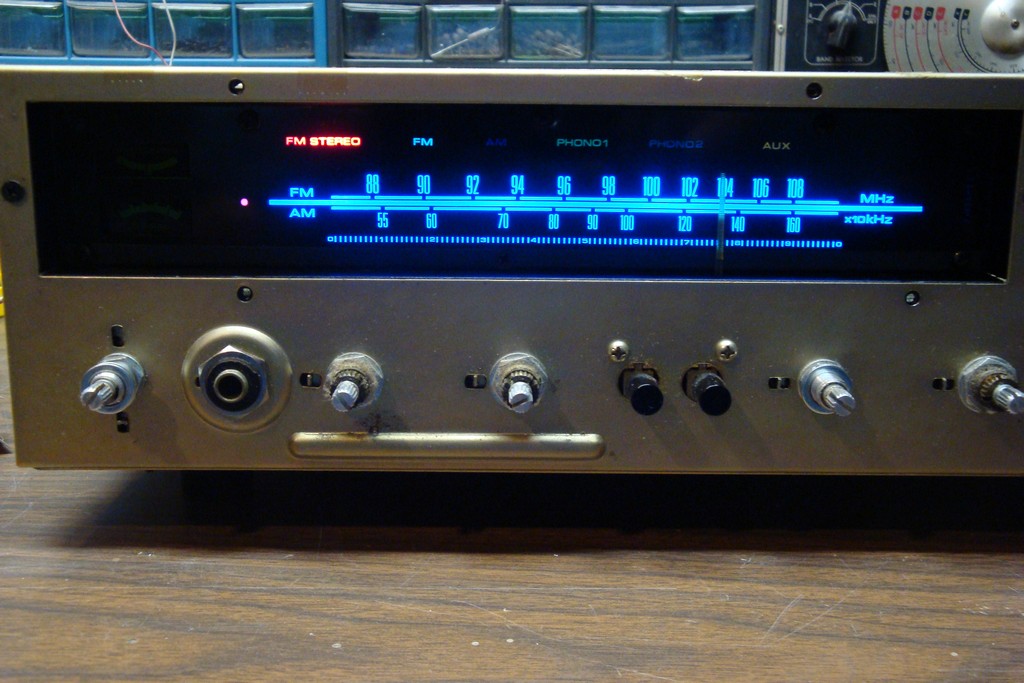
Just for fun, a photo showing the receiver "ON" and the LED fuse lamps illuminated:

Image00004.jpg


Once all four lamps have been replaced, return the receiver to the high end of the FM band and carefully place the plastic dial and metal strip back in place, and reinstall the screws.

Now a look at things with the dial back in place, before replacement of the front face:

Image00006.jpg


Finally, replace the front face and enjoy your new LED dial lamps.

Image00008.jpg


Now I need to find replacements for the lamps that illuminate the two meters. I will also have to replace the bulb that lights up the pointer. But the dial already looks much better.
 
Last edited:
Excellent write up post and "how to" .

Where were you able to get those LED fuse type Lamps?

Those are cool! Also did you have to solder any type of resistor in place for them or are they just "plug in " type any that's it?

Thanks for posting and sharing.

That Pioneer receiver display came out looking beautiful by the way!
 
R-2-R and Noodle

Thanks! The LED lamps are "plug and play" lamps from the auction site, seller cotillion777. They are set up for 6-8V use as received, no need to do anything other than to remove the old fuse lamps and install the new ones.

I have all of the lamps (save for the pointer) working now, but I have not yet converted the other lamps to LED. The six lamps above the dial are miniature bayonet - 8V, 0.25 mA; and the two lamps that illuminate the meters are miniature screw lamps - 8V, 0.25 mA. You can use #46 (6.3V, 250 mA) for the meter lamps and #44 (6.3V, 250 mA) for the other six lamps if you want to keep using incandescent lamps.

I discovered that the stereo lamp circuit wants a 250 mA lamp - I tried a #47 (150 mA) and then the lamp stayed on continuously. A #44 works perfectly.
 
Last edited:
Thanks for this tutorial. It was helpful. If anyone wants to know were to find the other bulbs (fm, am, aux indicator etcetera).

https://www.1000bulbs.com

Also realized that the indicator sockets disconnect from the frame (don't pull to hard cause of the soldered wires). LOL figured that out on my last one.
 
Last edited:
R-2-R and Noodle

Thanks! The LED lamps are "plug and play" lamps from the auction site, seller cotillion777. They are set up for 6-8V use as received, no need to do anything other than to remove the old fuse lamps and install the new ones.

I have all of the lamps (save for the pointer) working now, but I have not yet converted the other lamps to LED. The six lamps above the dial are miniature bayonet - 8V, 0.25 mA; and the two lamps that illuminate the meters are miniature screw lamps - 8V, 0.25 mA. You can use #46 (6.3V, 250 mA) for the meter lamps and #44 (6.3V, 250 mA) for the other six lamps if you want to keep using incandescent lamps.

I discovered that the stereo lamp circuit wants a 250 mA lamp - I tried a #47 (150 mA) and then the lamp stayed on continuously. A #44 works perfectly.

hello, thanks to your instructions I have the dial lights replaced with LEDs. Can you please list steps on how to replace the screw type bulbs for the meters? Do I need to take the wood case off to do that? Also are the lights only illuminated when switched to turner? I was hoping the lights would stay on when I’m in phone mode like how my marantz receiver does. Thanks for all your help, this post has been great!!
 
hello, thanks to your instructions I have the dial lights replaced with LEDs. Can you please list steps on how to replace the screw type bulbs for the meters? Do I need to take the wood case off to do that? Also are the lights only illuminated when switched to turner? I was hoping the lights would stay on when I’m in phone mode like how my marantz receiver does. Thanks for all your help, this post has been great!!
Sorry I meant *phono mode
 
hello, thanks to your instructions I have the dial lights replaced with LEDs. Can you please list steps on how to replace the screw type bulbs for the meters? Do I need to take the wood case off to do that? Also are the lights only illuminated when switched to turner? I was hoping the lights would stay on when I’m in phone mode like how my marantz receiver does. Thanks for all your help, this post has been great!!

To get to the lights you have to take out the 4 end screws and take off the wood lid.

Actually I did my dial lights without taking out the dial glass. Pop loose two of the function lamp assemblies to get access to the two phillips head screws on top of the light assembly hood and once removed and you can pivot back the light assembly housing and insert the fuse lamps that way.

To get the screw lamps behind the meters remove the screw that is holding the bracket they are mounted on to the chassis at the side. Also take out the screw holding the dial string pulley bracket that stands behind the bulbs to the chassis so you can move it out of the way. You need to do that so you can work the bulb assembly past the back of the top meter. Careful with the dial string and note how things are run so you can put it back together correctly. The metal hood over the dial bulbs pops off. I had to bend it wider, tweaked it a bit but got it to go around the LED replacements and fit back in the space between the meters. Clearance is tight so things may not go back the first time and you have to figure out the adjustments based on what interferes.

On the SX-1500TD assuming mine has not been modified the tuning dial stays lit when the unit is on. Both meters are lit with FM, just the strength meter with AM, and when not on a tuner selection both meters will be dark.
IMG_20200212_054010.jpg
 
To get to the lights you have to take out the 4 end screws and take off the wood lid.

Actually I did my dial lights without taking out the dial glass. Pop loose two of the function lamp assemblies to get access to the two phillips head screws on top of the light assembly hood and once removed and you can pivot back the light assembly housing and insert the fuse lamps that way.

To get the screw lamps behind the meters remove the screw that is holding the bracket they are mounted on to the chassis at the side. Also take out the screw holding the dial string pulley bracket that stands behind the bulbs to the chassis so you can move it out of the way. You need to do that so you can work the bulb assembly past the back of the top meter. Careful with the dial string and note how things are run so you can put it back together correctly. The metal hood over the dial bulbs pops off. I had to bend it wider, tweaked it a bit but got it to go around the LED replacements and fit back in the space between the meters. Clearance is tight so things may not go back the first time and you have to figure out the adjustments based on what interferes.

On the SX-1500TD assuming mine has not been modified the tuning dial stays lit when the unit is on. Both meters are lit with FM, just the strength meter with AM, and when not on a tuner selection both meters will be dark.
View attachment 1761092
Thanks so much for your instruction! When the unit is switched to phono do your fuse LEDs stay lit in the tuner section? Mine the whole face goes black except for the green phono light
 
I read you comment again and I gather that when the unit is not switched to tuner everything goes black except the function lamps. Poor design in my opinion I wish all lights stayed lit no matter what is selected. I never listen to the radio so changing the bulbs has turned out to be kind of a moot point. Thanks again for your instructions!
 
To get to the lights you have to take out the 4 end screws and take off the wood lid.

Actually I did my dial lights without taking out the dial glass. Pop loose two of the function lamp assemblies to get access to the two phillips head screws on top of the light assembly hood and once removed and you can pivot back the light assembly housing and insert the fuse lamps that way.

To get the screw lamps behind the meters remove the screw that is holding the bracket they are mounted on to the chassis at the side. Also take out the screw holding the dial string pulley bracket that stands behind the bulbs to the chassis so you can move it out of the way. You need to do that so you can work the bulb assembly past the back of the top meter. Careful with the dial string and note how things are run so you can put it back together correctly. The metal hood over the dial bulbs pops off. I had to bend it wider, tweaked it a bit but got it to go around the LED replacements and fit back in the space between the meters. Clearance is tight so things may not go back the first time and you have to figure out the adjustments based on what interferes.

On the SX-1500TD assuming mine has not been modified the tuning dial stays lit when the unit is on. Both meters are lit with FM, just the strength meter with AM, and when not on a tuner selection both meters will be dark.
View attachment 1761092

Hello again. First off thanks for your detailed answers to my question. I wanted to reach out again for some advice. I saw a video on YouTube where someone had a pioneer sx-1500td and the blue lights in the dial section stayed lit when he switched to phono and aux. if there is a modification that would allow the lights to stay on would you have any knowledge of what could be done to achieve this modification? Thanks again!
 
Hello again. First off thanks for your detailed answers to my question. I wanted to reach out again for some advice. I saw a video on YouTube where someone had a pioneer sx-1500td and the blue lights in the dial section stayed lit when he switched to phono and aux. if there is a modification that would allow the lights to stay on would you have any knowledge of what could be done to achieve this modification? Thanks again!
Was not sure if mine was standard or someone modified it.

But looking at the schematic etc from hifiengine.com it looks like mine is working the way the it should. The schematic shows four lamps, the fuse lamps, are fed off one tap of the transformer and other end to chassis ground. As long as the unit is on they should be on. The function lights and tuning meter lights (strength for both FM and AM, center for FM) looks to get power based on the function switches which also comes off the same hot wire that feeds the fuse lamps. Wonder if Pioneer made a change at some point or someone modified the one you have. I modified a Sansui 2000A and Sherwood S-7200 they only had the tuning dial lit when the tuner was used, if nothing was playing hard to tell if they were on if not at an angle to see the indicator lamps.

I followed the wiring on mine and took two pictures. The big blue wire (schematic has 7.5 V will be AC) comes out of the transformer and goes to the plastic sleeved fuse and a smaller blue wire comes off the other end of the fuse and works its way around on the bottom of the chassis and up through a hole above the headphone jack on the power switch side. Comes up topside between the fuse lamp housing and the tuning meters and goes to one side of the first fuse lamp then to one side of the other three in order and then the blue wiring continues to the function selector where the pointer lamp, function lamps, and meter lamps should get their power. Pointer is on and signal strength meter lit for AM and FM, center meter for FM only. Other end of the fuse lamps are sequentially wired with black wire that goes to a chassis ground tab near the tuning knob flywheel.

I did not try to follow the layout of the purple and blue wires that come off the function selector to the AM and FM function lights and the meter lights. But if your tuning dial is only lit when tuner is used the fuse lamps are apparently wired in after the function switch apparently on the same segment that feeds the pointer and strength meter.

I hope that is not too confusing. I will leave mine open in the event I need to take a closer look at the function selector and the wiring past it.
IMG_20200213_051035.jpg IMG_20200213_051302.jpg
 
Last edited:
I thought one more picture may help. This shows the tuning knob flywheel, the chassis ground tab, and also the terminal strip that feeds the pointer. The yellow wire comes from the function selector and feeds the pointer bulb. The red wire is the +ve side of the LED replacement I wired in to have a lit pointer again the old one in mine had burned out. Those two wires join at the front tab on the strip. The blue wire running vertically on the right is the -ve of the pointer LED tying into the ground loop wiring on the back of one of the function lamps.

IMG_20200213_055346.jpg
 
I thought one more picture may help. This shows the tuning knob flywheel, the chassis ground tab, and also the terminal strip that feeds the pointer. The yellow wire comes from the function selector and feeds the pointer bulb. The red wire is the +ve side of the LED replacement I wired in to have a lit pointer again the old one in mine had burned out. Those two wires join at the front tab on the strip. The blue wire running vertically on the right is the -ve of the pointer LED tying into the ground loop wiring on the back of one of the function lamps.

View attachment 1762098
Thanks again for everything, you’ve been a huge help!
 
Back
Top Bottom