

E-Switch makes a good replacement, DPDT just like the original. I can't remember whether the 500/600 needs the 18mm spacing or the 20mm spacing (I think it's the 20mm one). I'll update the thread in the future when I have a chance to check. But Digikey carries one, and Mouser the other. Just so you know.
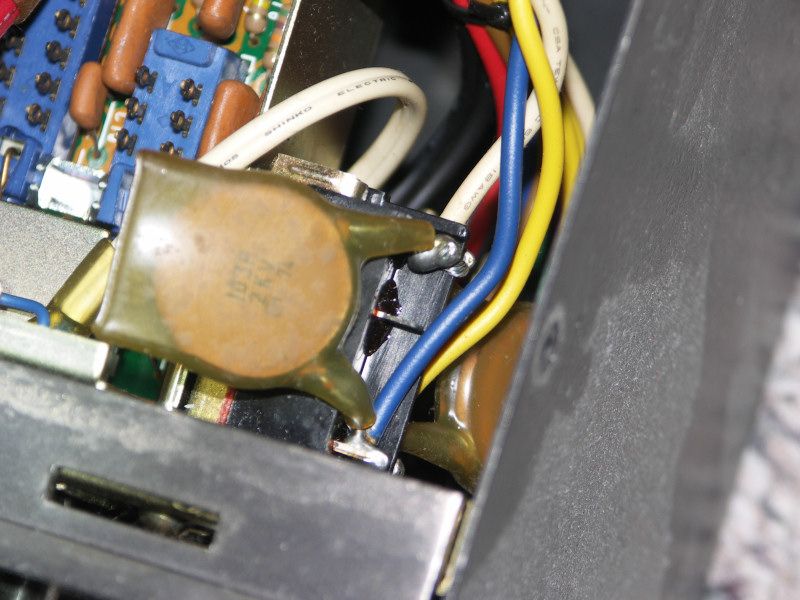
Three wires run to the stock switch...a white, a blue, and a yellow. The white is the incoming AC line, and it should be soldered to the 'back' lugs of the switch. The back lugs should be jumpered from the left to the right side of the switch (the switch is a double-pole double-throw [DPDT]) so that when the switch is 'on' it supplies power to both the blue and yellow wires. I believe that one side of the stock switch supplies power to only one transformer, and the other side supplies power to the other transformer PLUS the 'switched' AC convenience outlets on the back panel. Pretty sure the blue is the transformer wire, and the yellow the other t-former and the switched outlets.
No matter...the essence of this is that all three wires are shorted together when the switch is 'on'. You can wire up the new switch the way the original is done, or short the two transformer wires to share the power-on current surge.
Note that the stock switch is a little odd, in that the 'common' connection is at the end of the switch, and the 'NC' (normally closed) contacts are in the middle, and the 'NO' (normally open) are at the front of the switch. I have a pic here, but this is only with the bottom removed and only shows one side of the switch well, but you can see that the common is jumpered from one side of the switch to the other, but that the wires for the t-formers are kept separate on their respective side of the switch. You can also see that there are two safety caps...more on this later.
The E-Switch is more traditional in its terminal arrangement. The two contacts in the middle are the common, and the contacts at the back are the NO and the contacts at the front are the NC. Push the switch plunger in, and the center contacts make with the rear contacts. Simple.
So to replace the stock switch, the white can be connected to either the center contacts or the rear contacts...whichever you prefer. But the pins from the left and right of the switch need to be joined, to supply power to both halves of the switch. The blue and yellow wires can be connected to the pins you didn't use (either the back or the center). If you do this in stock form, you'd connect one wire to one side, and the remaining wire to the other side. This will mean you need two safety caps, just like the original setup (first link in this thread has a Digikey PN for a safety cap, use ONLY a UL rated safety cap here!). I do believe it is good insurance to put new safety caps on the new switch.
The last option is to join the left and right sides of the switch for the t-former wires as well. A little more of a PITA, but if you go this route you'll need only one safety cap.
I know this is lengthy, but it's intended for the novice. I've gotten two requests for notes on the Model 500 and 600 in the last week, so there must be a few Kenwood switches dying like flies out there lately. Thought it might be easier to start a new thread here and share for all the guys who might be contemplating this switch replacement.
Three wires run to the stock switch...a white, a blue, and a yellow. The white is the incoming AC line, and it should be soldered to the 'back' lugs of the switch. The back lugs should be jumpered from the left to the right side of the switch (the switch is a double-pole double-throw [DPDT]) so that when the switch is 'on' it supplies power to both the blue and yellow wires. I believe that one side of the stock switch supplies power to only one transformer, and the other side supplies power to the other transformer PLUS the 'switched' AC convenience outlets on the back panel. Pretty sure the blue is the transformer wire, and the yellow the other t-former and the switched outlets.
No matter...the essence of this is that all three wires are shorted together when the switch is 'on'. You can wire up the new switch the way the original is done, or short the two transformer wires to share the power-on current surge.
Note that the stock switch is a little odd, in that the 'common' connection is at the end of the switch, and the 'NC' (normally closed) contacts are in the middle, and the 'NO' (normally open) are at the front of the switch. I have a pic here, but this is only with the bottom removed and only shows one side of the switch well, but you can see that the common is jumpered from one side of the switch to the other, but that the wires for the t-formers are kept separate on their respective side of the switch. You can also see that there are two safety caps...more on this later.

The E-Switch is more traditional in its terminal arrangement. The two contacts in the middle are the common, and the contacts at the back are the NO and the contacts at the front are the NC. Push the switch plunger in, and the center contacts make with the rear contacts. Simple.
So to replace the stock switch, the white can be connected to either the center contacts or the rear contacts...whichever you prefer. But the pins from the left and right of the switch need to be joined, to supply power to both halves of the switch. The blue and yellow wires can be connected to the pins you didn't use (either the back or the center). If you do this in stock form, you'd connect one wire to one side, and the remaining wire to the other side. This will mean you need two safety caps, just like the original setup (first link in this thread has a Digikey PN for a safety cap, use ONLY a UL rated safety cap here!). I do believe it is good insurance to put new safety caps on the new switch.
The last option is to join the left and right sides of the switch for the t-former wires as well. A little more of a PITA, but if you go this route you'll need only one safety cap.
I know this is lengthy, but it's intended for the novice. I've gotten two requests for notes on the Model 500 and 600 in the last week, so there must be a few Kenwood switches dying like flies out there lately. Thought it might be easier to start a new thread here and share for all the guys who might be contemplating this switch replacement.
Last edited:
