

BadassBob
Digitally rendered
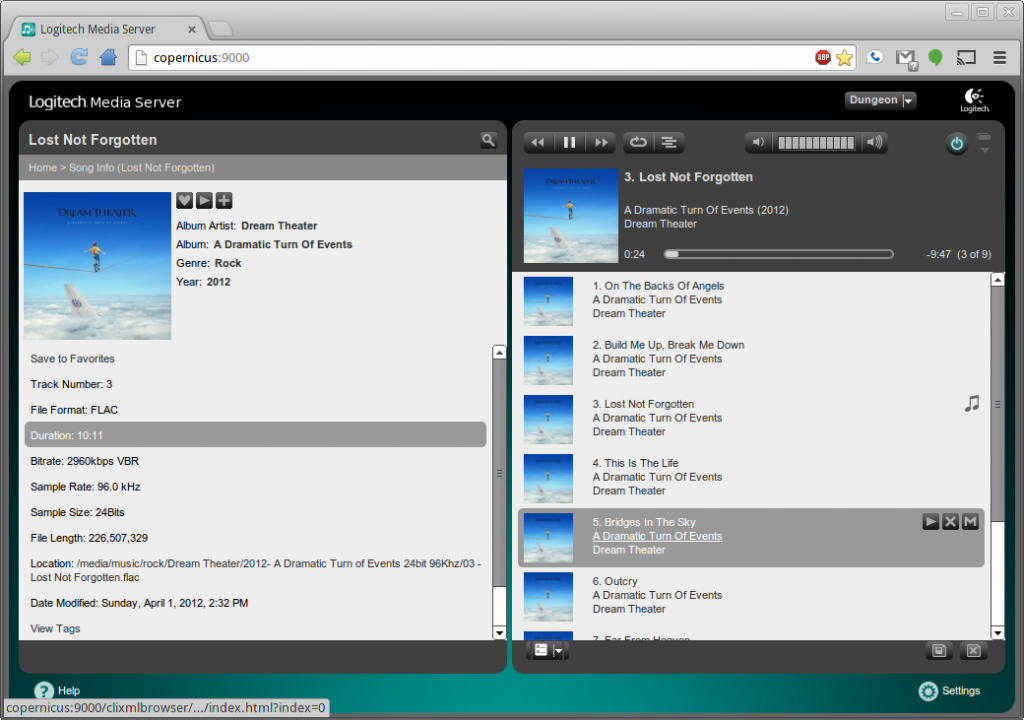
What you will find in the thread below is a way to make a Raspberry Pi computer into the perfect replacement for a Squeezebox. Since the Squeezebox line was discontinued a little while ago, the prices have skyrocketed, leaving a big hole in the market for network music players. There are plenty of alternatives out there, but for the money, the Squeezebox was king. Devices offering similar functionality were often priced many times that of a Squeezebox. Now it's gone, just like that. We will miss them, they brought more audiophiles to the world of computer audio than any other product. The good news is, the Raspberry Pi more than fills the role of a Squeezebox. She sure ain't pretty, but boy can she sing!
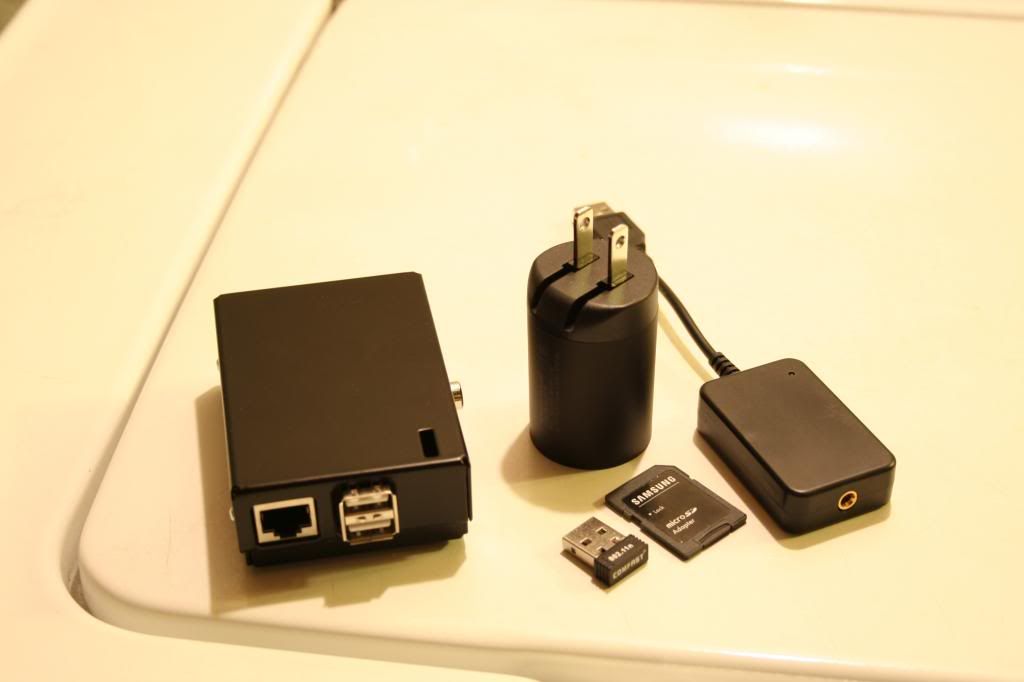
With that out of the way, now we need parts. Some may already have them, but we are going from scratch. This thread assumes you have nothing, so we will start with the parts. The bulk of the cost will be determined in which DAC/transport you choose. Either way, a realistic minimum would be ~$100. This would include the Raspberry Pi unit, enclosure, wifi adapter, SD card, power supply, and DAC.
Here's a little parts list:
Power Supply – tablet charger, and not a cellphone charger
These make for great power supplies due to their nice and beefy 5V 2a output. The 5V 1a charger recommended for the Raspberry Pi isn't enough to power a USB DAC and a wifi dongle without a powered USB hub. My favorite is the HP Touchpad charger, which can generally be found for $10 to $15.
Raspberry Pi
These days, many online retailers carry them. If you prefer to purchase from a brick and mortar outlet, Microcenter also carries them.
SD Card
4GB or more, preferably Class 10.
Wifi dongle
The mini-sized dongles work perfectly. They don't protrude much, and can usually be found for less than $10. A quick eBay search of “raspberry pi wifi” will turn up what is needed.
Case
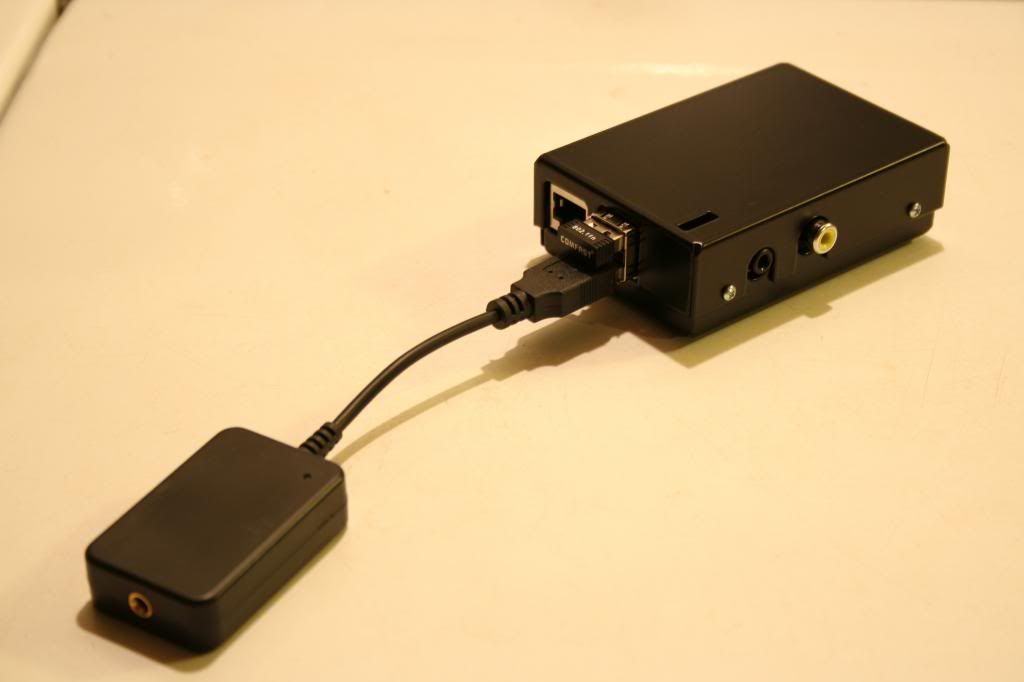
There are more case options than you can shake a stick at. Wood, plastic, metal, whatever. I'm more partial to heavy cases, because stiff cables will toss around a light case like a ragdoll. The case I chose is made of powdercoated steel, and has a very nice heft to it. That bad boy ain't goin' nowhere. No matter the material, a decent case will run ~$20. The cheaper ones are exactly that, cheap. The first case I bought was just small sheets of laser cut plastic, it rattled and creaked, something we are trying to avoid.
DAC
There are many units that work well with the Raspberry Pi. Some of the more popular choices are the M2Tech Hiface, Sabre-based DAC's such as the ODAC and HifimeDIY units, Schiit Modi, HRT Music Streamer II, and the Behringer UCA202. There are many options out there. If it supports Linux, chances are, it will work with the Raspberry Pi.
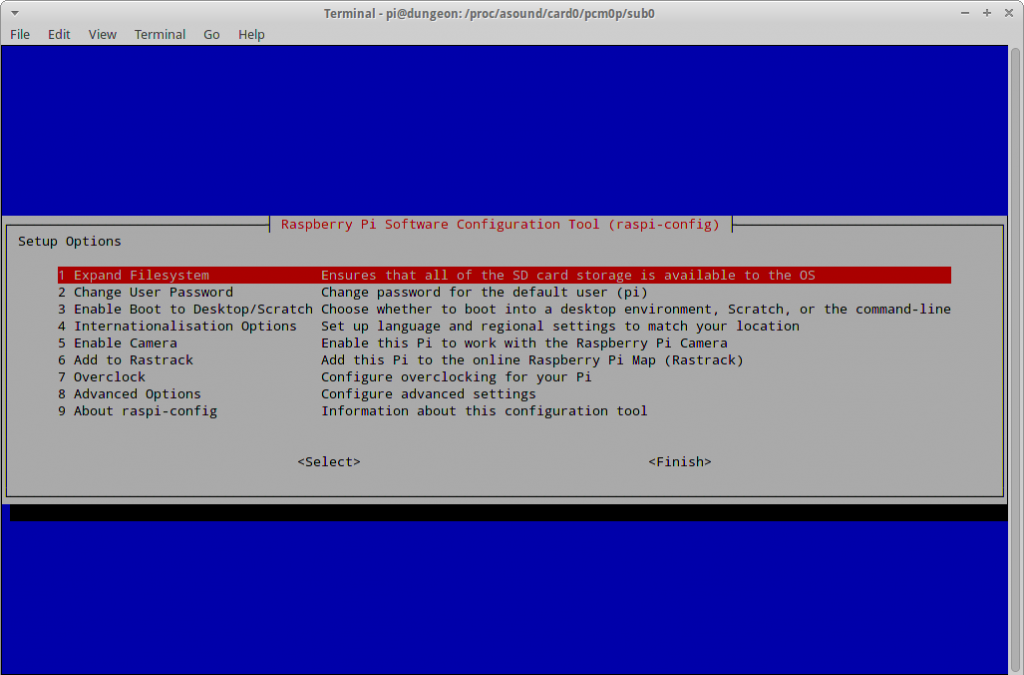
Now that you have a box of shiny new parts, grab yourself a copy of Raspbian Wheezy. Once it is finished downloading, unzip it, so you have a raspbian-wheezy.img file. Now, we need something to write the image to your SD card. Many here are Windows users, and the recommended software in the Windows realm is Win32 Disk Imager. Now that you have that downloaded, install it and proceed to load the raspbian-wheezy.img to the SD card. One thing I would like to stress, if you have any USB storage devices connected other than the SD card, disconnect them!. We do not want to accidentally write over your 1TB USB hard drive. Better safe than sorry. Once the image is written, remove it from your PC and insert it into your Raspberry Pi. Proceed to hook up your Raspberry Pi with a USB keyboard, wifi dongle, HDMI cable, and network cable, then power it on.
First thing, we need to expand the filesystem, so go to option 1 and hit enter. This will make the Raspbian operating system use the entire contents of the SD card.
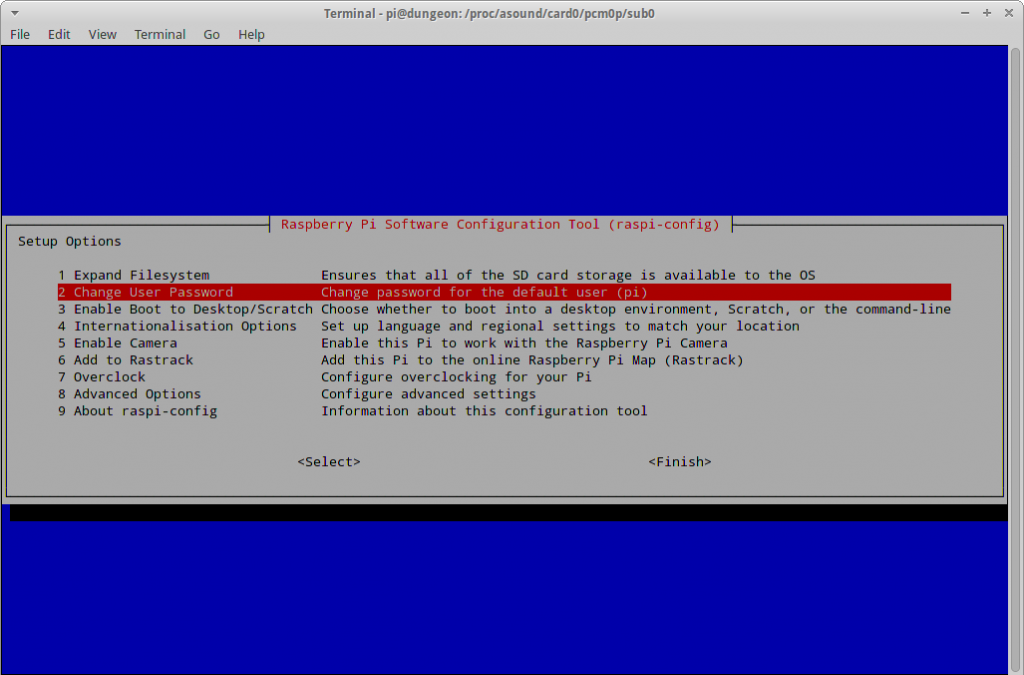
Next we will want to change the user password, so head over to option 2.
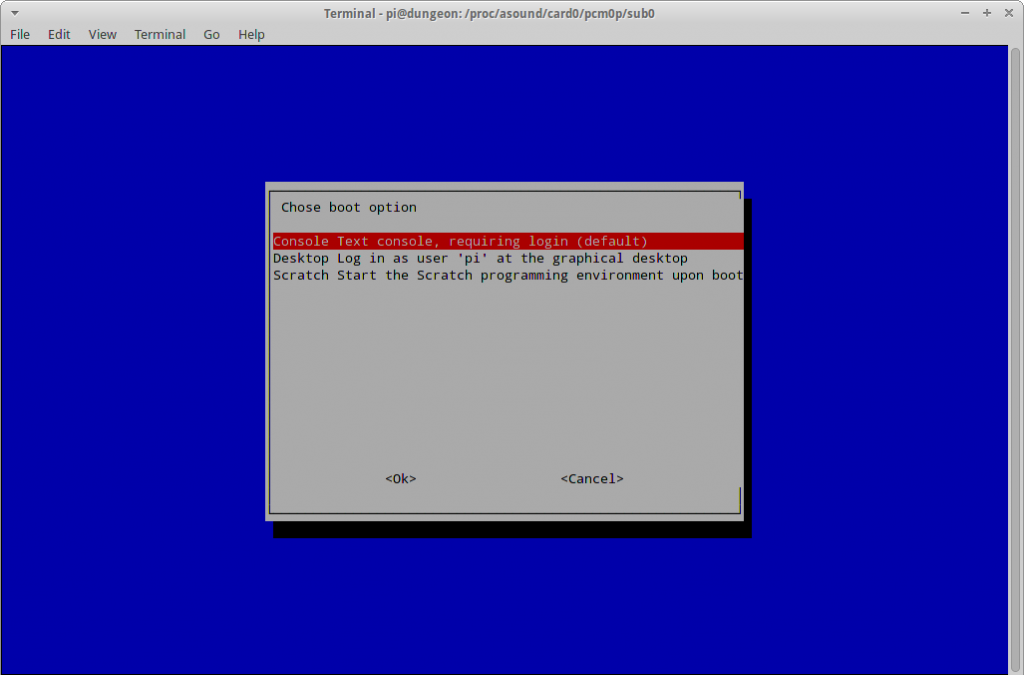
Once you've chosen a password, hit option 3, Enable Boot to Desktop/Scratch and pick the first option, Console Text console, requiring login (default).
Now, we can move on to option 7, overclocking. 900MHz is no issue for the Raspberry Pi without a heatsink. I've been doing it awhile, and haven't had any stability issues.
After you get finished ramping up the speed, move on to option 8, Advanced Options. The first thing you want to do here is change the hostname, option A2. You may pick whatever you wish. It isn't necessary, but you do have the option. Once that's finished, hit option A3, Memory Split. Since we won't be using a GUI with Squeezelite, you can shrink it right down to 4MB. Next, we need remote access, so go to option A4 and enable SSH. Finally, hit the last one, A6, and update. Once it is updated, you will need to reboot it for all changes to take place. To perform a clean reboot, issue the command
Once rebooted, note the DHCP address assigned to the Raspberry Pi. We will need this for SSH access. Now that you have your Raspberry Pi's IP address, you need to download PuTTY, this give you remote command line to access your Raspberry Pi. Simply fire up PuTTY, punch in the IP address of the Raspberry Pi, enter a password, and you are in! Now, you may disconnect the keyboard and monitor, then attach your USB DAC/transport. From here on out, we will be working from a command line over SSH.
When you SSH into the Raspberry Pi, the username will be "pi", and the password whatever you chose earlier. Now that we are at a terminal, we need to remove any unnecessary software. We will need no desktop, no games, web browser, etc. Raspbian is a full-fledged desktop OS, and we are going to make it shed a lot of weight. This is a music player after all, so the bloat has to go.
First, we need to update the Raspberry Pi firmware. This firmware fixes issues with the USB bus, making for a better audio experience. It has fixed many peoples' issues with crackles and dropouts.
Now, we need to shed some weight. This is a long process due mostly to the very low power of the Raspberry Pi. It may take ½ hour or more, so you may step away for a bit while it's working. After this, all of the unnecessary software will be nothing but a dream.
Remove the python games.
Dump the rest of Python.
Let us remove the rest of the things we don't need.
Then we update.
Now, we will enable wifi. First, you need to download wicd.
To start wicd-curses, simply type it in the terminal.
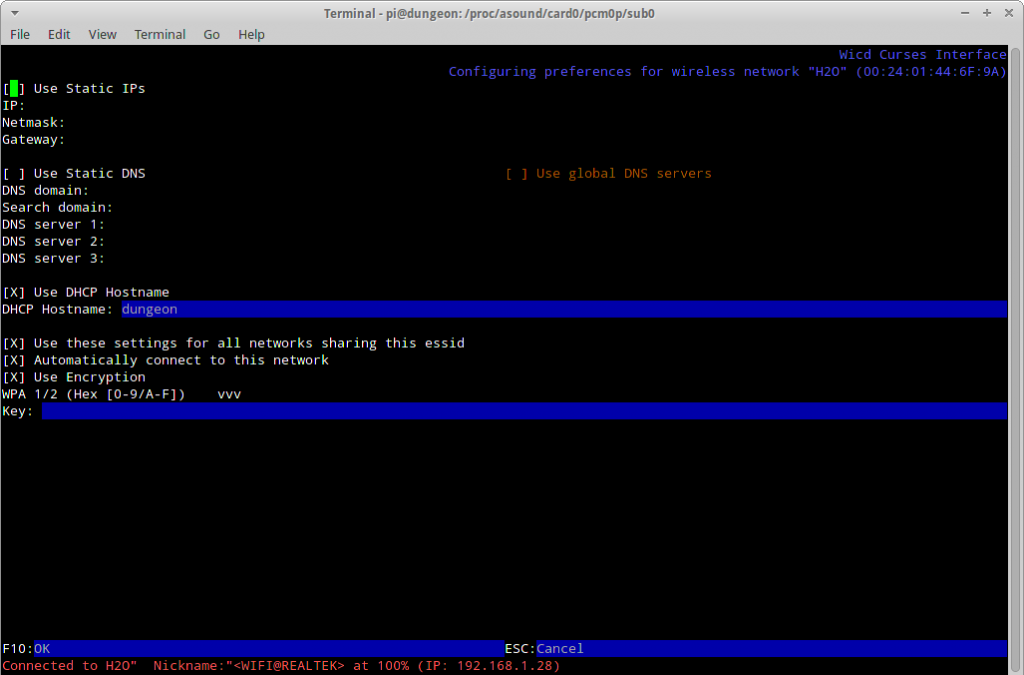
Now, you should be looking at a screen similar to this.
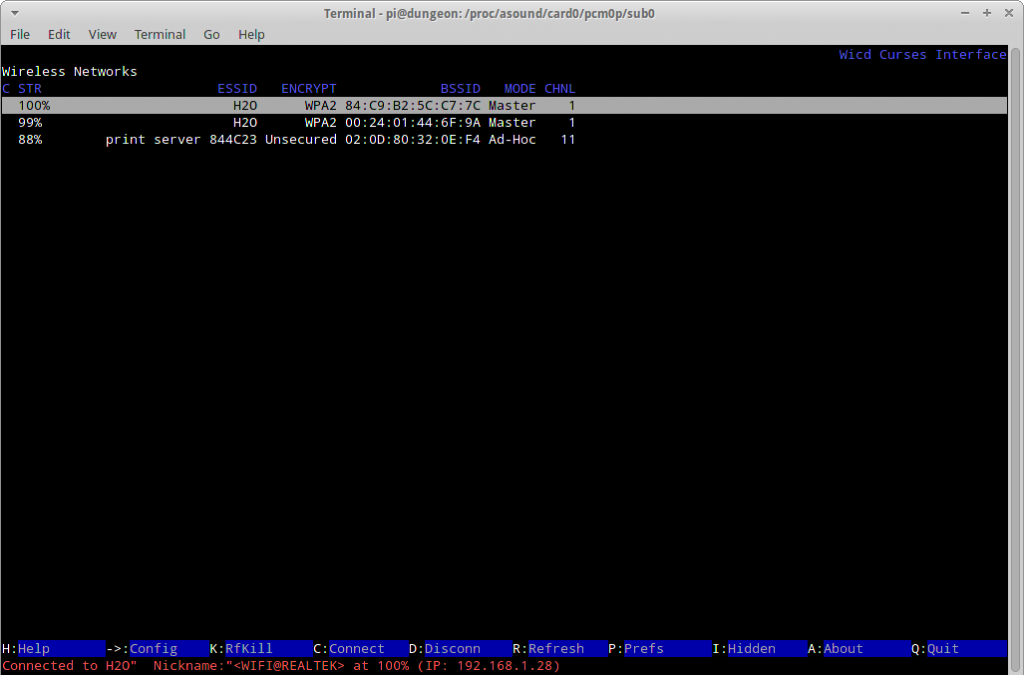
Here, wicd lists all of the available networks. Up and down arrows select the network, and right arrow takes you to the configuration menu seen here. You can use a dynamic IP and input your wifi password, or you can set a static IP. Static would be best, because then you will know your IP address for future maintenance and not have to worry about it changing.
Once the network settings are configured, highlight your network again, and press Shift + C. That will connect you to the wifi. Chances are, it will freeze your SSH terminal, but no worries. Simply refire PuTTY and have it connect to the IP you just assigned. You may now disconnect the LAN cable.
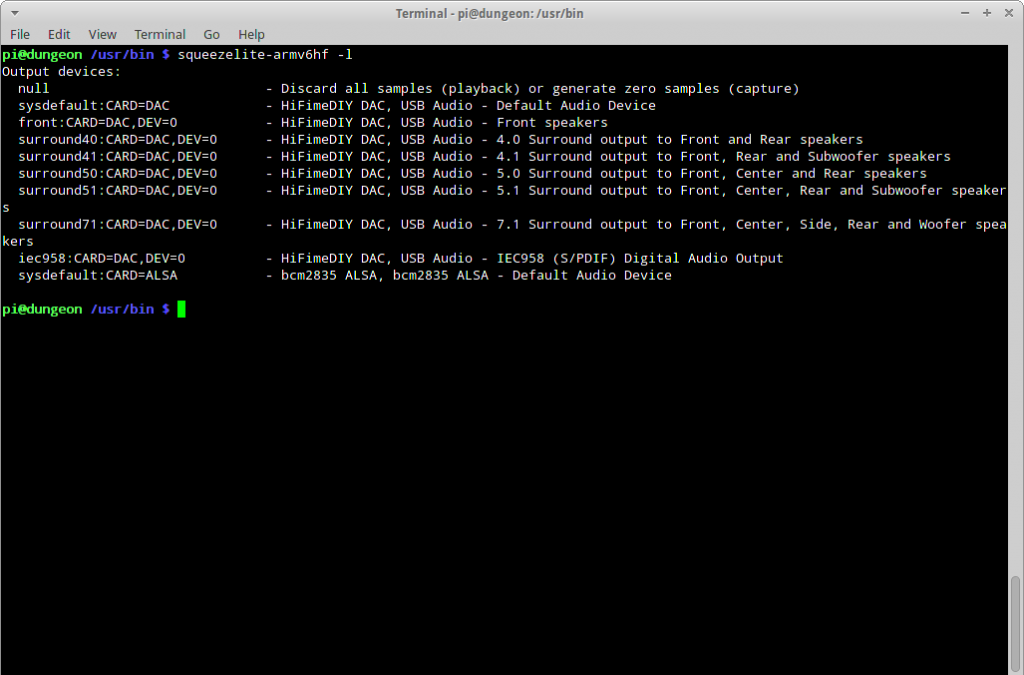
We also need to make the USB DAC the default audio device.
We need to comment out the line that reads
and make it look like this.
Note the #, this will tell the operating system to skip that line in the conf file, making your USB DAC the default audio device. Once the line is commented out, press Ctrl + O to write the changes, and Y to save.
Finally, we need to create our asound.conf file
and add this. Once it is copied and pasted, press Ctrl + O to append, and Y to save, done!
Now that we have a lean and mean music playing machine, it needs to be able to play something. For that, we will use Squeezelite. Before we install Squeezelite, there is other software that needs to be installed. This puppy will play every audio file, but it needs the correct libraries installed first.
With that out of the way, now we need parts. Some may already have them, but we are going from scratch. This thread assumes you have nothing, so we will start with the parts. The bulk of the cost will be determined in which DAC/transport you choose. Either way, a realistic minimum would be ~$100. This would include the Raspberry Pi unit, enclosure, wifi adapter, SD card, power supply, and DAC.
Here's a little parts list:
Power Supply – tablet charger, and not a cellphone charger
These make for great power supplies due to their nice and beefy 5V 2a output. The 5V 1a charger recommended for the Raspberry Pi isn't enough to power a USB DAC and a wifi dongle without a powered USB hub. My favorite is the HP Touchpad charger, which can generally be found for $10 to $15.
Raspberry Pi
These days, many online retailers carry them. If you prefer to purchase from a brick and mortar outlet, Microcenter also carries them.
SD Card
4GB or more, preferably Class 10.
Wifi dongle
The mini-sized dongles work perfectly. They don't protrude much, and can usually be found for less than $10. A quick eBay search of “raspberry pi wifi” will turn up what is needed.
Case
There are more case options than you can shake a stick at. Wood, plastic, metal, whatever. I'm more partial to heavy cases, because stiff cables will toss around a light case like a ragdoll. The case I chose is made of powdercoated steel, and has a very nice heft to it. That bad boy ain't goin' nowhere. No matter the material, a decent case will run ~$20. The cheaper ones are exactly that, cheap. The first case I bought was just small sheets of laser cut plastic, it rattled and creaked, something we are trying to avoid.
DAC
There are many units that work well with the Raspberry Pi. Some of the more popular choices are the M2Tech Hiface, Sabre-based DAC's such as the ODAC and HifimeDIY units, Schiit Modi, HRT Music Streamer II, and the Behringer UCA202. There are many options out there. If it supports Linux, chances are, it will work with the Raspberry Pi.
Now that you have a box of shiny new parts, grab yourself a copy of Raspbian Wheezy. Once it is finished downloading, unzip it, so you have a raspbian-wheezy.img file. Now, we need something to write the image to your SD card. Many here are Windows users, and the recommended software in the Windows realm is Win32 Disk Imager. Now that you have that downloaded, install it and proceed to load the raspbian-wheezy.img to the SD card. One thing I would like to stress, if you have any USB storage devices connected other than the SD card, disconnect them!. We do not want to accidentally write over your 1TB USB hard drive. Better safe than sorry. Once the image is written, remove it from your PC and insert it into your Raspberry Pi. Proceed to hook up your Raspberry Pi with a USB keyboard, wifi dongle, HDMI cable, and network cable, then power it on.
First thing, we need to expand the filesystem, so go to option 1 and hit enter. This will make the Raspbian operating system use the entire contents of the SD card.
Next we will want to change the user password, so head over to option 2.
Once you've chosen a password, hit option 3, Enable Boot to Desktop/Scratch and pick the first option, Console Text console, requiring login (default).
Now, we can move on to option 7, overclocking. 900MHz is no issue for the Raspberry Pi without a heatsink. I've been doing it awhile, and haven't had any stability issues.
After you get finished ramping up the speed, move on to option 8, Advanced Options. The first thing you want to do here is change the hostname, option A2. You may pick whatever you wish. It isn't necessary, but you do have the option. Once that's finished, hit option A3, Memory Split. Since we won't be using a GUI with Squeezelite, you can shrink it right down to 4MB. Next, we need remote access, so go to option A4 and enable SSH. Finally, hit the last one, A6, and update. Once it is updated, you will need to reboot it for all changes to take place. To perform a clean reboot, issue the command
Code:
sudo shutdown -hr nowOnce rebooted, note the DHCP address assigned to the Raspberry Pi. We will need this for SSH access. Now that you have your Raspberry Pi's IP address, you need to download PuTTY, this give you remote command line to access your Raspberry Pi. Simply fire up PuTTY, punch in the IP address of the Raspberry Pi, enter a password, and you are in! Now, you may disconnect the keyboard and monitor, then attach your USB DAC/transport. From here on out, we will be working from a command line over SSH.
When you SSH into the Raspberry Pi, the username will be "pi", and the password whatever you chose earlier. Now that we are at a terminal, we need to remove any unnecessary software. We will need no desktop, no games, web browser, etc. Raspbian is a full-fledged desktop OS, and we are going to make it shed a lot of weight. This is a music player after all, so the bloat has to go.
First, we need to update the Raspberry Pi firmware. This firmware fixes issues with the USB bus, making for a better audio experience. It has fixed many peoples' issues with crackles and dropouts.
Code:
sudo BRANCH=next rpi-updateNow, we need to shed some weight. This is a long process due mostly to the very low power of the Raspberry Pi. It may take ½ hour or more, so you may step away for a bit while it's working. After this, all of the unnecessary software will be nothing but a dream.
Code:
sudo apt-get remove aspell desktop-base desktop-file-utils dictionaries-common dillo fonts-droid fonts-freefont-ttf fontconfig fontconfig-config galculator gnome-icon-theme gnome-themes-standard gpicview gsettings-desktop-schemas gsfonts gsfonts-x11 hicolor-icon-theme leafpad lightdm lightdm-gtk-greeter lxappearance lxde lxde-common lxde-core lxde-icon-theme lxmenu-data midori mime-support openbox omxplayer penguinspuzzle x11-common wpagui python3 python3-minimal python-pygame x11-commonRemove the python games.
Code:
sudo rm -rf python_gamesDump the rest of Python.
Code:
sudo apt-get remove `sudo dpkg --get-selections | grep -v "deinstall" | grep python | sed s/install//`Let us remove the rest of the things we don't need.
Code:
sudo apt-get autoremove
sudo apt-get clean
Then we update.
Code:
sudo apt-get update
sudo apt-get upgrade
Now, we will enable wifi. First, you need to download wicd.
Code:
sudo apt-get install wicd-curses wicd-cliTo start wicd-curses, simply type it in the terminal.
Code:
wicd-cursesNow, you should be looking at a screen similar to this.
Here, wicd lists all of the available networks. Up and down arrows select the network, and right arrow takes you to the configuration menu seen here. You can use a dynamic IP and input your wifi password, or you can set a static IP. Static would be best, because then you will know your IP address for future maintenance and not have to worry about it changing.
Once the network settings are configured, highlight your network again, and press Shift + C. That will connect you to the wifi. Chances are, it will freeze your SSH terminal, but no worries. Simply refire PuTTY and have it connect to the IP you just assigned. You may now disconnect the LAN cable.
We also need to make the USB DAC the default audio device.
Code:
sudo nano /etc/modprobe.d/alsa-base.confWe need to comment out the line that reads
Code:
options snd-usb-audio index=-2
Code:
#options snd-usb-audio index=-2Finally, we need to create our asound.conf file
Code:
sudo nano /etc/asound.confand add this. Once it is copied and pasted, press Ctrl + O to append, and Y to save, done!
Code:
pcm.!default {
type hw
card 0
}

ctl.!default {
type hw
card 0
}
Now that we have a lean and mean music playing machine, it needs to be able to play something. For that, we will use Squeezelite. Before we install Squeezelite, there is other software that needs to be installed. This puppy will play every audio file, but it needs the correct libraries installed first.
Code:
sudo apt-get install libasound2-dev libflac-dev libmad0-dev libvorbis-dev libfaad-dev libmpg123-dev ffmpeg
Last edited:


") .
.