My second sx770

zebulon1

Working on my own stuff. Finally
Subscriber
A little quiet around AK's Pioneer Forum so I though I would post my Current Pioneer project.

I repaired a sx-770 for my Vietnam War Veteran friend last month. He had bought it when he was stationed there in the late sixty's. It was my first cap coupled amp repair and was a fun project. I had bought a donor 770 to complete the restoration, providing all the missing parts needed to make it perfect. The donor was missing the transformer, speaker terminal assembly and power cord. The serial number indicated it was a late model in the production run.
Having a spare donor, I went on a search for a broken 770 to restore and low-and-behold I found one. This one is an early model where the tuner board is quite-a-bit different. The pictures show the differences. Also, you'll notice I included a image of the donor unit's amp board using the replacement outputs.

Note to others:
When I started this hobby, I went for the big sets and soon realized they were a hand full. It took several years and help from the great members here on AK to figure out how to work on these beautiful sets. In retrospect I would of started on sets like these 770's and would of been a lot further ahead.

Late model tuner board:

attachment.php


Early model tuner board:

attachment.php


I started looking at the amp board for the project set. I have a Mouser order in for all the caps and transistors. I use standard equivalents we have been using here in the Pioneer Forum. 1220's, 2690's, 1845's and 1815's.

attachment.php


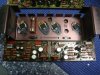
This Amp board is from the donor set. The previous guy used Motorola P41C917's for the outputs and modifing the back/trace side to make them work. A pretty good job was done but the outputs on the project set's amp board are in good shape.

attachment.php


Project set below. I am going to use the faceplate from the donor set as it is mint with no flaws. The bonnet will get veneered with a quartersawn walnut and should look pretty classy.

attachment.php
 

Attachments

  • Pioneer sx-770 1.jpg
    Pioneer sx-770 1.jpg
    78.6 KB · Views: 175
  • Pioneer sx-770 2.jpg
    Pioneer sx-770 2.jpg
    103 KB · Views: 171
  • Pioneer sx-770 5.jpg
    Pioneer sx-770 5.jpg
    131.7 KB · Views: 169
  • Pioneer sx-770 4.jpg
    Pioneer sx-770 4.jpg
    110.5 KB · Views: 345
  • Pioneer sx-770 3.jpg
    Pioneer sx-770 3.jpg
    123.3 KB · Views: 175
Last edited:
Like that screwdriver and med bottle holder you are using, hope you don't mind if I duplicate it :D
-Lee
 
I finished the amp today:
Cleaned and inspected board and resistors.
Installed new caps and transistors.
Set the amplifier settings to MTF's spec's.

Rebuilt the power supply yesterday:
Four caps and three transistors. Wow!

Waiting for the lamp order to arrive and then tackle the front. The 770 has a dial pointer lamp that's a little chore to change. Only one lamp was working on the set when I received it.

Below, the completed Amplifier board:

attachment.php


When I can, I like to run the amp assembly separate from the set and get everything dialed in before I install the complete assembly. I developed this method (I know I'm not the first! :D) after working on the Luxman's, particularly the R-1120's. I am getting much better at fixing things the first time :yes: but I like the access.

attachment.php
 

Attachments

  • 770 amp complete 2.jpg
    770 amp complete 2.jpg
    154.5 KB · Views: 672
  • 770 amp complete 1.jpg
    770 amp complete 1.jpg
    118.7 KB · Views: 123
You guy's were commenting on my Bench:
I found this 32 inch Panasonic LCD and a Sony Blueray player at a yard sale for $75.00 and thought of a use for it. It works great except when it goes off right when I'm looking at it. But as you can see It is quite a organized mess. My shop is the garage here in Las Vegas. No cozy basements like I used to have when I lived in Wisconsin. Working the electronics and other hobbies in the same three car garage is convenient. I like to do other things throughout the day and breaking off of one project actually keeps me on track with the others. I also enjoy working with the door open and taking in the Nevada sun and air.

attachment.php
 

Attachments

  • work bench.jpg
    work bench.jpg
    107.4 KB · Views: 102
I finished the amp today:
Cleaned and inspected board and resistors.
Installed new caps and transistors.
Set the amplifier settings to MTF's spec's.

Rebuilt the power supply yesterday:
Four caps and three transistors. Wow!

Waiting for the lamp order to arrive and then tackle the front. The 770 has a dial pointer lamp that's a little chore to change. Only one lamp was working on the set when I received it.

Below, the completed Amplifier board:

attachment.php


When I can, I like to run the amp assembly separate from the set and get everything dialed in before I install the complete assembly. I developed this method (I know I'm not the first! :D) after working on the Luxman's, particularly the R-1120's. I am getting much better at fixing things the first time :yes: but I like the access.

attachment.php

You are not the first, I think all of us "transistor nerds" do the same.

Mini grabber link?
 

Nice workbench. I'm going to build something better in our basement once some walls go up and I can put a door with a lock on it to keep inquisitive teenagers out. For now I have a small folding table in my media storage/sedondary system room (aka front office).

Careful with those crocodile clip jumpers. I've been burned by them in the past. Most I've seen they're made by folding the stripped wire back over the jacket then crimping to the clip. The joint is crappy and gets worse with time as the copper oxidizes. I always rebuild them by sliding the cover back, opening the crimp, lap soldering the wire to the body of the clip then recrimping over the insulation once the clip cools.

The bench (way too small) and yes, those are Indignias flanking it


Secondary system:
Yamaha PX-3, Arcam Delta 290 integrated, Platinum Audio Quattro speakers, B&W P7 'phones


My pet DBT, properly wired to preserve hot, neutral, and ground
 
Very, very nice! The details are all over the place. Nice work!! :thmbsp:

You don't need alot of room to feed the hobby, that's what's agreeable to me.
I'm not counting the completed or set's in the Que. :tears:
 
Firing it up after the PS and Amp restoration it sounded like poop. Popping and static in the switches and controls. FM sounded better than the AUX with a line level signal. Strange, but I had to complete the Deoxit treatment and rebuild the Control amp (-039) so I wasn't too concerned.

Finished Recaping, and Deox'ing the Control Amp and Push switch board W15-087. The 087 board has one strange looking .47uf cap, replaced with a 50v Panasonic film.

She is sounding better and better each minute she plays.

Last board is the Head amp (-032) (EQ, Phono board).

attachment.php
 

Attachments

  • 770 control and front switches.jpg
    770 control and front switches.jpg
    127.3 KB · Views: 67
I wanted to mention that the push buttons on the 770 sets can be differant. It seems the early models had a small slot to accept the switch stem where the late models have a cross pattern. They both will work but when using the late buttons on an early set you will need to spread the switch stem open slightly. This will add some friction and secure the button to the stem. If you are going the other way it will require more time to file and shave the button and switch to make things fit. Heads up!

Early on left and late button on right:

attachment.php
 

Attachments

  • 770 push buttons.jpg
    770 push buttons.jpg
    107.4 KB · Views: 67
"Interalian" You are right on with the jumpers. I only use them when I know they won't short against anything. Still every time I use them I cringe a little.

I your new shop try to incorporate a standing workbench along with a sitting one. I would love to have one (Standing) and I do but it is occupied with another hobby.

I will save for some Micro clip Jumpers.
 
I used the KSC1845's and KSC2383's for the Head Amp transistors. With the new caps and silicon the Phono is working better than ever.
Note:
This set has both magnetic cartridge and ceramic cartridge provisions. Nice

2SC871 = KSC1845
2SC870 = KSC2383

attachment.php
 

Attachments

  • head amp.PNG
    head amp.PNG
    61.4 KB · Views: 48
The images I posted above in which I captioned them as the tuner are in fact the MPX boards. The boards are different and the schematics are found at two different sources.

I have the set running and in top form sound wise but the stereo light will not illuminate. Good signal and seems to have separation. The lamp is good. I clamped on to the lamp terminal with the DMM looking to see a voltage drop when she gets tuned in. No dice. It is not grounding the lamp when in stereo. I tinkered with the trimmer located on the MPX board with no improvement.

I'm thinking of swapping boards? Old board for the newer version and see what happens.
 
Back
Top Bottom