Kenwood KX-1030 Belt Replacement

RichK1

Active Member
I recently replaced the belts in my KX-1030 cassette deck so I thought I should post some pictures. I got the replacement belts from http://www.vintage-electronics.cc/kenwoodkits.html

The job was easier than I thought it would be. I must credit my friend Bob with discovering the solution. I only replaced the Drive Belt and the Take-Up Belt. I did not replace the two Counter Belts.

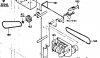
After opening the case, I only had to remove one screw. You have to replace the Drive Belt first. There are two screws to choose from to make space between the Flywheel and the Flywheel Holder: The Flywheel Thrust Screw or the M2.6x6 screw shown in the attached pictures. I did not want to mess up the Flywheel Thrust Screw which is nylon and probably not replaceable, so I removed the other screw which is metal.

I had to use a small Vice-Grips tool to apply enough torque to break the glue on the screw. I had to flex the Flywheel Holder Bracket just enough to sneak the belt behind the Flywheel. I used the hooked end of a bicycle spoke to manipulate the belt around the Flywheel and Motor Shaft.

After replacing the screw, it is very simple to install the Take-Up Belt using the spoke.
 

Attachments

  • KX-1030 Overview.jpg
    KX-1030 Overview.jpg
    128.5 KB · Views: 1,181
  • KX-1030 Belts.jpg
    KX-1030 Belts.jpg
    118.7 KB · Views: 1,239
  • KX-1030 Flywheel Screws.jpg
    KX-1030 Flywheel Screws.jpg
    108.1 KB · Views: 1,113
  • KX-1030 Another View.jpg
    KX-1030 Another View.jpg
    120.8 KB · Views: 1,136
Thank you for the fine labeled photos and tips. Now if I can just get rid of the staticy noise in mine.
 
Fantastic thread! I thank you for the labeled picture too, it is a very straight forward step by step that has me looking into doing it too! :thmbsp:

I sent you a PM, I am hoping to score the belts at a reasonable price, otherwise and unfortunately this beauty is going into craigslist as a parts unit, even though it's mint and came with the original box. :(
 
Nice work, your post couldn't have come at a better time as I just ordered a belt kit for my 1030 as well. :yes: :thmbsp:

Scott
 
Thanks for posting

I just picked up a KX1030 today for $3 at a thrift store. It didn't work and I took a chance on it. The main drive belt was totally gone and at first I didn't even realize that there should be one there. I'll be ordering a kit and with your post I'll soon have a new deck.
 
Looks like its my turn to post my experience with a belt replacement for a Kenwood KX-1030...

With some feedback from RichK1 (thanks for your help Rich!) I was successful in replacing the Drive Belt and the Take Up Belt, though I did have to loosen up the nylon Thrust Screw to slip the belt Drive Belt past the fly wheel. (see photo) Tricky and delicate operation, and I got very lucky with the green glue.

Feeling on a roll, I went after the Counter Belts. Not too bad an operation once you get the faceplace off (also see photos). Though I was only able to get to the main Counter Belt, and had to pass on the other, the drive operation seems alot smoother.

Still working to get the sound adjusted properly... but I'm on my way!

IMG_2710.jpgIMG_2725.jpgIMG_2726.jpg
 
Nylon Flywheel Thrust Screw

I am glad I was able to help.

You used a slightly different method than I did. You removed the Nylon Flyweel Thrust Screw instead of the M2.6x6 screw. This is fine, in fact it is probably the "factory approved method", although the service manual gives no clue.

In any case, since you removed or at least loosened the Flywheel Thrust Screw, you will need to re-adjust it. The purpose of this screw is to keep the flywheel from wobbling. If it is too tight or too loose, the speed will be uneven. This will create the effect of "sounds like listening to a tape underwater" you described in your PM. Fiddle around with it and you should be able to get it the way Goldilocks likes it, "just right".

As far as the counter belts, from the picture, it looks like you were able to replace the more difficult of the two: the belt between the cassette reel and the idler pulley. This requires removal of the faceplate. You can replace the second one, the one that goes between the counter idler pulley and counter itself, without removing the faceplate. Just pull the first one off the idler pulley, remove the old "second one". As you remove the old one you will see the path the new one will need to take. Install the new "second one", threading it underneath and around some obstacles of course. Then replace the first one back onto the idler pully. If your fingers are as fat as mine, you will find a small hook indispensible. I used a bicycle spoke, but you could use a crochet hook or whatever.

Rich
 

Attachments

  • counter belts.jpg
    counter belts.jpg
    59.8 KB · Views: 383
Excellent thread, at aglance Ithought I wa doing a complete disassembly. Now it will be a couple hour job + counter belts.
Thanks
Jeff
 
thx for posting these instructions, I had one I was going to give up on but now will try to save it.
 
I must be missing the obvious :drool:, but can anyone tell me the secret to removing the faceplate on the KX-1030? I have the screws off the top & bottom and all control knobs & switches off. It feels like something holding the faceplate near the cassette well/door. Any help would be most appreciated.

EDIT: Finally found it! Remove the door by sliding it upward after opening it.
 
Last edited:
KX 1030 going in now

Alright guys, I have been busy since, well my last post. I have put all of your comments together in a word file as a guide.

I picked up a briefcase ful of Country cassettes at an estate sale. I have a cassette in the truck, and the wife likes country. She said she wished she had a cassette deck since I scored all these tapes. I told her we have this one lol. So I got my marching orders to the bench.

I am stopping on tuner mods to fix the KX 1030 and I will add a list of caps/resistors I change as well, and add to the file.
Thanks for the thread Rich/Almost There/Neal

I can't post the file here as an attachment, no clue as to why. After cap replacement I will make it available for RIch or someone to edit/post as they see fit.
Jeff
 
Now it will be a Saga

This deck is chock full of Nippon Chemicon caps. :yuck:

Belt replacement looks to be a cinch, capacitor replacement, not such a cinch.
40or 50 caps, C307 looks bulged, and has a red mark on it already.

Yep, bulged cap, Nippon Chemicon, what a surpise. :thumbsdn:

Mouser & I are already on a first name basis as it is. Guess we will be going steady....
Jeff
 
40 minute job

Not bad. I opted to remove both metal screws for more flex, and an easier installation.

I found that lacquer thinner takes the melted rubber right off the metal parts and the nylon wheels. Lacquer thinner has no effect on nylon, that I am aware of.

Having written that, melt your deck at your own risk.

I used Q Tips and Make up removing pads stolen from the wife (she doesn't read AudioKarma) and I followed up with Ardrox to neutralize everywhere.

Ardorx is an aviation glass cleaner, and leaves behind no residue best I know.

Having written that, these belts do not tolerate anything chemical getting on them before they melt. So we shall see how the Ardrox performs.

I have blasted small parts, cleaned with alcohol before painting, and gotten fish eye. I blasted again, cleaned with Ardrox, perfect paint job.

You can look up the MSDS on Ardrox, I just tossed the dice here on no residue.

I have two belt kits, and they put two of the large flat rubber belts in each kit.

If my belts melt, I will report that here.

Now, if you will excuse me, I have to make a Mouser list for 4 to 6 dozen capactitors to change out.

Jeff
 
dragging now

I rebuilt the power supply in about an hour, changed the one blulged cap.

Lots of dragging issues, I did not remove the thrust washer nylon screw. I am now wondering if I disturbed it somehow, or if this is going to be pinch roller issue.

I have the Service manual, I will spend one more evening before this becomes a set aside for a while longer. If I have to disassemble to clean, no room on the bench right now.

I will just play tapes in the truck for the wife until I really have sometime and room.
Jeff
 
Thank you Richk1, You saved my kenwood kx1030 from the junk pile, I followed your instructions and every thing worked out fine. I was able to break the small metal screw free from the green goo with needle nose vice grips. I fed the flat drive belt behind the nilon screw by slightly flexing the metal hold down plate. Great detailed photos.

Thanks,
Doug
 
Great thread !!
I just snagged a super clean KX-1030 at the thrift for 5 bucks.
I suspected the belt had turned to goo, instead it lost all elasticity just hanging there.
Yay no goo to try to clean up. All I need to get is belts.
bob
 
Back
Top Bottom