

I got two persons asking how I polished my TT dust cover in the "fixing those scratched dust covers"-thread. As I wrote a thread on a swedish forum about this and took pics of the process I might aswell post them here. As there was a lot of pictures I publish these in this thread, not ruining the original thread.
IMPORTANT!
I don't take responsability for any cautions maybe by these procedures.
You do this at your own risk!
Do it outside and use crappy clothes that you don't care about.
This is only my own thoughts and trial methods to obtain a clear dust cover. I haven't use this practice proffessionally and it is my first polished cover.
Do not do this in direct sunlight or UV-light.
IMPORTANT!
These steps does not cover the process of sanding with wet sanding paper. If you have deep scratches you have to use fine wet sanding paper to get rid of deep scratches. I have not tried this(yet) so I can't give you any help about this.
Here is a theoretical pic of the problem. A cut through in microscopical view.

1. The material with scratches
2. Dream scenario would be to sand/polish it down until the surface is perfectly even.
3. Cheating a bit and less work as point 2. Will make the cover a bit bulby with big slopes that can be seen.
4. This is what I am going to obtain. Reducing the sharp edges of the scratches will reduce the angles creating less optical/visually visible scratches.
I am doing this in 3 steps.
1. Polishing with machine and metal polish. (Autosol)
2. Polishing with machine and car polish.(Sonax car polish)
3. Polishing by hand with Meguiars PlastX.
Everything I use can be bought at a car service store, which makes shopping easy.
First, decide what finish you want before you start this procedure, otherwise you can go on forever. If you want it like new, depending on original shape of the cover of course, most times you have to wet sand.
I took a lid that was quite abused for a Pioneer PL-516. As it was going for the thrash the former owner had put som other stuff that put rust on the lid aswell. I got the record player for free, cleaned and lubed the engine, new belt and finally polished cover made it look quite OK.
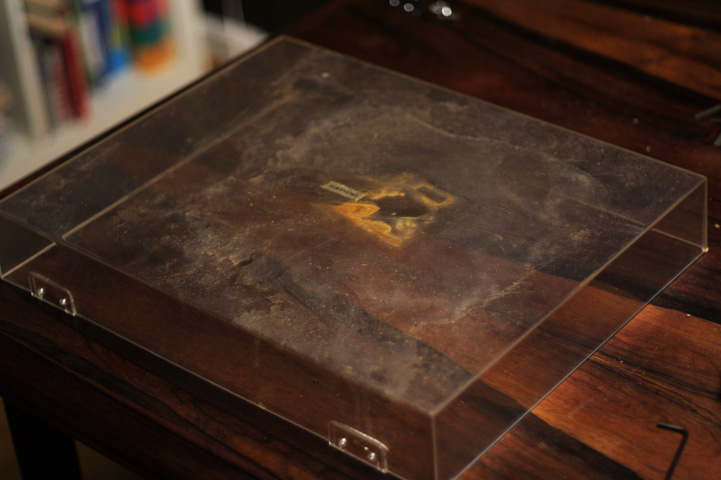
Cleaned with hand dish soap(?) and a soft sponge:

Rust:

Acryl/Plexi can be fragile. Use something similiar in size inside the cover to even up the load(for example some books). The cover must be above the table/ground and NOT standing on its sides. Apply a soft towel over the books for softer landing and better friction.

Now use masking tape for covering the aluminium label/logo if there is one at your lid.
I used a oscillating polishing machine with double pads.

New pads:

Oscillating(this means that the pad is rotating around its own axle while it rotates.):

HERE IS A CRITICAL POINT! DO THIS OUTSIDE! (look what happened to me):


Start the machine with the pads touching the lid and stop with the pads touching the lid, DON'T LIFT IT.
Use systematic patterns while polishing, for example:

Bad example:

IMPORTANT!
I don't take responsability for any cautions maybe by these procedures.
You do this at your own risk!
Do it outside and use crappy clothes that you don't care about.
This is only my own thoughts and trial methods to obtain a clear dust cover. I haven't use this practice proffessionally and it is my first polished cover.
Do not do this in direct sunlight or UV-light.
IMPORTANT!
These steps does not cover the process of sanding with wet sanding paper. If you have deep scratches you have to use fine wet sanding paper to get rid of deep scratches. I have not tried this(yet) so I can't give you any help about this.
Here is a theoretical pic of the problem. A cut through in microscopical view.
1. The material with scratches
2. Dream scenario would be to sand/polish it down until the surface is perfectly even.
3. Cheating a bit and less work as point 2. Will make the cover a bit bulby with big slopes that can be seen.
4. This is what I am going to obtain. Reducing the sharp edges of the scratches will reduce the angles creating less optical/visually visible scratches.
I am doing this in 3 steps.
1. Polishing with machine and metal polish. (Autosol)
2. Polishing with machine and car polish.(Sonax car polish)
3. Polishing by hand with Meguiars PlastX.
Everything I use can be bought at a car service store, which makes shopping easy.
First, decide what finish you want before you start this procedure, otherwise you can go on forever. If you want it like new, depending on original shape of the cover of course, most times you have to wet sand.
I took a lid that was quite abused for a Pioneer PL-516. As it was going for the thrash the former owner had put som other stuff that put rust on the lid aswell. I got the record player for free, cleaned and lubed the engine, new belt and finally polished cover made it look quite OK.
Cleaned with hand dish soap(?) and a soft sponge:
Rust:
Acryl/Plexi can be fragile. Use something similiar in size inside the cover to even up the load(for example some books). The cover must be above the table/ground and NOT standing on its sides. Apply a soft towel over the books for softer landing and better friction.
Now use masking tape for covering the aluminium label/logo if there is one at your lid.
I used a oscillating polishing machine with double pads.
New pads:
Oscillating(this means that the pad is rotating around its own axle while it rotates.):
HERE IS A CRITICAL POINT! DO THIS OUTSIDE! (look what happened to me):
Start the machine with the pads touching the lid and stop with the pads touching the lid, DON'T LIFT IT.
Use systematic patterns while polishing, for example:
Bad example:


