Revox B 795

Robie

Live it or live with it.
Subscriber
Revox B 795 TT

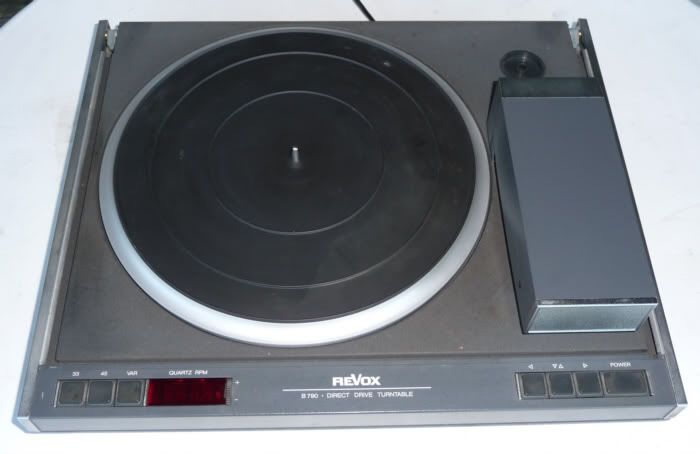
A friend was moving and hadn't unpacked this TT in over 10 years. He not only gave me his similarly unused B&W DM-3000s but also threw in his Revox B 795. I've finally unpacked it but the flat black vinyl covering on the base seems to have turned into a sticky mess that stuck to the Styrofoam packing material. Regardless, it still seems to turn and function mechanically although the platter seems to need a hand assist to begin spinning. Once it spins, it continues and seems stable.

All I've done is clean the arm rails with alcohol.

It came with some type of Grado that looks remarkably like my old, Grado, Signature 8MX. Can't really identify which model without taking it out of that imposing tangential/linear tracking arm.

In the box was also an old unmounted Dynavector 10x3 with original purchase receipt (purchased in 1982) but the stylus seems to have very little diamond left (it's very, very tiny). Pics and a review to come but it may be a couple of weeks. Also, I seem to have all the Revox literature that would have normally come with the 795.
 
Last edited:
Excellent gift from your friend.

The paint used on Revox gear is nice looking if in good condition but seems to be very sensitive to age and storage conditions.

In any case, don't attempt to clean the base using any kind of thinning or cleaning fluids. They will simply disolve the paint and make a sticky mess.

The best way to clean a Revox cover or TT plinth is to strip it down of all electronics and mechanical parts and then rinse it with mild cream hand soap and mildly hot water. Don't rub it, just let the soap and water do their trick.

If the plinth finish has been shot by the styrofoam, then you might have the base of a project: to paint it black piano gloss. I also have one B790 with a plinth beyond salvation of paint and am considering either piano black or ferrari red.
 
Finally got it hooked up to my old McIntosh MA230 as it is in a location where I have room for a TT and the old Mac has provision for 2 TTs. Surprisingly, it works despite being packed away in its box for +/- 10 years.

Sounds good but the 33 RPM was flashing intermittently at first. It seems to be on continuously after the first LP.

It has some type of Grado on it but the linear tracking arm looks so complicated it's hard to tell what type and I don't want to mess with it. It looks like my old Grado 8MX but then so do half the other Grados out there. I'll get some pics later today.
 
The ReVox items of that period were coated with a suede finish paint called Nextel. I think 3M made it. It is still available. Soundcraft used it also.
 
Hi Robie,

What a nice friend you have that gives you great stereo equipment. When you clean the rails, you can lubricate it with WD-40 this is similar to that Revox used. All Revox record players I've seen have all poor surface finish, but it is possible to fix. Revox record players is probably one of the best linetrackers out there they are very robust in their construction.

I have a B 790, which I found in the garbage room when I throw a bit rubbish it is fully functional but was very dirty, although it also had a bad finish but I will in future take some time to renovate it but then I will probably paint it with other colors.

Here is my record player

P1000568.jpg


Good luck with your ReVox player Robie.

Anders
 
I am now a B 795 owner. Mine has a Signet MM Cartridge installed in it. Problem is cueing is intermittent. What's involved in repairing this? I'd like to get it back to health. Thanks! Nice turntables the ReVox Linatrack line is. :tresbon:
 
Hi All -

I can answer most B79x questions if you want to PM me.

Kent, I answered your "damper" question on the Vinyl Engine site just a few weeks ago - do a search.

The Nextel finish that Revox originally used was made by 3M. It was of a formulation that decayed due to air pollution and eventually turned sticky. I've found that the BEST way to restore the finish (somewhat) is to COMPLETELY strip the TT of all electronics/mechanical parts and then wash the base and top plate in the dishwasher using a standard dishwasher soap - let it air dry, DON'T have the dishwasher heat dry it!! It is possible to refinish the table with new Nextel, but it will be expensive - the new paint DOES NOT get sticky, it was reformulate. The present owner of Nextel is the German firm of Mankiewicz and their web site of colors is:

http://www.nextel-coating.com/technischeinformationen/default.asp?lng=eng

The Revox color is B21, the "Dark Anthracite". Unfortunately, this paint is only sold in containers of 2 Liter sizes and you need a primer and color coat to do the job. Strap on the seat belts, the cost of 2 Liters is $170!! I had a B77 case, B790 top/bottom, B791 top/bottom repainted and my bank account is still in shock, BUT IT SURE LOOKS NICE!!

P.M. me and I can send any of you who are interested a small archive of documents on setup and work I've done on my B79x units. They are great tables flying below the radar for now, I'll never give mine up.

Dale
 
Thanks for the replies from everyone. It continues to amaze me that others have weighed in particularly those from so far away but I guess that's just AK and the internet now days.

I've downloaded the Service Manual and Operation Manual from both Vinyl Engine and Studer. I also cleaned the rails again with alcohol and will lube them up with WD-40 as recommended. However, the platter still requires some help (hand assist) to get spinning each time I start it. All other functions seem fine except as follows.

After playing some known albums it's evident that the platter speed is not constant. High notes in particular seem to "warble". What a shame, as this unknown Grado is really a killer cartridge in spite of the warbling and there is a noticeable lack of surface noise. Also, none of the dreaded Grado hum.

As this TT was in storage for so long, I'm thinking (really hoping) it could just use some "exercise". I was planning on leaving it spinning all night on 45 RPM and reassessing tomorrow.

Does anyone have experience with this problem?

K.A.B., BTW my son's name is Anders, and my Grandfather was from Osby.
 
Last edited:
K.A.B., BTW my son's name is Anders, and my Grandfather was from Osby.

Wow thats odd I live about 40 km from Osby but Anders is a common name in Sweden. Can you speak Swedish, or just understand what they're talking about.

Anders
 
As this TT was in storage for so long, I'm thinking (really hoping) it could just use some "exercise". I was planning on leaving it spinning all night on 45 RPM and reassessing tomorrow.

Does anyone have experience with this problem?

It doesn't really need an excersise. But if you do that, first make shure the shaft is clean, otherwise you will ruin the bearing. First, remove the platter and then the sub-platter (which doubles as a rotor) by carefully pulling it upwards. The spindle is extending to the bottom and fits into the shaft, pivoted on a teflon like lining in the bottom. At first it might seem not coming out, but it's vacuum underneath that's holding it there.

Clean the shaft and spindle with a cotton swab and pure alcohol. Then apply just one or two drops of light machine oil in the shaft and carefully drop the platter in place. If it fits right then it should remain "suspended" by the air bubble formed under it. Don't worry, just rotate the platter by hand a few turns - don't push it.

You can then let it burn-in for a few hours.

But the golden Frako electrolytes inside are a ticking bomb. You'd better replace those at the first opportunity - or sign of erratic performance.

The speed LED is a quartz lock indicator. It probably means there is an adjustment slightly off. But the warbling sound is what made me think there's dirt in the shaft or the oil has dried out.

Dale - I've also contacted Manciewicz in Hamburg. It appears that the price of paint plus shipping would be enormous. Tried sharing costs with a couple of other people localy but it didn't work out. There's a guy in Germany that is also offering to paint parts at a almost reasonable price if shipping isn't put into consideration. His name is Josef_sharf and that is his ebay handle. Also has a website.
 
I will go to vinyl engine and check that post. Thanks. I plan on downloading owners and service manuals tomorrow. I plan then on replacing all Frako electrolytics ASAP. This turntable has had little use in years. I am hoping the above steps and frequent use cures it's ills. I like it. Thanks! :tresbon:
 
Ask Dale aka boyerd001, I found a thread on another forum about B790 where Dale mentions that he can help. I sent an e-mail to Dale about how to renovate a B790 I got a long list of things to do which shall be done after all other projects are completed.

Thanks Dale for your e-mail and what to do list I received from you.

cheers
Anders
 
I cleaned and relubed the bearing and wiped a thin film of WD-40 on the rails.

After reassembly, the platter spun right up to speed as described in the operation manual even though the 33 RPM light flickered a bit upon start up. The light is constantly on after a few minutes but will blink every minute or so.

However, it now no longer starts on its own without a "hand assist" and unfortunately, every record I play still sounds very warbled (like obvious off-key singing and instruments all with a slow vibrato). I'm now wondering if it's either an adjustment or electronic problem. I'll PM Dale and see if he has any insight.
 
Hi Robie

Got your PM.

I'm not so sure I would have taken the motor apart, but sounds like you got it back together okay. The Service Manual NEVER mentions cleaning or lubing that shaft/bearing and I've never had a problem with those motors in any table (including a couple of "beaters" that I've found), so that would have been the last thing I would have done.

SaSi is correct on the Frako electrolytic capacitors, REPLACE ALL OF THEM. I can't emphasize that enough, replace all Frako caps on all the PCBs. I would also replace the tantalum caps since I've had problems with them too.

My guess on your speed problem is that it is electronic - either in the Power Supply PCB (can't supply a steady source of current for the motor) or on the Motor PCB (an IC in the regulator/comparator circuit is going). I would look at the Motor PCB first and see if any of the ICs are in sockets. All the ICs were in sockets in the B790 and some were in the early B795s, while all later B795s and B791s had their ICs soldered in. There are corrosion problems with those sockets, so if there are any, I would pull (carefully) and reinsert the ICs a couple of times to clean their pins. In working on these tables, I've never had an IC fail - most were well sourced parts that were conservatively rated. I would put them at the bottom of my list. Likewise transistors, I can't remember one of them being a problem either (although I replaced a few before finding it was a tantalum or electrolytic cap that was the problem!).

I really think the problem lies in the Power Supply PCB. First, replace ALL Frako caps - the 2 2200uF@16v and 1 1000uF@40v especially. I would upgrade the 2200uF to 25v since that is a tight tolerance. Also, I would replace the "small, round" full wave rectifier on that PCB - it is also a tight tolerance and I had one fail in a fashion where it would open and then close depending on the current draw, with the TT's behavior becoming extremely erratic (think it's involved with the +5v supply if I remember correctly). Replace or just remove the 0.1uF RIFA cap on the small PCB near the power transformer. It is an X2 type for EMI suppression, and you can do without it if you can't find another X2 to replace it with (they also fail quite regularly). Lastly, check the rating on the power transformer itself (should be on a label on the tranny itself) - Revox seems to have set most of their power transformers for the USA market at 110volts!! The transformer can easily be rewired to 120volts (just move 2 wires on the input side) and that is illustrated in the Service Manual. The change will reduce the "over voltage stress" on components and reduce any further chance of failure.

This should get you started (hopefully), let me know how it goes.

Dale
 
I would start at the Frakos. Eratic behaviour is their greatest virtue.
 
Thanks Dale and Sasi,

Please bear with me as I am certainly limited in my electronics knowledge and experience but not afraid to try something new. The way I figure it, the TT is very nice but unusable in its present state.

I've disassembled the TT and extracted the Power Supply Board and attached some pics of it (first pic below). That leads to a few questions that I need a little help with, please.

  1. There do not appear to be ICs mounted in sockets. The Various PCB boards are connected by means of connectors and sockets though and I've plugged and unplugged them all to dislodge some of that potential corrosion.
  2. I have no problem identifying the Frakos on the Power Supply Board and it appears that both Parts Express and Mouser have 2,200uF/25v Xicons 20%s that I assume will work (http://www.parts-express.com/pe/showdetl.cfm?Partnumber=020-1120).
  3. As far as the replacements for the 1,000uF/40V Frako, Mouser has about 7 Vishays in that value. I assume I just need a "general purposed cap." Parts express has no 40V but does have a 1,000uf/50V Xicon (http://www.parts-express.com/pe/showdetl.cfm?Partnumber=020-1254) that I assume will also work. Is one preferable?
  4. As far as the "small round rectifier" on the same board, it is labeled B40C800 G. I think I located a Vishay replacement at Mouser (http://www.vishay.com/docs/88534/800g.pdf). Is this an appropriate replacement?
  5. Lastly, you mention "Tantalums" and I understand that they are capacitors but I can't identify any on the same Power Supply Board in the first photo below unless they are the three grey disks located adjacent to the Frakos?

Thanks again for your knowledge, experience and patience.

I've also included a photo of the inside of the TT in its entirety along with a pic of the power supply which bears a 110V sticker. I do not see a small capacitor on the board next to it unless it it is that rectangular component installed between the grey wires to the left of the yellow wrapped windings (in the transformer closeup pic).

100909 download 003.jpg Power Supply Board

100909 download 006.jpg Transformer

100909 download 007.jpg Entire TT
 
Last edited:
Hi Robie -

I'll try to answer these in order:

1) The Motor PCB (lower left in 3rd JPG) has several socketed ICs along the left hand side - CAREFULLY pry them out and re-seat them (watch the keying for orientation).

2-4) I usually buy my parts from Digikey. The caps you referenced are fine, but here are the ones I have bought:
(a) 2200uF @ 25v Digikey # 4042PHBK-ND
(b) 1000uF @ 40v Digikey # 4056PHBK-ND
(c) Full Wave Rectifier: W04M Digikey #W04M-BPMS-ND

The X2 EMI capacitor is behind the Power Transformer (which is labeled for 110vac) on the small PCB that has 6 wires going into it (power cord/power transformer/on-off switch). There are 2 Digikey numbers for this cap since the original RIFA has a 20mm lead spacing and nothing you will find will be that: 0.1uF (10mm lead spacing) Digikey #BC1601-ND; 0.15uF (15mm lead spacing) Digikey #BC1605-ND.

The silver discs on the Power Supply PCB are ICLs (Incoming Current Limiters) and they should be left alone. The Tantalums caps look like little "gum drops" (small M&M candy size) and are the equivalent of electrolytics (i.e. are polarized BUT smaller). Revox used a lot of them since at the time (30 years ago) they were fairly new and thought to last longer/remain more stable. They do do that, but don't stress well and fail to a short circuit - not a desirable trait. I replace them because they have given me the most trouble in the past - if they are working, they're fine, but when they act up, OH BOY!

I would start on the Power Supply PCB and "little" PCB next to the transformer first, followed by rewiring the Power Transformer for 120vac. These 2 PCBs are "single sided" boards (foil only on one side) and are easier to work on and not ruin/harm the board's foil tracings. UNFORTUNATELY, the Motor and Tonearm PCBs are "double sided" boards with "plated through" holes which makes de-soldering them VERY, VERY difficult if you are not experienced and have the proper de-soldering tools (a simple pump doesn't work well since the holes are so small and the lead fit so tight).

I hope this helps,

Dale
 
Dale,

Thanks so very much. I really appreciate all the help.

Found the IC sockets and inserted each one several times to break loose any corrosion.

I'll order the caps and rectifier and see if that solves it.

Finally, as Sasi had recommended, the rotor pulls right out ot the brass socket pretty easily and the lubricant that was in there had turned into a brown sticky substance. There is a vacuum created by the close tolerances of the spindle and socket and the lube creates an even better seal. It cleaned up easily with alcohol. It was easy to relube and slowly rotate the rotor down despite the air bubble underneath.
 
Back
Top Bottom