SX-1080 High End Muffled / Protection Circuit Comes On at High Volume

Grog

Loot Galoot
Subscriber
Hi Folks,

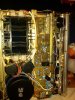
I have a mint SX-1080 I bought off Ebay a few years ago. It has had to be cleaned and over the last two years by just using it and working the controls it seems to be OK.

I'm driving a brand new pair of Cerwin Vega CLS-15 speakers.

Problems:

1) I find with the tone defeated or all tone controls at the 0 Settings ( flat ) the high end is dead - very lifeless, muffled. I have to turn on the Tone toggle and use the 25 KHz Turnover setting, with the Tone knob swung to the # 4 position to get a nice clear ( not overly bright ) sound.

Question: I've been reading many posts about this receiver and some allude to needing a recapping. Is the age of this receiver showing and I may need a recap in the tone circuits?

2) Sometimes I like to crank the volume. These speakers are rated to handle everything this receiver can dish out. I have noticed when I have the Volume control at the 1 o'clock position the sound pressure is insane and aweseome. No distortion whatsoever. However, if a really heavy bass track comes on at that volume, the receiver protection circuit kicks in and kills the sound. It will click back on and stay on if I drop the volume to the 11 or 12 o'clock position.

Question: Is the receiver showing it's age and perhaps unable to output at that level anymore? Could this be another capacitor issue?

I'm trying to decide whether to send this out to get it overhauled.

Any help would be appreciated.

Cheers!
 
You are not going to do it yourself?

The protection triggering could be an adjustment, dc offset, atypically called "center voltage adjustment" in the service manual. It should be 0.000v or as close as possible.

You need a DMM and the service manual to adjust it. PM me your email address if you can't find one for download.

You can test the treble problem, by using another signal source with it's own volume control, and feed it into the "power amp in" jacks after removing the preamp out bridging links.

If the sound is good using another source, the amp is ok, and the problem is in the preamp. This is also a good time to double check the protection.

Both the protection and the treble can conceivable be traced back to aging electrolytic capacitors.

The amp uses a pair of 2.2 uf low leakage caps (C1, C2) arranged as a low leakage, non polarized capacitor - a modern 1 uf Panasonic ECQ metalized stacked film cap is a superior substitute for the pair, and also use another ECQ cap (C11) for the 0.22 uf cap in the over current protection circuit on the amplifier card. With these two caps on the amp card, they will never need replacing again.

IF you're game, a recap is more about the time spent doing it than the parts cost. I have talked plenty of AK'ers through it.
 
Last edited:
Hi Mark,

I have the service manual and I've been reading it and the one thing that intimidates me is the level of tear down to get to the tone control board and amp board. Is it easier than it looks? I'd hate to be that guy that tears it down and can't get it back together.

Soldering doesn't concern me.
 
This advice is lost in past threads:

Take it one EASY, REVERSIBLE step at a time, make SURE you know how to reverse each step,

Practice reversing each step, it's a lot different to DO it than to THINK about doing it. It looks different from the "other side".

Keep hardware segregated in small groups (bags or containers, LABEL THEM), NEVER trust your memory: take copious notes and pictures. KEEP pencil and paper handy so the urge to write isn't squelched by the lack of a paper and pencil. If a verbal description isn't adequate, make yourself a drawing. For YOU to understand, two days later when you reread it.

The FIRST time I took apart a MACBOOK to replace a shattered screen, I found that the (2, 3 or 4) screws used on any particular assembly were ALL DIFFERENT, guess how many notes and drawings I made?? (The owner, a med student remarked at my preparations before I opened it that morning that it looked like I was prepping for major surgery... I was...he was further impressed that evening when he found out I was still at it, and almost finished. When I finished, and it turned right on and worked flawlessly, then he appreciated my preparations fully - and to get at THAT screen and inverter, you have to GUT the thing... very little is left attached together)

COMPARED TO THAT, THIS IS CANDY.....

Do ONE component at a time, NEVER DO TWO!!! NO MATTER WHAT!!!! IT WILL BITE YOU!!! QUICKLY!!!

When a component comes out, MAKE SURE the markings on the board correspond to reality, like: WHICH SIDE of that cap WAS plus... and was the board MARKED like THAT???

Many's the time I have reversed my hand movements of removing a cap to be absolutely sure that I had the polarity properly identified.

It's a bit of a puzzle, your advantage is that you are starting with a finished puzzle, taking it carefully apart and putting it back together.

Each component replaced is IT'S OWN ACCOMPLISHMENT!!

As for which parts, I take care of that...

alawishes: I've seen MTF take guys who couldn't tie their shoelaces in a lit room with a ten man working party, and guide him through a SX1010 or any number of other SX receivers. In 99% of them they got the unit working(the one percent is still in progress). Don't get ahead of him, Ask Plenty of questions, and DO try. It's kinda scary the 1st time, but as you get time inside of it, it becomes easier. We;ve all been there, Done that. Don't sweat the small stuff.

Larry

:lmao:

Larry sure can turn a phrase..... :D

We'll talk first about swapping capacitors, and after you cut your teeth on them, (and regain more confidence) then we'll progress to the transistors.
 
Last edited:
Awesome

You rock.

If you're willing to take the time to help me, I will work my ass off to learn.

Wax on, wax off

Let's give it a whirl!
 
Started the tear down

Hi Mark,

I have the front, top and bottom off. I'm going to try to post some pics here.

From what I see none of the caps are leaking or swollen. The only one that seems a bit bulbous on top is that big black one in the middle of the power supply assembly ( pic Power Supply.jpg )

I've been studying the service manual and I've come to the conclusion that to get at these circuit board assemblies, I need to remove the black steel front chassis all the levers and knobs protrude through. I am hoping to be able to do that and not have to re-string the tuner. Is that possible?

In your PM and on this thread, I believe you were saying the electrolytic capacitors are my main concern. Looks like that is all these light blue ones.

What are your thoughts on that big fat black one on the power supply circuit and those huge ACH-085 ones beside the toroidal power supply?

I've gor some pics here I'll post. It only allows 6. I took full views then one each of the assemblies in place. I hope I can add them in another reply post.
 

Attachments

  • Front View Unassembled.jpg
    Front View Unassembled.jpg
    122.2 KB · Views: 234
  • Full View Underside.jpg
    Full View Underside.jpg
    142 KB · Views: 215
  • Top View Unassembled.jpg
    Top View Unassembled.jpg
    129.5 KB · Views: 181
  • Function and EQ, Flat Amp Assys.jpg
    Function and EQ, Flat Amp Assys.jpg
    86.6 KB · Views: 163
  • Power Amplifier Assy.jpg
    Power Amplifier Assy.jpg
    65.6 KB · Views: 222
  • Power Supply Assy.jpg
    Power Supply Assy.jpg
    113.2 KB · Views: 239
Remainder of Pics

I thought you'd be able to use these pics while we talk about the project.

Cheers!
 

Attachments

  • View of Underside.jpg
    View of Underside.jpg
    135.1 KB · Views: 99
  • Tuner Assy.jpg
    Tuner Assy.jpg
    130 KB · Views: 104
  • Tone Control, Speaker Switch, Filter Assys.jpg
    Tone Control, Speaker Switch, Filter Assys.jpg
    113.4 KB · Views: 111
  • Protection Assy.jpg
    Protection Assy.jpg
    119.6 KB · Views: 148
  • Power Transformer and Caps.jpg
    Power Transformer and Caps.jpg
    81.7 KB · Views: 145
  • SX-1080 in action .jpg
    SX-1080 in action .jpg
    122.7 KB · Views: 135
There are sub-assemblies behind that chassis panel that are held in with just a few screws. Those few screws are the ONLY ones to be removed. The sub assemblies have ANOTHER, SMALLER steel plate mounting them all. Sometimes you can see screws, screwed into the SECOND, subassembly plate. Look closely. Look closer at the exploded drawing.

The LITTLE capacitors are the problem, NOT the few big ones (usually).

Caps NEED moisture to work ("electrolytic") and after 30 years the dry out, loosing value or short circuiting. Heat accelerates moisture loss. Little caps have less to loose before trouble. Big caps take longer to dry out.
 
SX-1080 Recap List

Hi Mark!

Per our PM's and posts, here is the recap list for all electrolytic capacitors.

I have this in an Excel spreadsheet that is a lot easier to manage, but it I can't upload that and the Word.doc is still too big, so I had to convert it to a PDF to upload it. I can email you the Excel spreadsheet if you would rather work from that. Or I can send it in Word.

I was on Digi-key and Mousers' websites because I've noticed in other threads about recapping that people have ordered new caps from both companies. Note I have included columns for replacement model numbers, voltage and uF values, and quantities. I show the model number column as Digi-Key and Mouser because I don't know what company I'll be buying from?

I got a bit overwhelmed by their filters for selecting caps. Maybe I'm showing my noobieness here but from what I see it looks like I have to work with Aluminum Electrolytic Capacitors because that seems to be the class of cap that has the most choices? Some of the things they ask for are above my head but I think I only have the basics covered:

1) Capacitance - check.
2) Tolerance - I don't know what to select here.
3) Voltage Rating - check.
4) ESR - ??
5) Operating Temperature Range - ??
6) Termination - I believe I need to select "leads"?
7) Dimensions - ??
8) Product - Mouser's site asks for a selection with a range of options like: aluminum, bipolar/non-polar, computer grade, general purpose, high frequency, high temp, low esr, low impedance, low leakage etc. I'm not sure what to ask for.

I think you said you were going to send me a list of replacements? That would be awesome. Or if you could guide me in what to select in the options I show above that would be great too.

Pics attached are of the tone control assembly pulled out ready to go. I think when I get the caps I will do it first, then pull the next assembly and do it, and so on. The power amplifier assemblies ( AWH-071 ) look like a bear to get at. It would appear replacing the caps on them and getting those big ACH-085 by the power transformer look like major surgery. Am I wrong?

Speaking if the AWH-071 assemblies - it looks like there two of them. My manual shows a parts list for it but if there are two should I be doubling up on the caps they show?

Cheers!
 

Attachments

  • SM AWE-092 Page.jpg
    SM AWE-092 Page.jpg
    99.3 KB · Views: 78
  • SM Back Cover.jpg
    SM Back Cover.jpg
    68.1 KB · Views: 57
  • SM Front Cover.jpg
    SM Front Cover.jpg
    123.5 KB · Views: 68
  • AWG-056 Tone Control Assy.jpg
    AWG-056 Tone Control Assy.jpg
    111.3 KB · Views: 116
  • Pioneer SX -1080 Recap List.pdf
    26.6 KB · Views: 189
zip up the spreadsheet, we can download the zip, and unzip it.

some stuff I'm working on, that I grabbed a quick copy for an example
this is extracted from the parts lists in the service manual
and what I need to generate the final parts lists.

sample "input data":
sx-1980 filter
awm-119 c1 0.22 35 csza
awm-119 c2 0.22 35 csza
awm-119 c3 0.22 35 csza
awm-119 c4 0.22 35 csza
awm-119 c5 4.7 25 csza
awm-119 c6 4.7 25 csza
awm-119 c11 10 25 csza
awm-119 c12 10 25 csza

apc assy
awx-124 c4 47 16 cea
awx-124 c5 100 16 cea
awx-124 c8 2.2 25 csza
awx-124 c12 100 6 cea


output data:
filter
awm-119 c1 0.22 35 csza 0.22 50 598-DSF050J224
awm-119 c2 0.22 35 csza 0.22 50 598-DSF050J224
awm-119 c3 0.22 35 csza 0.22 50 598-DSF050J224
awm-119 c4 0.22 35 csza 0.22 50 598-DSF050J224
awm-119 c5 4.7 25 csza 4.7 50 647-UKL1H4R7KDDANA
awm-119 c6 4.7 25 csza 4.7 50 647-UKL1H4R7KDDANA
awm-119 c11 10 25 csza 10 50 647-UKL1H100KDDANA
awm-119 c12 10 25 csza 10 50 647-UKL1H100KDDANA

apc assy
awx-124 c4 47 16 cea 47 35 647-UPW1V470MED1TD
awx-124 c5 100 16 cea 100 35 647-UPW1V101MPD1TD
awx-124 c8 2.2 25 csza 2.2 50 647-UKL1H2R2MDAANA
awx-124 c12 100 6 cea 100 10 647-UPW1A101MDD

from other notes:

on the protection board, awm-120:

q1 2sa733 to-92 ecb
512-KSA1013YBU to-92L ecb 160v 1a .9w 50mhz 160-320hfe $0.17

Q2 2sc1438 to-92 ecb
512-KSC2690AYS to-126 ecb 120/a160 1.2a 20w 155mhz 35-320hfe $0.40

awm-120 c1 220uf 35v cea 220uf 35v 647-UPW1V221MPD $0.22 ea
awm-120 c2 100uf 16v cea 100uf 35v 647-UPW1V101MPD $0.26 ea
awm-120 c3 10uf 16v cea 10uf 50v 647-UPW1H100MDD $0.12 ea
awm-120 c4 47uf 16v cea 47uf 35v 647-UPW1V470MED1TD $0.10 ea
awm-120 c5 47uf 16v cea 47uf 35v 647-UPW1V470MED1TD $0.10 ea
awm-120 c6 1uf 80v cea 1uf 100v 647-UPW2A010MDD $0.16 ea

on each amp channel, awh-071:
Q8 2sc869 to-92 BCE - backwards but use the symbol on the board for the replacement!!
mouser.com # 512-KSC2310YBU TO-92L ecb 150v .05a .8w 100mhz 40-240hfe $0.11 ea

awh-071 C11 0.22uf 35v cssa (solid aluminum radial leaded cap )
mouser.com # 598-DSF050J224 0.22uf 50v (replaced with metalized poly stacked film, a "forever" replacement..) $0.52 ea

c1,c2 could be replaced by ONE capacitor, (2.2 uf in series is 1.1uf)
5989-100V1.0-F 1uf 100v metalized poly stacked film $0.53 ea...
it would be a superior substitution, as well as a "forever" cap...
should fit quite well too.
 
Last edited:
Zipped files

Hi Mark,

Here is the list, zipped in two formats - one is in Excel and the other in Word.

Wasn't sure which you preferred.

Thanks for the suggestion to zip - never thought of that!

:)
 

Attachments

  • SX-1080 Capacitor Requirements.zip
    4.9 KB · Views: 190
  • Pioneer SX -1080 Recap List.zip
    23.4 KB · Views: 198
Did I do an Oops?

Mark,

I've been sleeping on this and I think what you meant in your post is that I should arrange my spreadsheet to match the exact order of the data per your example.

Am I correct?

If so I can do that for you but I just want to clarify what those AWM/AWX numbers are?

Or is what I sent OK?
 
It is usable, a matter of style.

but it would entail some extra time from me as I convert to it, faster than struggling with a different format.

Plus the final result stands for posterity here forever, usable by everyone... so I strive for consistency.

I use a one component per line style because i print out the list and use it when working, lining out the entry when the caps is replaced. Lining out an individual component designation can sometimes leave ambiguities if one is not careful and hit two designations by accident.

The aaa-nnn board designations on each line irrevocably specify and connect the component and replacement.... several c5's in a sort where the board designation was lost would take more time to get correct.

In order to speed things up for me when I have it all in "my" format, I embed an order indicator, then sort by capacitor type, value and voltage into a hierarchical list for locating components.

I then get the list of in stock voltages for that capacitor and value and select as needed and in stock / cost / size etc... having the board number and component number easily available makes it faster to figure out special requirements beyond those in the parts list.

After everything is done, the original order is restored (retaining the added data) and the order indicator stripped.

You have also seen the ach-060 and ach-085 pioneer parts designations rather than a manufacturer's part number - that means there was some special consideration that didn't fit into Pioneer's cea/cssa etc discriminator system - and then I have to figure out what and why - usually a process of elimination while reverse engineering the circuit.

example - there's a 4.7k resistor across a particular 100uf 10v cap - so low leakage doesn't make sense....
 
Last edited:
Sx-1080 Cap List Rev 1

Hi Mark,

Here is the list, in Excel, the way you prefer it. I hope it's OK.

The very last group of three caps is taken from the page entitled Section 12 - "Schematic Diagrams, P.C. Board Patterns and Parts List".In Section 12.1 Miscellaneous Parts List under the heading Capacitors on page 36, these are listed. I recognize the two big ones are the giant filter caps in the power supply?
 

Attachments

  • SX-1080 Capacitor Requirements Rev 1.zip
    5.4 KB · Views: 123
result:

I did not check all stock, but many generated by recent mouser visits.

edit: 4 out
0.47uf 50v find / use ecq 667-ECQ-E1474KF 0.47uf 100v
3.3uf 50v ukl zippo - all possibilities on order...
edit: they are part of stereo signal path input to pa1002, can use 4.7uf ukl s...
2.2uf 50v ukl 647-UKL1H2R2MDAANA use 647-UKL1H2R2MDDANA
100uf upw 10v 647-UPW1A101MDD use 647-UPW1A101MDD6

don't even know if you are going to use all the list, so I'm not going back in for now, stock varies over time.
 

Attachments

  • sx-1080 caps mtf rev 1.zip
    8.1 KB · Views: 274
Last edited:
I will order all of them

Mark,

Thank you very much. I'll get on Mouser's site and order everything. Sorry for being a noob, but what did you mean by this part:

edit 4 out
0.47uf 50v find / use ecq
3.3uf 50v ukl
2.2uf 50v ukl 647-UKL1H2R2MDAANA use 647-UKL1H2R2MDDANA
100uf upw 10v


Also, I notice you didn't offer a replacement number for the ACH-085 big filter caps. Do you recommend not replacing those?

May I pick your brain for one last thing?

I'm a bit confused by what the guys are saying on here about De-Oxit, ProGold, Faderlube etc.

While I have this thing torn down I want to clean all the switches and pots and levers and I think I understand that once you do that you need to apply Faderlube.

I read that Guide to De-Oxit and I think I figured it out but then the guys start posting their preferences and I get stumped again.

For this vintage receiver, which De-Oxit and which Faderlube product do you recommend?

Thanks again,
 
I wasn't DONE with the post. Items OUT OF STOCK. Alternate numbers provided, but OOS is temporary...

I post then edit so a window or tab screwup on my end doesn't disappear a lot of hard work. It happens enough.... otherwise I have to keep another window open to back my post up into it.

:D can you tell I'm being nibbled to death by ducks and getting a bit burned out to boot? :D
Pretty sure I'll get NO bench time in today... :tears:
sigh....

deoxit - cuts corrosion bonds to good metal - minimal lubrication properties - minimal long term protectant qualities

faderlube - no corrosion cutting - great lubrication - some protection qualities but will wash off gold if applied after gold

progold - no corrosion cutting - no lubrication - lots of protection qualities. will wash out faderlube if it can even get to the metal to protect it.

all of these can be gotten in 100 percent solution in various applicators including mechanical and propellant sprat

they can also be gotten with a 95 percent petroleum solvent carrier (for cleaning old junk out of way so stuff can work etc)

There is an option for a 95 percent non-flammable carrier iiac

thus deoxit, then faderlube(pots) or progold(switches,plugs).

there is some question about just faderlubing rather than progolding the switches...

The BIG caps are VERY stock dependent, and a real PITA to find. Unless proven bad, or you have sources and are determined to preventatively replace them - leave them be.

Caps usually dry out... those honking big monsters have plenty of moisture reserve. As long as they haven't puked all over the place... or been burned up internally by a rectifier fault.

I use D5S-6, F5S-H6 and G5S-6 , mostly because I probably got it over the counter and have seen no need to change.

ALTHOUGH I milk off quantities and use different applicators and have a wide range of strangely bent and modified straws.
 
Last edited:
Thank You

Mark,

Thank You.

I've read a lot of your posts over the last few weeks about recapping and with the knowledge I've picked up from those and from your help tonight you've broken the trail for me to get this project done.

I'll let you know how it turns out.

Cheers!
 
I am not sure if you got started yet, but I figured I will give some advice to some experience I got from recapping my SX-1050...

Paper Clips are your best friend.... these kind... No really, they are. See, these Pioneers have pins with wires that wrap around them, and I've had some literally break on me from the heat of the soldering iron. (I used a 30watt solder iron)... and I decided to use these kind of paper clips over on the pins with the wires, and I haven't had any issues ever again. Though I was still playing it carefully.
DSC00392.jpg


This is just something that worked for me, so I thought I'd share. :thmbsp:
 
Are you using these as heat sinks or for handling/keeping things together while moving boards around?

Thanks!
 
Back
Top Bottom