


powerlight
Active Member
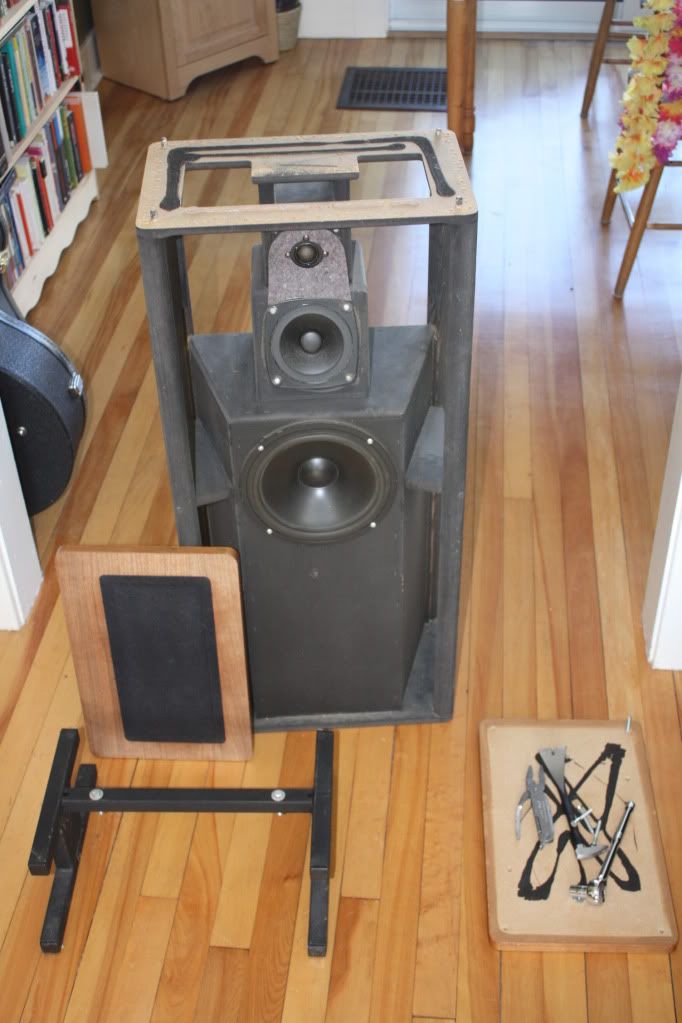
Thought I’d share some pics of the sock replacement I did on my Vandersteen Model 2 speakers. I couldn’t afford to send them to the factory so I figured I’d give it a shot on my own. These are the steps that I followed and I post them in case anyone wants an inside look at the Vandies (What’s behind those socks anyway?) or wants to see how the top/bottom is joined to the body or can take this and find a better way to do it. I’m certainly NOT an expert but I thought this might be useful to anyone else considering doing the same…

Here are the tools I used:

The previous owner was obviously a cat owner too: The socks doubled as scratching posts and I could have made my own cat out of the fur trapped inside the socks.

First, the tops were already loosened for me (bought these in a pawn shop) so that made the process much easier. I think with a slim pry bar and gentle, evenly distributed pressure the tops can be loosened and removed. There is a peg at each of the four corners in addition to a black, tarry adhesive and what looks like a clear silicone attaching the tops. If you’re going to attempt to remove securely fastened tops all I can say is, “Be careful and work slowly and gently!” I was very happy to be able to skip this step!
The socks are stapled at the top, bottom and behind the dress plate on the back using ¼” staples. I removed the staples with my multi-tool and a small bar designed for removing moulding. Pliers are helpful. The bolts on the stands come off with a 7/16” socket to get at the bottoms. The bottoms have the same black adhesive and a 2” screw in each corner.


My wife sewed up the new fabric based on the old sock. We tried it on the speaker a few times and she gradually took in the seam a little at a time until it fit snug and tight on the frame.
We stapled starting at the bottom, then at the top. This part is a 2 person job. When the sock was on securely we cut out the hole in the back for the dress plate. Restapling on the back proved tricky because of the tight space. In the end we trimmed the fabric to fit just inside the plate and used the plate to hold the fabric in place. The 6 screws really clamp it down so I figured we may as well try it. If it slips out down the road then we’ll deal with it then. (Note: I did staple it on the second speaker and recommend doing it if you can.)
The most time consuming part of the process was replacing the fabric on the top. The fabric is stretched around a frame made of fiberboard. This is held to the top with 4 narrow 5/8” long staples, as seen below:

I used my small bar to pry the frame out, working it off evenly a little at a time and watching for tear-out in the fiberboard as I went. (You can also see the 2 adhesives and peg holes in the pic below.)

There are around 60 staples holding the fabric in place and this is all covered in the same black, tarry adhesive. I assume the overkill on the staples and adhesive is due to the fact that the tops are likely to have something accidentally set on them at some point or another hence the extra reinforcement. I cut the fabric out and went to town on the staples. This was a bit time consuming and messy. I thought of just driving the staples in flush with the surface of the frame and adding new staples just in front of the old ones to hold the fabric. Probably should have. I felt obliged to remove the old ones and clean it up a little though.

Be warned: The tarry adhesive can stick to and stain anything it gets mashed into. It’d be a good idea to put a sheet down if you’re doing this in the house. Better yet, chuck it out in the garage for the messy bit.
The wood was a little beaten and faded so I gave the veneer a very light sanding with 220 grit on a sanding block and then tung oiled it once a day for 3 days (perhaps overkill for a veneer). Be careful not to try to take out any deep dings by sanding. You can chew through the veneer quite easily. I had to leave some of the deep gouges alone which got me thinking about making some solid wood replacements for the tops and bottoms. I read the fiberboard is chosen for its acoustic qualities so this is probably best left alone I guess.
I hope someone finds all this useful. I’ve gotten so much out of this site I thought I’d try to use my limited knowledge and experience to try and give something back. I know I would have liked to have found something like this online before I started! Here are some before and after pics:


Here are the tools I used:
The previous owner was obviously a cat owner too: The socks doubled as scratching posts and I could have made my own cat out of the fur trapped inside the socks.
First, the tops were already loosened for me (bought these in a pawn shop) so that made the process much easier. I think with a slim pry bar and gentle, evenly distributed pressure the tops can be loosened and removed. There is a peg at each of the four corners in addition to a black, tarry adhesive and what looks like a clear silicone attaching the tops. If you’re going to attempt to remove securely fastened tops all I can say is, “Be careful and work slowly and gently!” I was very happy to be able to skip this step!
The socks are stapled at the top, bottom and behind the dress plate on the back using ¼” staples. I removed the staples with my multi-tool and a small bar designed for removing moulding. Pliers are helpful. The bolts on the stands come off with a 7/16” socket to get at the bottoms. The bottoms have the same black adhesive and a 2” screw in each corner.
My wife sewed up the new fabric based on the old sock. We tried it on the speaker a few times and she gradually took in the seam a little at a time until it fit snug and tight on the frame.
We stapled starting at the bottom, then at the top. This part is a 2 person job. When the sock was on securely we cut out the hole in the back for the dress plate. Restapling on the back proved tricky because of the tight space. In the end we trimmed the fabric to fit just inside the plate and used the plate to hold the fabric in place. The 6 screws really clamp it down so I figured we may as well try it. If it slips out down the road then we’ll deal with it then. (Note: I did staple it on the second speaker and recommend doing it if you can.)
The most time consuming part of the process was replacing the fabric on the top. The fabric is stretched around a frame made of fiberboard. This is held to the top with 4 narrow 5/8” long staples, as seen below:
I used my small bar to pry the frame out, working it off evenly a little at a time and watching for tear-out in the fiberboard as I went. (You can also see the 2 adhesives and peg holes in the pic below.)
There are around 60 staples holding the fabric in place and this is all covered in the same black, tarry adhesive. I assume the overkill on the staples and adhesive is due to the fact that the tops are likely to have something accidentally set on them at some point or another hence the extra reinforcement. I cut the fabric out and went to town on the staples. This was a bit time consuming and messy. I thought of just driving the staples in flush with the surface of the frame and adding new staples just in front of the old ones to hold the fabric. Probably should have. I felt obliged to remove the old ones and clean it up a little though.
Be warned: The tarry adhesive can stick to and stain anything it gets mashed into. It’d be a good idea to put a sheet down if you’re doing this in the house. Better yet, chuck it out in the garage for the messy bit.
The wood was a little beaten and faded so I gave the veneer a very light sanding with 220 grit on a sanding block and then tung oiled it once a day for 3 days (perhaps overkill for a veneer). Be careful not to try to take out any deep dings by sanding. You can chew through the veneer quite easily. I had to leave some of the deep gouges alone which got me thinking about making some solid wood replacements for the tops and bottoms. I read the fiberboard is chosen for its acoustic qualities so this is probably best left alone I guess.
I hope someone finds all this useful. I’ve gotten so much out of this site I thought I’d try to use my limited knowledge and experience to try and give something back. I know I would have liked to have found something like this online before I started! Here are some before and after pics:


