• The move to the new server is done. There are some software and database maintenance updates in process. This has us passing the hat around to help out. We appreciate any donations. Seriously, even a dollar helps. The payment page may be found here - https://www.audiokarma.org/support.html

Marantz 5025B belt replacement

Treker

Super Member
I picked up a Marantz 5025B cassette deck a couple of weeks ago that needed a belt replacement. Since I couldn't find a tutorial in the archives of the AK forums on replacing the belts in this unit, I thought I would document the process so that others might benefit when searching for such information in the future.

Here is a picture of the Marantz 5025B that I did the belt replacement on.
IMG_1091.jpg


Here are the tools that I used for the belt replacement. The only slightly out of the ordinary ones are the straight and the hook tools, which were both very important to making this project a success.
IMG_1163.jpg
 
Register to hide this ad
that multi-bit screwdriver - is it holding the bit in place magnetical ?

(magnetic tools are not the best choise to use in a tapedeck)
 
Here are the three new belts from Vintage Electronics waiting to be installed.
IMG_1102.jpg


Here is the unit with the cover off. Our main area of interest is the tape drive, which can be seen in the right of the photo.
IMG_1095.jpg
 
that multi-bit screwdriver - is it holding the bit in place magnetical ?

(magnetic tools are not the best choise to use in a tapedeck)

Good point, but no, this one is not magnetic. It is the type with the spring loaded ball bearing that fits in a detent in the handle.
 
There are 3 belts in this unit, 2 of which can be seen here.
IMG_1099.jpg


In this picture you can see all 3 belts. The one closest to the front of the unit in the lower right of the photo goes to the left reel drive, and is the hardest one to replace, but as it turns out not too hard. It drives the tape counter.
IMG_1103.jpg
 
Last edited:
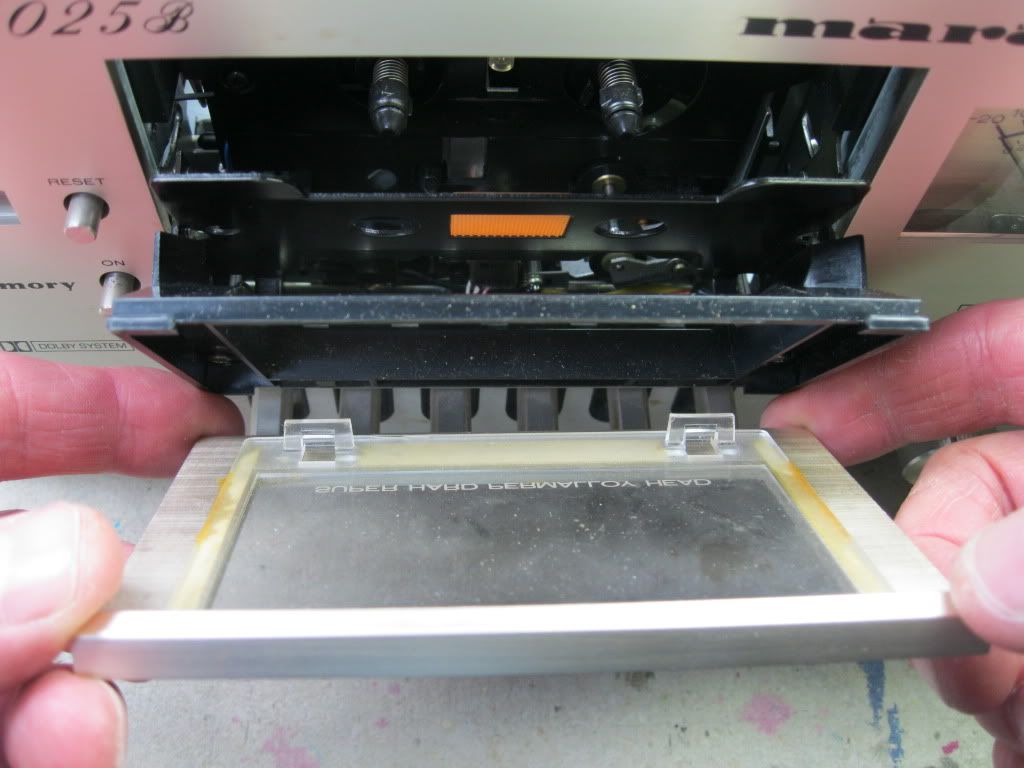
Next we need to remove the cover to the cassette door.
IMG_1104.jpg


Grip it from the sides and bottom as you see in this picture and pull up with your index fingers while at the same time pushing down with your thumbs on the black plastic cassette carrier that the cover is attached to. It should snap right off.
IMG_1105.jpg


As can be seen in the photo, there is a ridge across the top and two plastic tabs on the bottom of the door.
IMG_1107.jpg
 
Last edited:
There are two screws that need to be taken out in order to remove the black plastic cassette carrier. One on the left, and one on the right as can be seen in these two photos.

IMG_1109.jpg


IMG_1110.jpg
 
Next, remove the screw that I am pointing at in the following photo. There is a hole in the metal cassette sub carrier that allows access to this screw. Removing this screw will allow you to remove and reinstall the the belt that goes from the left drive reel to the tape counter.
IMG_1111.jpg


For the next step we are going to need the small hook tool.
IMG_1112.jpg
 
Last edited:
Open the cassette door which will allow the metal cassette sub carrier to move forward. Work the end of the metal hook tool under the edge of the left reel drive belt.
IMG_1114.jpg


Now pull the drive belt over the left reel pully.
IMG_1115.jpg
 
Last edited:
Move to the inside of the unit and use the hook tool to remove the left reel drive belt from the tape counter pulley shown.
IMG_1116.jpg


Next you will need to work the old belt past the end of the little plastic stud that I am pointing to with the probe tip. This is the same plastic stud that the screw that you removed earlier was screwed into.
IMG_1118.jpg
 
Last edited:
Here are the old and the new left reel drive / tape counter belts. The old one is on the outside, and the new one is on the inside. You can easily see how much the old belt is stretched out in this photo.
IMG_1120.jpg


Now take the new left reel drive / tape counter belt and work it past the black plastic stud we had to work the old drive belt past in the previous step. This is just about the hardest step in the whole belt replacement process. I used the hook and straight tools to help work the new belt past this stud.
IMG_1123.jpg
 
Last edited:
Now, reach in from the top with the hook tool and work the drive belt to the edge of the reel pulley as shown.

IMG_1125.jpg


Next, use the straight tool to grab the belt from the hook tool.

IMG_1126.jpg


Pull the new belt over the reel pulley with the straight tool.

IMG_1127.jpg


And finally, use the hook took to pull the new belt into its groove in the left reel pulley.

IMG_1128.jpg


Almost done. Now we have to move to the back.

IMG_1129.jpg


Working from the back and again using the hook tool, position the new left reel drive belt over the tape counter pulley shown. Check to see that the belt is running true and that it is not twisted, as this belt has a squarish cross section.

IMG_1116.jpg
 
Last edited:
Reinstall the screw that we removed earlier from the front of the metal cassette sub carrier.

IMG_1130.jpg


Next we are going to remove the other 2 drive belts. The smaller one...

IMG_1133.jpg


And the large flat one.

IMG_1135.jpg


As you will notice, they both attach to the drive pulley on the front of the motor.
 
Remove the 2 screws that attach the oilite bushing to the drive system flywheel.

IMG_1136.jpg


IMG_1137.jpg


And finally remove the metal plate that holds the oilite bushing. It might also be a good idea to apply a very small drop of oil to the oilite bushing before reassembly. I used synthetic 10W30 motor oil for this.

IMG_1138.jpg
 
Use the hook tool to first remove the smaller of the two remaining drive belts from the motor drive pulley...

IMG_1139.jpg


and its associated larger pulley.

IMG_1140.jpg
 
Use the hook tool to remove the large flat belt from the front of the motor drive pulley and from around the rim of the large system drive flywheel.

IMG_1142.jpg


Work the old flat drive belt around the front and past the large system flywheel and remove. This took a little bit of work, but was not too hard.

IMG_1144.jpg
 
Last edited:
Now, basically do the same thing in reverse with the new large flat system drive belt. Work it past the front of the main system drive flywheel, and situate it around its rim. This may take a little work.

IMG_1144.jpg


And again using the hook tool, pull the large flat system drive belt over the motor drive pulley and situate in its proper position.

IMG_1145.jpg


Now reattach the metal plate holding the oilite bushing and reinstall the 2 screws that hold it in place.

IMG_1146.jpg

IMG_1148.jpg
 
Install the last new drive belt over the larger pulley and situate it in the groove that is runs in. Use the straight and hook tools as needed to help you with this.

IMG_1151.jpg


And finally use the hook tool to pull the last belt over its position on the motor pulley.

IMG_1154.jpg
 
Move back to the front of the deck and reinstall the black plastic cassette carrier with the 2 screws you removed earlier.

IMG_1155.jpg


IMG_1156.jpg


Insert a cassette and check for proper operation of the door. Make sure that everything lines up and that there is no binding.

IMG_1157.jpg


IMG_1158.jpg
 
Now its time to see if our hard work has paid off. First make sure that there is nothing inside the unit that shouldn't be there. We wouldn't want an electric shock or a short or anything like that. Now plug the unit in, and press the power button. Check all of the functions of the unit, including fast forward, reverse, play, record, and pause. Does everything work as it should? If not, you may have to go back and do a little troubleshooting to find out what the problem is, but hopefully everything is now working as it should be.

IMG_1159.jpg
 
Back
Top Bottom