• Please note that Audiokarma will be offline briefly for updates early on Monday morning, September 28th.

KEF 104/2 Restoration

1ADSarge

Der Bürgermeister
Subscriber
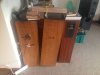
Hey everyone, I am starting this thread to document the restoration of my recently acquired KEF 104/2. After a thorough inspection, the two internal woofer donuts have rotted pretty badly so I took on the process of disassembling the cabs so I can pull the woofers out.

First, I pulled the front pods off the front by removing two top hex head bolts and two bottom hex head bolts with an allen wrench.

podtopbolts.jpg

podbottombolts.jpg


After removing the pod and disconnecting the color coded wires for the pod, there is an access hatch in the front top with six phillips head bolts.

podconnectors.jpg

topaccesspanel.jpg


After removing the access panel, there will be some white filler and a yellow foam wrap that will need to be removed to access the woofer.

azadujed.jpg

aqyna5at.jpg


Next, I flipped the cab upside down. On the bottom, you will need to remove eight phillips head bolts. It is best if you leave the spikes attached to the bottom. I used a pair of slip joint pliers to grip one of the feet and carefully pulled upward to remove the bottom access panel. You will then need to remove the white filler and yellow foam wrap to access the woofer.

bottomaccesspanel.jpg

yba7e5ap.jpg


You will then need to unsolder the wires to the woofer. Then remove the center bolt holding the force canceling alloy bar. Once that bolt is removed, you can then remove the three nuts and washers holding the woofer in place. Then remove the woofer.

bottomwoofer.jpg


Turn the cab back upright. Twist the force canceling alloy bar in a clockwise direction while holding the center bolt with your finger in the center hole of the top woofer to remove the center bolt. You can then remove the three nuts and washers holding the top woofer in place. You will not need to unsolder these connections as it is easy to just disconnect them from the crossover terminals which are labeled. Make sure to label the woofers as the top and bottom and which cab they came out of.

topwoofer.jpg

crossovery.jpg


Also, make sure you put all your bolts, washers, and any other separate parts in a plastic bag labeled with which cab they came from. After removing all four woofers, I took my vacuum and vacuumed out the cabs and lightly rubbed the remaining foam with my suction tool so as to not get any of the foam pieces in the voice coil.

Before:
eqe7e7er.jpg


After:
ebymezyz.jpg


I have ordered the refoam donut kit from this link: https://www.simplyspeakers.com/mobi...pair-Kit-105-107-B250-FSK-KEF-PAIR_p_586.html Once I get the kit in the mail, I'll report back with the last few things I have left to get done before they go back together.

Jared
 
Last edited:
Register to hide this ad
Thanks Jared you pictures will help us lucky 104/2 owners!
This is my only speaker that sounds sort of 3D to me...not that I have heard any of the great speakers....
 
Thank you for this. I got one of these a while ago and was able to see enough to tell that they were alright but I wondered how to do it when they need it. It is great to see what is inside. I'll keep watching.
 
Wow, makes me wish I had a pair of 104/2's that needed the donuts replaced. Nice job. I hear the tweeter replacement is even funner!
 
Thanks everyone for the kind words and thanks for the contributing links canuckaudiog. I did the same type of thread when I restored my Acoustic Research AR-2A's and I found that it helped out a few people who prefer detailed pictures on what to do rather than just text, much like me. I'm glad I could help and encourage people to take the initiative to finish restoring such a well renowned, great sounding speaker and get them singing like they should be. I'm hoping to get my refoam kit in the mail the next day or two. I will be applying a bead of wood glue throughout the chambers of the cabinet just to insure strong cabinet integrity. I will also be replacing all the seals with new weatherstripping and the rubber grommets with new pieces as well. I think I'll end up doing the ferrofluid in the tweeters as well while I have everything apart. The link you posted canuckaudiog, will be a big help! I'll post pics and my steps as soon as the parts arrive and I have time to get back at it.

Jared

Sent from my Note II using Tapatalk 2
 
Last edited:
Been listening to some (by far the best speaks for my ears so far and some time to come) and have stopped because of the most recent postings saying NO!

Thanks for this thread and pics....and nice ones at that!
 
There's no real need to stop unless you have the foam surrounds you won't damage the speaker by playing with bad donuts
 
Nice job with this Jared.
Here's a thread I commented into about four years ago when I was restoring my 104/2s.
Mine are now with their 3rd owner since I sold them.
I've probably lost track of them for good, but they went to a good home.
At the time I was unaware of the ferrofluid issue in the tweeter. My take was that the units were somewhat under-tweetered and my solution was to tip the fronts up with hardware store brown plastic door wedges.

Here's a link to a thread that includes my restoration:
http://www.audiokarma.org/forums/showthread.php?t=244995

If the goo from the old speaker foam falls into the voice coil gap, that might cause problems.
 
Donuts should be here tomorrow. My excitement will probably get the better of me and will probably force me to get to work on these tomorrow despite my pile of college homework I need to get done :)

Jared

Sent from my Note II using Tapatalk 2
 
Well, after a long night, I finally got the KEF's finished. I'll finish my last steps and photos tomorrow. This project drained me for the evening but I can say after a good two hours of listening, WOW, they sound quite a bit better than when I first got them! I was a bit surprised at how much low end these things pushed out. Cheers, till tomorrow then :)

Jared

aha6e4eh.jpg


Sent from my Note II using Tapatalk 2
 
I remember when I fired mine up after the donuts were done and was also surprised at the amount of bass coming out.
 
OK - so i restored my 104's a couple of months ago.

I now have another pair I am restoring for someone.

This pair doesnt look like its had feet for a while - they have just been sitting on the ground for years. as a result, the wood around the bottom panel has been swelling. i have removed the bottom screws and run a blade around the edge - still a super tight fit. have run a hairdryer into the gap for about 1/2 an hour - the bottom panels simply wont budge. I am putting leverage pressure onto them at all edges and the sides are bowing out dangerous much.

One corner of the bottom panel has now separated from itself - Im at the point where these panels may just need to be removed in pieces, and new MDF panels are put in instead.

Any ideas before things get this drastic? Not such a bloody great design when this happens.....the job of getting into these is tough enough as it is!
 
Attempted solution - trying to let gravity do the work - if I can get just one side pulled up.....screwed some bolts into the speaker spike holes and put all the weight of the speaker on that side to try to lever it off.

Guess what - it worked!!!!!!!!!!

IMG_4144.jpg
 
Last edited:
Hi all;

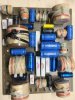
After much thought and reading online, I decided to restore one of the cross-overs on my 25 yr old KEF 104/2 reference speakers. Wow what a difference! An engineer with Paradigm Canada told me I would likely be wasting my time, but I decided to go ahead anyways. Nothing to loose (and possibly much to gain) other than the relatively small cost of replacement caps from Falcon Acoustics and a bit of time. Well it opened up the mids, much deeper bass and definitely better response in the upper end (I thought it was my hearing). I had replaced the surrounds a few years ago as well as the T33 ferrofluid tweeters.

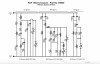
My reference tracks blew me away. It even shows up in the frequency response on a measurement test with a calibrated mic. It is like I was listening to those amazing speakers with a blanket on. The circuit diagram below may be useful. Made sure the replacement parts measured as indicated.

Just put off new speaker purchase by a few years. Looking at KEF Reference 3's. :-)
Now on to the other side..

Setup
Classe CP-800 Preamp
Classe CA-300
KEF 104/2
B&W DB1 Sub
Roon server
Audioquest cables

Screen Shot 2019-06-13 at 5.52.44 PM.png IMG_6988.JPG
 
It even shows up in the frequency response on a measurement test with a calibrated mic.

Thanks for the report and glad the crossover re-cap made an improvement. I'm curious in this since I've done a bunch of frequency response measurements on my 104/2s - can you elaborate on what improvement or change you saw?
 
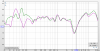
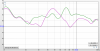
For anyone interested, here are the frequency response graphs, before (red) and after (green) the right hand side KEF 104/2 cross-over recap. The response shape is close to the same as the drivers did not change. Both measurements taken 1m on axis at tweeter height using REW and calibrated miniDSP UMIK microphone.

Upper end slightly more bright and smoother lower end which you can hear with reference tracks.

Screen Shot 2019-06-17 at 6.15.37 PM.png
Screen Shot 2019-06-17 at 6.16.03 PM.png

The real test however is listening, and the clarity has much improved. :-)
 
Great thread.

Thought I'd contribute a little to help you out.

Not that you need it but here are my disassembly pictures: http://www.audiokarma.org/forums/showthread.php?t=512676&page=4

And here is the fluid change: http://www.audiokarma.org/forums/showpost.php?p=6727930&postcount=73

Let me know if I can be of more assistance. Good luck with your project!


Old thread, but the question is specific to the tension on the nuts holding the woofers on. When I disassembled my pair they weren’t even finger tight. I replaced the old seals and grommets. When you reinstall the woofers you don’t want to crush the seals, so how tight on the nuts???
 
Old thread, but the question is specific to the tension on the nuts holding the woofers on. When I disassembled my pair they weren’t even finger tight. I replaced the old seals and grommets. When you reinstall the woofers you don’t want to crush the seals, so how tight on the nuts???
I tightened them in a star pattern until I saw that the grommets were evenly compressed and the washer wasn't cutting into them, which it seemed like happened when they were too tight. It's been a while and I didn't have a torque wrench at the time, so hope that helps. I did some measurements at the woofer port and everything seemed reasonable afterwards too.
 
Back
Top Bottom