***UPDATE***....see link for portable/stand mounted panel below.
Here's a fundamental absorptiona panel design that is easy, inexpensive, and effective. I chose to use Owens Corning 703 though Roxul SafeNSound is a good alternative (but it takes 3" thickness in SafenSound to perform like 2" OC 703). I found 2" thick 2'x4' 703 panels locally at an industrial insulation supply house for $8/ea. A few other supply houses in the area were almost twice as expensive so be sure to shop around. Roxul SafeNSound can be special ordered from Lowes and it's about $60 for a bale of eight 3" thick 2'x4' panels. I think the 703 has a slight edge in performance, but I wouldn't hesitate a second to substitute with the Roxul (I have panels made from both OC703 and SafeNSound in my listening space). The only downside to using SafeNSound is it's not as rigid and smooth as 703 so it tends to look "lumpy" when used in a non-nested design (absorption media not nested inside the frame). This is significant because with the media nested inside the frame you have less absorptive surface area and no airspace between the boundary layer (wall) and absorption media. This will decrease the panel's absorption in the mid to upper bass region and the only way around it is to mount the panel away from the wall (around a foot or more ideally).
For the frame I used 1"x4" pine screwed together. Angle brackets could be employed as well but it is an additional expense that adds up quickly if you are building several panels. A screwed together frame with corner gussets gives just as much strength and rigidity as the corner brackets for less money and that's the construction method I used on some larger panels (gussets were made from 1/4" plywood). The backing material is muslin cloth and the facing material is speaker grill material but muslin or burlap could be used as facing material as well and you have a variety of decor friendly colors to choose from with those two fabrics. Here's a step by step.
1. Build your frame. I made these 2'x2' but you can build them to just about any size you want. Most of my panels are 2'x4' and this size is probably best for first reflection absorption. 2'x2' are probably better suited if you have one (or two arranged vertically) behind each speaker and one behind the equipment rack. Again, mine are just screwed together with two #8x1.5" wood screws per joint with all holes pre drilled to prevent splitting but metal corner brackets could be used as well.
2. Lay out your backing material. This will be behind the absorption media and will create a surface for it to rest on. Just drape it over the frame as you're going to staple it to the frame next.
3. Staple the backing material to the frame. I like to start with one side and get it all stapled down then go to the opposite side, pull it taut, and staple it down repeating with the remaining two sides. Again, you want it nice and taut. Trim your excess material away once you're done.
4. Cut absorption media to size (if necessary). You can see I've set the 703 on top of the backing material. This is the basic configuration coming together.
5. Lay out your facing material and locate absorption media. Spread the facing material out across your working surface and get all the wrinkles out. Then lay your absorption media on top of that and leave enough excess material around the sides to allow it to wrap over the sides of the absorption media, the sides of the frame, and back around the frame so it can be stapled. For instance, I used 4" of 703, the 1x4 is 3.5", and I gave myself 1.5" to staple, so I allowed 9" excess material beyond the absorption media.
6. Lay your frame on top of absorption media. You want the backing material against the absorption media rather than having the absorption media nested inside the frame. This creates airspace between the absorption media and the boundary surface (wall) which, like I mentioned earlier, makes the panel more effective at absorbing upper and mid bass content.
7. Cut your facing material and staple it to the frame. What you're going to do here is bring the facing material up and over the absorption media and frame and staple it to the edge of the frame opposite the edge the backing material is stapled to.
8. Trim edges and fold your corners. Trimming in self explanatory, folding the edges is something you'll have to play with as there are few different ways to skin the cat. I just make sure the folds are on opposite sides so they can be inconspicuously located on top and bottom of the panel so as to not be visible when hung on the wall.
9. Admire your finished panel (but not the crappy, low res picture of mine)
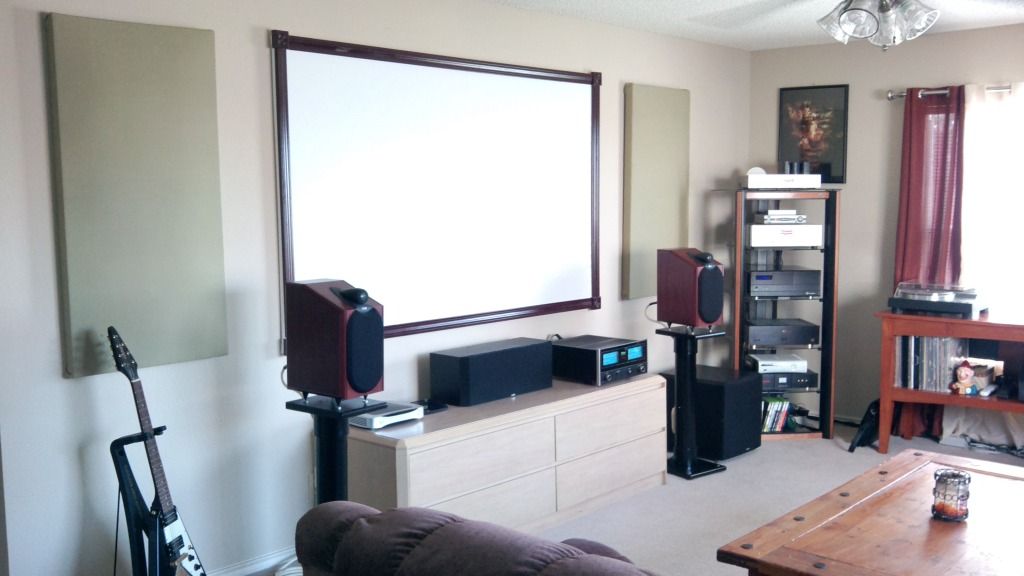
Mount it on the wall with picture hangers or whatever method you prefer. You can also build stands for them easily enough to get mobile panels that can be moved around the room for experimentation and also to get them positioned away from the wall for better absorption of mid and upper bass content. Total cost for this little 2'x2' panel with 4" thick of 703 (or a 2'x4' with 2" thick 703) came to just under $20 and could have been less if the facing material would have been muslin.
Keep in mind the thickness of the absorption media layer will have an effect on LF performance. A 4" or 6" thick panel will have better LF absorption performance (below 125 Hz) than a 2" or 3". For first/early reflection points at side wall and ceiling a 2" or 3" panel is generally utilized. For front and rear walls, where an accumulation of LF content is often concentrated (especially near and in corners, including corners formed by wall/ceiling junction), the thicker panels can be beneficial. A 2" thick panel of OC703 spaced approximately one foot from the wall will give effective absorption down to 125 Hz. If the panel is mounted on the wall you'll need 4" of thickness to get effective absorption down to 125 Hz.
See my other threads for absorption panel placement, DIY broadband corner absorbers ("superchunk" style bass traps) and DIY diffusion panels. All these treatments...the absorption panels, broadband corner absorbers, and diffusion panels..... are the fundamental acoustic room treatments that will really get your room acoustics under control. Do a YouTube search for "Ethan Winer" for good tutorials on how to implement these treatments.
http://audiokarma.org/forums/showthread.php?t=446798
http://www.audiokarma.org/forums/showthread.php?t=433749
http://www.audiokarma.org/forums/showthread.php?t=535105
http://www.audiokarma.org/forums/showthread.php?t=547132
****Portable/stand mounted absorption panel build....****
http://www.audiokarma.org/forums/showthread.php?t=572781
Here's a fundamental absorptiona panel design that is easy, inexpensive, and effective. I chose to use Owens Corning 703 though Roxul SafeNSound is a good alternative (but it takes 3" thickness in SafenSound to perform like 2" OC 703). I found 2" thick 2'x4' 703 panels locally at an industrial insulation supply house for $8/ea. A few other supply houses in the area were almost twice as expensive so be sure to shop around. Roxul SafeNSound can be special ordered from Lowes and it's about $60 for a bale of eight 3" thick 2'x4' panels. I think the 703 has a slight edge in performance, but I wouldn't hesitate a second to substitute with the Roxul (I have panels made from both OC703 and SafeNSound in my listening space). The only downside to using SafeNSound is it's not as rigid and smooth as 703 so it tends to look "lumpy" when used in a non-nested design (absorption media not nested inside the frame). This is significant because with the media nested inside the frame you have less absorptive surface area and no airspace between the boundary layer (wall) and absorption media. This will decrease the panel's absorption in the mid to upper bass region and the only way around it is to mount the panel away from the wall (around a foot or more ideally).
For the frame I used 1"x4" pine screwed together. Angle brackets could be employed as well but it is an additional expense that adds up quickly if you are building several panels. A screwed together frame with corner gussets gives just as much strength and rigidity as the corner brackets for less money and that's the construction method I used on some larger panels (gussets were made from 1/4" plywood). The backing material is muslin cloth and the facing material is speaker grill material but muslin or burlap could be used as facing material as well and you have a variety of decor friendly colors to choose from with those two fabrics. Here's a step by step.
1. Build your frame. I made these 2'x2' but you can build them to just about any size you want. Most of my panels are 2'x4' and this size is probably best for first reflection absorption. 2'x2' are probably better suited if you have one (or two arranged vertically) behind each speaker and one behind the equipment rack. Again, mine are just screwed together with two #8x1.5" wood screws per joint with all holes pre drilled to prevent splitting but metal corner brackets could be used as well.
2. Lay out your backing material. This will be behind the absorption media and will create a surface for it to rest on. Just drape it over the frame as you're going to staple it to the frame next.
3. Staple the backing material to the frame. I like to start with one side and get it all stapled down then go to the opposite side, pull it taut, and staple it down repeating with the remaining two sides. Again, you want it nice and taut. Trim your excess material away once you're done.
4. Cut absorption media to size (if necessary). You can see I've set the 703 on top of the backing material. This is the basic configuration coming together.
5. Lay out your facing material and locate absorption media. Spread the facing material out across your working surface and get all the wrinkles out. Then lay your absorption media on top of that and leave enough excess material around the sides to allow it to wrap over the sides of the absorption media, the sides of the frame, and back around the frame so it can be stapled. For instance, I used 4" of 703, the 1x4 is 3.5", and I gave myself 1.5" to staple, so I allowed 9" excess material beyond the absorption media.
6. Lay your frame on top of absorption media. You want the backing material against the absorption media rather than having the absorption media nested inside the frame. This creates airspace between the absorption media and the boundary surface (wall) which, like I mentioned earlier, makes the panel more effective at absorbing upper and mid bass content.
7. Cut your facing material and staple it to the frame. What you're going to do here is bring the facing material up and over the absorption media and frame and staple it to the edge of the frame opposite the edge the backing material is stapled to.
8. Trim edges and fold your corners. Trimming in self explanatory, folding the edges is something you'll have to play with as there are few different ways to skin the cat. I just make sure the folds are on opposite sides so they can be inconspicuously located on top and bottom of the panel so as to not be visible when hung on the wall.
9. Admire your finished panel (but not the crappy, low res picture of mine)
Mount it on the wall with picture hangers or whatever method you prefer. You can also build stands for them easily enough to get mobile panels that can be moved around the room for experimentation and also to get them positioned away from the wall for better absorption of mid and upper bass content. Total cost for this little 2'x2' panel with 4" thick of 703 (or a 2'x4' with 2" thick 703) came to just under $20 and could have been less if the facing material would have been muslin.
Keep in mind the thickness of the absorption media layer will have an effect on LF performance. A 4" or 6" thick panel will have better LF absorption performance (below 125 Hz) than a 2" or 3". For first/early reflection points at side wall and ceiling a 2" or 3" panel is generally utilized. For front and rear walls, where an accumulation of LF content is often concentrated (especially near and in corners, including corners formed by wall/ceiling junction), the thicker panels can be beneficial. A 2" thick panel of OC703 spaced approximately one foot from the wall will give effective absorption down to 125 Hz. If the panel is mounted on the wall you'll need 4" of thickness to get effective absorption down to 125 Hz.
See my other threads for absorption panel placement, DIY broadband corner absorbers ("superchunk" style bass traps) and DIY diffusion panels. All these treatments...the absorption panels, broadband corner absorbers, and diffusion panels..... are the fundamental acoustic room treatments that will really get your room acoustics under control. Do a YouTube search for "Ethan Winer" for good tutorials on how to implement these treatments.
http://audiokarma.org/forums/showthread.php?t=446798
http://www.audiokarma.org/forums/showthread.php?t=433749
http://www.audiokarma.org/forums/showthread.php?t=535105
http://www.audiokarma.org/forums/showthread.php?t=547132
****Portable/stand mounted absorption panel build....****
http://www.audiokarma.org/forums/showthread.php?t=572781
Attachments


Last edited: